• Skip to primary navigation
  • Skip to main content
  • Skip to primary sidebar
  • Skip to footer

My Plant-Based Family

Eating Whole Food, Plant-Based Diet recipes, On a Budget.

  • Plant-Based Recipes
    • Breakfast
    • Main Dish
    • Instant Pot
    • Daniel Fast Recipes
    • Side Dishes
    • Bread and Muffins
    • Salad and Wraps
    • Soup, Stews, and Chili
    • Sauces, Dips, and Salad Dressings
    • Desserts
    • Crock Pot
    • Mexican Food
  • Videos
  • Resources
    • Getting Started
    • Books
      • The Plant-Based Diet Starter Guide
      • The Plant-Based Holiday Meal Plan & Cookbook
  • Meal Plans
    • Meal Plans 2020
    • Meal Plans 2019
    • Meal Plans 2017
    • Meal Plans 2016
    • Meal Plans 2015
    • Meal Plans 2014
    • Meal Plans 2013
  • About Us
    • Our Family
    • Contact Me
    • Our Food Philosophy
    • Disclosure Policy
      • Privacy Policy
  • Daniel Fast Recipes

Daniel Fast Recipes

Instant Pot Oatmeal {Steel Cut Oats}

January 13, 2016 by Holly Yzquierdo 140 Comments

In the realm of wholesome breakfast options, few foods offer the same level of satisfaction and nourishment as steel cut oats. Making them in the Instant Pot is a game-changer for my morning routine.

I love steel cut oats (I usually buy these that are gluten-free) but the standard 10-20 minutes of stove top cooking most packages recommend seems to take me longer. Instead, I use my Instant Pot!

Instant Pot Oatmeal Recipe that is plant-based, vegan, dairy-free and gluten-free oats

What are Steel Cut Oats?

Steel cut oats, also known as Irish oats or pinhead oats, are a minimally processed form of oat groats. Unlike rolled oats or instant oats, which are flattened and steamed, steel cut oats are made by simply chopping the oat groats into small pieces with steel blades. This minimal processing retains the natural texture and flavor of the oats, resulting in a hearty and chewy cereal with a rich, nutty taste.

One of the primary reasons for the popularity of steel cut oats is their impressive nutritional profile. These whole grains are rich in complex carbohydrates, fiber, protein, vitamins, and minerals, making them a nutrient-dense addition to any meal.

Instant Pot Oatmeal with banana

Oatmeal Additions for Breakfast

I enjoy oatmeal because there are hundreds of ways to customize a bowl to keep breakfast exciting. Adding various ingredients to steel cut oatmeal can enhance its flavor, texture, and nutritional value.

Here’s a list of ingredients you can add to your steel-cut oatmeal for a delicious and satisfying breakfast:

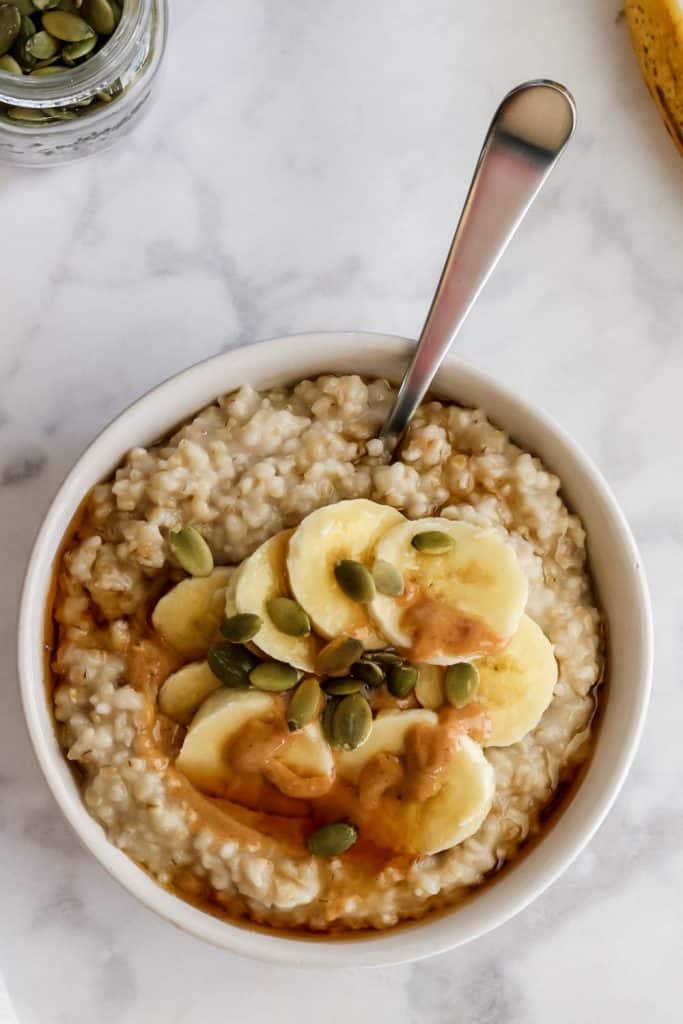
  1. Fresh or dried fruit – Sliced bananas, berries, diced mango, sliced apples or pears, dried cranberries, chopped dates or figs
  2. Nuts and seeds – Chopping almonds, walnuts pecans or cashews, sunflower seeds, pumpkin seeds, chia seeds, flax seeds, hemp seeds
  3. Sweeteners – Maple syrup, honey, agave nectar, brown sugar, coconut sugar
  4. Spices and flavorings – Ground cinnamon, ground nutmeg, vanilla extract, almond extract, cardamom, ginger, allspice
  5. Plant based dairy – Almond, soy coconut or oat milk, vegan butter, coconut cream
  6. Protein boosters – Nut butter (peanut butter, almond butter, cashew butter), plant-based protein powder (pea protein, soy protein, hemp protein)
  7. Flavor enhancers – Unsweetened cocoa powder, shredded coconut, lemon or orange zest, espresso powder
  8. Crunchy toppings – Granola, cacao nibs, crispy cereal, toasted coconut flakes
  9. Savory options (for savory oatmeal):
    • Sautéed vegetables (spinach, mushrooms, bell peppers)
    • Fried or poached egg
    • Avocado slices
    • Sliced tomatoes
    • Fresh herbs (parsley, cilantro, chives)
    • Vegan cheese
    • Hot sauce or salsa

Feel free to mix and match these ingredients to create your own unique and delicious bowl of Instant Pot oatmeal for breakfast!

How Long Does Instant Pot Oatmeal Take to Cook?

If this is your first time cooking with the Instant Pot, it is important to note that it takes a while for the Instant Pot to come up to pressure. That means once you start it, it may take 15 minutes for more before it starts counting down the 3 minute cooking time. This is normal. After it’s done cooking, it takes time for the pressure to drop.

It’s still easier than cooking it on the stove because you have to watch your pot and stir regularly. With the Instant Pot, you can walk away and come back to perfect oatmeal. You may want to start it when you wake up. Then come back to it after you’ve gotten dressed and ready for the day.

Instant Pot Oatmeal with Berries

How to Make Instant Pot Oatmeal

Ingredients

  • 1 cup steel cut oats
  • 3 cups water
  • optional spices (cinnamon)
  • toppings of your choice (fruit)

Instructions

Step 1 – Dump into Instant Pot

Dump oats into the Instant Pot followed by the water.

Step 2 – Cook

Close the lid and close the vent. Press MANUAL and use the arrow buttons to go to 3 minutes.

Step 3 – Natural Release

After the oats finish cooking, press the OFF button or unplug the Instant Pot so the pressure will release naturally.

Step 4 – Stir

After the pressure releases, open the lid and give the oatmeal a good stir. It will probably have extra liquid, this will absorb as it cools.

Step 5 – Add Toppings

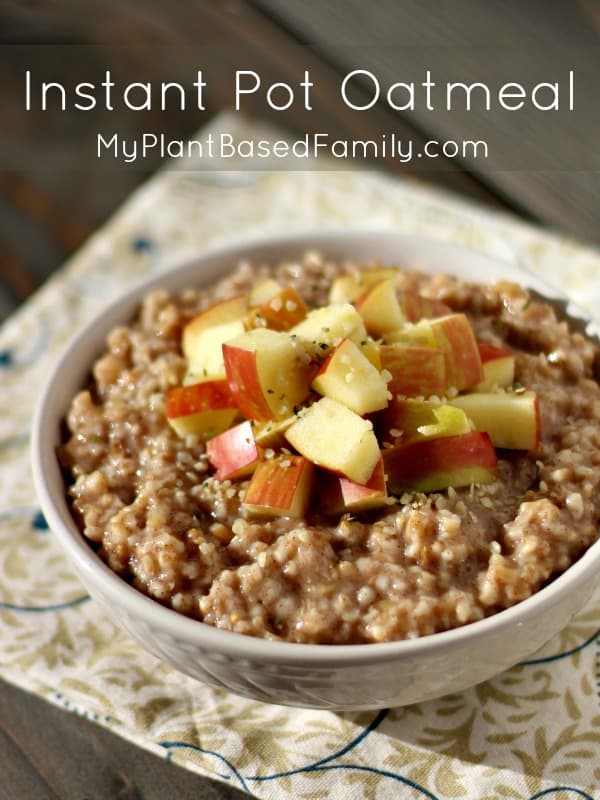
Add cinnamon or other additions and allow to cool slightly before serving. Top oatmeal with fresh fruit of your choice, apples are shown.

Oatmeal recipe using the Instant Pot that is plant-based, dairy-free and gluten-free. (Vegan)

Servings

This recipe makes about 2-3 servings depending on how hungry you are and how much you add for the toppings. You can easily double this recipe, and store it for easy breakfasts all week. There is no need to adjust the cooking time.

More Oatmeal Recipes

If you love oatmeal like I do, check out these other great recipes using steel cut oats:

  • Bake Oatmeal Bars with Fruit
  • Oatmeal Cups
  • Apple Cinnamon Baked Oatmeal
  • Banana Nut Oatmeal (Instant Pot or Stove Top)
  • Chocolate Cherry Oatmeal
Yield: 3 servings

Instant Pot Oatmeal

Instant Pot Oatmeal

Steel Cut Oats have never been easier than this Instant Pot recipes. Your family will love this recipe that can be customized to each persons preference. See video for ideas!

Prep Time 5 minutes
Cook Time 3 minutes
Additional Time 20 minutes
Total Time 28 minutes

Ingredients

  • 1 cup steel cut oats
  • 3 cups water
  • optional spices (cinnamon shown)
  • toppings of your choice (apples shown)

Instructions

  1. Dump oats into the Instant Pot followed by the water.
  2. Close the lid and close the vent.
  3. Press manual and use the arrow buttons to go down to 3 minutes.
  4. After the oats finish cooking, press the off button or unplug the Instant Pot so the pressure will release naturally.
  5. After the pressure releases, open the lid and give the oatmeal a good stir. It will probably have extra liquid, this will absorb as it cools.
  6. Add cinnamon or other additions and allow to cool slightly before serving.
  7. Top oatmeal with fresh fruit of your choice, apples are shown.

Notes

Top with your favorite fruit, nuts or seeds for an incredible meal. You can sweeten with maple syrup.

Need more? Double the oats and water, cook for the same amount of time.

Recommended Products

As an Amazon Associate and member of other affiliate programs, I earn from qualifying purchases.

  • Instant Pot 
    Instant Pot 

Did you make this recipe?

We'd love to see it! Tag us and use #MyPlantBasedFamily!

© Holly Yzquierdo
Category: Instant Pot

Filed Under: Breakfast, Daniel Fast Recipes, Instant Pot, Recipes Tagged With: Instant Pot, Plant Based Diet, Vegan

Broccoli and Mushroom Stir Fry

August 9, 2015 by Holly Yzquierdo 9 Comments

stir fry broccoli and mushroom

After a long day I really don’t want to spend a lot of time in the kitchen. That is one of the reasons I’m such a fan of Batch Cooking. Sometimes I need a quick and easy meal. Stir fry’s are such an easy option. Since I don’t cook with oil some may argue that this isn’t a true stir fry. The extra fat found in oil isn’t really needed if you use a little water in its place. (You can view this post to see how I use water for fried rice.)

We almost always have cooked  brown rice in the fridge. We use it in so many recipes it is a staple in our diet. When I don’t have rice cooked, I can make it quickly in my Instant Pot. This stir fry can be made with whatever veggies you have on hand but half my household loves mushrooms so this dish was for them.

stir fry broccoli and mushroom

Broccoli and Mushroom Stir Fry

Ingredients

  • 1 crown broccoli, chopped
  • 2 carrots, sliced
  • 8 oz mushrooms sliced
  • 1/2 an onion, diced
  • 4 cups cooked brown rice
  • Bragg Liquid Aminos (or soy sauce or Tamari)

As with many of my recipes, you can add more ingredients or remove items you don’t like without a huge problem with the recipe. For example, if you aren’t a big fan of mushrooms use less or use bell peppers in their place.

Do

  1. In a hot skillet or wok add diced onions and sliced carrots, cover with a lid. Check on them regularly and stir. When they begin to stick pour a few tablespoons of water in the skillet and stir again.
  2. Once the carrots are starting to soften, dump in the mushrooms. These will need to cook for several minutes. Once they have exuded their juices and look shiny, pour the broccoli in and cover once again.
  3. Check veggies every few minutes and stir. If they begin to stick to the pan add more water again.
  4. Once all of the veggies are cooked to a tender/crisp consistency dump in your cooked rice and stir. You can use less than 4 cups if desired.  You can also heat the rice separately if desired.
  5. Pour Bragg Liquid Aminos over the rice and veggies. I’d start with a little and add more to taste. We probably use a couple of tablespoons but it is a high sodium food so limit it if necessary.

This meal comes together in less than 20 minutes. If you have to cook the rice allow yourself sufficient time. This is a really easy meal to make and packs perfectly in a lunch box (I only recommend it for adult or older kids lunches).

If you like this, check out my other great Asian inspired meals, Veggie Pad Thai and my easy Oil-Free (un)Fried Rice.

Yield: 4 Servings

Broccoli and Mushroom Stir Fry

stir fry broccoli and mushroom

Quick weeknight meal using leftover rice and veggies. Broccoli and mushroom stir fry is great for leftovers and meal planning too!

Prep Time 10 minutes
Cook Time 10 minutes
Total Time 20 minutes

Ingredients

  • 1 crown broccoli, chopped
  • 2 carrots, sliced
  • 8 oz mushrooms sliced
  • 1/2 an onion, diced
  • 4 cups cooked brown rice
  • Bragg Liquid Aminos (or soy sauce or Tamari)

Instructions

  1. In a hot skillet or wok add diced onions and sliced carrots, cover with a lid. Check on them regularly and stir. When they begin to stick pour a few tablespoons of water in the skillet and stir again.
  2. Once the carrots are starting to soften, dump in the mushrooms. These will need to cook for several minutes. Once they have exuded their juices and look shiny, pour the broccoli in and cover once again.
  3. Check veggies every few minutes and stir. If they begin to stick to the pan add more water again.
  4. Once all of the veggies are cooked to a tender/crisp consistency dump in your cooked rice and stir. You can use less than 4 cups if desired.  You can also heat the rice separately if desired.
  5. Pour Bragg Liquid Aminos over the rice and veggies. I’d start with a little and add more to taste. We probably use a couple of tablespoons but it is a high sodium food so limit it if necessary.

Notes

As with many of my recipes, you can add more ingredients or remove items you don’t like without a huge problem with the recipe. For example, if you aren’t a big fan of mushrooms use less or use bell peppers in their place.

Did you make this recipe?

We'd love to see it! Tag us and use #MyPlantBasedFamily!

© Holly Yzquierdo

Filed Under: Daniel Fast Recipes, Main Dish Recipes, Recipes Tagged With: gluten free, Plant Based Diet, Recipes, Unprocessed, Vegan

Black Bean Mango Salad

June 3, 2015 by Holly Yzquierdo 13 Comments

Black Bean Mango Salad Vegan Gluten-Free

As the weather warms up and cravings turn to lighter, more refreshing fare, there’s nothing quite like a vibrant salad to satisfy your appetite. Bursting with the tropical sweetness of ripe mangoes, the earthy richness of black beans, and the zesty freshness of lime, this Black Bean Mango Salad is a celebration of summer in every bite.

Black Bean Mango Salad is incredibly versatile. It can be served as a side dish, piled high on top of tacos or nachos, or enjoyed on its own as a light and refreshing meal. Whether you’re a devoted salad eater or someone looking for a new way to incorporate more fruits and vegetables into your routine, give this recipe a whirl.

Black Bean Mango Salad Vegan Gluten-Free Plant-Based

Easy Black Bean Mango Salad

Unlike most of the recipes you’ll find here on My Plant Based Family, this recipe is for a single serving. My kids would love most of the things in this salad, but if your kids are like mine, they don’t want it all mixed together. So this salad is just for me.

Even though this is for a single serving, I prefer to build two (or three or four) at a time to eat later in the week. The only real difference is you’ll want to store the diced mango separately because it can get a little slimy.

The measurements below can be adapted to your taste. I actually added a little more of everything for the salad I ate at home. This size was perfect for work. I don’t know about you but it takes me a long time to eat BIG salads. My lunch salads need to be a little average size.

Black Bean Mango Salad Vegan Gluten-Free

Costumization Ideas

Feel free to customize this Black Bean Mango Salad to suit your taste preferences too.

  • You can add diced jalapeño for a spicy kick or diced cucumber for added crunch.
  • If you prefer a sweeter salad, you can drizzle a bit of honey or maple syrup to enhance the natural sweetness of the mangoes.
  • For a heartier meal, serve this salad on a bed of quinoa.
  • Experiment with different herbs and spices to create your own unique flavor profile. Fresh mint, basil, or parsley can add a refreshing twist, while smoked paprika or chili powder can add depth and complexity.

Black Bean Mango Salad Recipe

Ingredients

  • 2-3 cups chopped romaine lettuce
  • 1/2 cup black beans, drained and rinsed
  • 1/2 cup organic corn
  • 1/4 cup diced tomato (remove seeds)
  • 1/4 cup diced onion (I prefer sweet onion or red onions)
  • 1/4 of a large mango (or half a small mango) diced.
  • diced jalapenos to taste
  • juice from half a lime
  • 1/4 cup chopped cilantro (optional)
  • 1/2 avocado (optional)

Instructions

Step 1 – Layer Ingredients

Place lettuce in a large bowl then top with beans, corn, tomatoes, onion and mango*.

Step 2 – Customize and Stir

If using jalapenos and cilantro add now. Give the salad a good stir.

Step 3 – Give it a Squeeze

Squeeze fresh lime juice over the salad and stir one more time.

*Notes: If you are packing an extra salad for another day, leave the mango, lime juice and avocado separate.

More Fresh Salad Recipes

If you like this salad, you’ll love these plant based recipes too:

  • Oil-Free Cowboy Caviar
  • BBQ Chickpea Salad
  • Sweet Potato and Black Bean Bowl
  • Black Bean Corn Salad with Avocado
  • Quinoa-Lentil Salad
Yield: 1 Serving

Black Bean Mango Salad

Black Bean Mango Salad Vegan Gluten-Free

Gluten-free, oil-free fresh flavors of summer. Treat yourself to this fresh Black Bean Mango Salad for one.

Prep Time 10 minutes

Ingredients

  • 2-3 cups chopped romaine lettuce
  • 1/2 cup black beans, drained and rinsed
  • 1/2 cup organic corn
  • 1/4 cup diced tomato (remove seeds)
  • 1/4 cup diced onion (I prefer sweet onion or red onions)
  • 1/4 of a large mango (or half a small mango) diced
  • diced jalapenos to taste
  • juice from half a lime
  • 1/4 cup chopped cilantro (optional)
  • 1/2 avocado (optional)

Instructions

  1. Place lettuce in a large bowl then top with beans, corn, tomatoes, onion and mango.
  2. If using jalapenos and cilantro add now. Give the salad a good stir.
  3. Squeeze fresh lime juice over the salad and stir one more time.

Notes

If you are packing an extra salad for another day leave the mango, lime juice and avocado separate.

Did you make this recipe?

We'd love to see it! Tag us and use #MyPlantBasedFamily!

© Holly Yzquierdo

Filed Under: Daniel Fast Recipes, Main Dish Recipes, Mexican Food, Recipes, Salads & Wraps Tagged With: gluten free, Plant Based Diet, Recipes, Unprocessed, Vegan

Instant Pot Mexican Casserole

April 2, 2015 by Holly Yzquierdo 83 Comments

The Instant Pot Mexican Casserole will amaze your family and impress your guests! This should be your go to plant-based recipe for your Instant Pot.

This is the cheat code for easy, vegan, oil-free, and gluten-free Instant Pot Mexican Casserole! Use dry beans without soaking or cooking ahead of time. With the Instant Pot, you can achieve the same slow-cooked flavors and textures of a traditional casserole in a fraction of the time. No need to babysit the stove or wait hours for your meal to be ready.

Additionally, this vegan Mexican casserole is a fantastic way to pack in a variety of nutrient-rich ingredients. From protein-packed beans, every bite is bursting with goodness. The bold and zesty flavors work great as a main dish or side dish.

The Instant Pot Mexican Casserole will amaze your family and impress your guests! This should be your go to plant-based recipe for your Instant Pot.

If you’ve tried my Crock Pot version or the Stove or Oven version, you know that this flavor combination is really good and really easy. Some people don’t like the texture of the rice when cooked in the Crock Pot. The Instant Pot Mexican Casserole comes out perfect every time; if you have a pressure cooker I challenge you to make this!

The Instant Pot Mexican Casserole will amaze your family and impress your guests! This should be your go to plant-based recipe for your Instant Pot.

Instant Pot Mexican Casserole

If your family is just starting to try plant-based living, this recipe is for you! You can enjoy it in a bowl topped with your favorite ingredients, wrapped in a tortilla, or with chips.

Ingredients

  • 2 cups uncooked brown rice
  • 1 cup uncooked dry beans (if you have trouble with beans not cooking enough, try soaking them first)
  • 5 cups water
  • 1 6 oz can of tomato paste (or 1 8 oz can tomato sauce with slightly less water)
  • 1 tsp garlic
  • 2 tsp onion powder
  • 2 tsp chili powder
  • 1 tsp sea salt (optional)

Instructions

Step 1 – Add Ingredients

Dump all of the ingredients into your pressure cooker and stir once or twice.

Step 2 – Pressure Cook

Close the lid and cook on manual for 28 minutes.

Step 3 – Release Pressure

Once done, allow the pressure to come down and open carefully. If you are in a hurry you can do a quick release.

Step 4 – Serve

This meal can be eaten alone or served with tortillas or chips and salsa. It travels well making it perfect for lunch boxes.

This photo shows what it looks like right out of the pressure cooker! It’s quite a bit darker than the Crock Pot and Stove Top versions.

The Instant Pot Mexican Casserole will amaze your family and impress your guests! This should be your go to plant-based recipe for your Instant Pot.

A Note on Using Dry Beans

I’ve had feedback from some that their black beans are not soft enough after cooking. Most people do not have a problem. If this is the case for you, make sure you are using beans that are not old. Beans that have been in your pantry for a year will take longer to cook than fresh beans. (This is why I stopped buying giant bags of beans in bulk.)

The Instant Pot Mexican Casserole will amaze your family and impress your guests! This should be your go to plant-based recipe for your Instant Pot.

Also, hard water could make the beans cook more slowly. If your beans could be older or if you have hard water, I recommend soaking the beans in warm water before cooking.

If using beans other than black beans make sure you are cooking this long enough. The rice takes 28 minutes to cook but some beans may take longer. Consult the Instant Pot cooking guides and cook it as long as necessary.

The Instant Pot Mexican Casserole will amaze your family and impress your guests! This should be your go to plant-based recipe for your Instant Pot.

Customization Ideas for Mexican Casserole

Feel free to customize this vegan Mexican casserole with your favorite vegetables or beans. You can add diced zucchini, shredded carrots, or even cooked sweet potatoes for extra flavor and nutrients.

If you prefer a spicier dish, add a diced jalapeño or a pinch of red pepper flakes to the mix.

Experiment with different seasoning blends to suit your taste preferences. Smoked paprika, chipotle powder, or taco seasoning can add depth and complexity to the flavor profile.

For added richness, you can stir in a dollop of vegan cream cheese or cashew cream before serving.

More Plant-Based Instant Pot Recipes

If you love your Instant Pot as much as I do, here are some other great recipes to try. They save me so much time!

  • Instant Pot Refried Beans
  • Instant Pot Breakfast Rice
  • Instant Pot Mexican Quinoa
  • Instant Pot Rice and Beans with Green Chilies
  • Instant Pot Lentil Stew – No Oil

You might also find this information helpful on How to Clean an Instant Pot.

Yield: 6 Servings

Instant Pot Mexican Casserole

The Instant Pot Mexican Casserole will amaze your family and impress your guests! This should be your go to plant-based recipe for your Instant Pot.

The Instant Pot Mexican Casserole will amaze your family and impress your guests! This should be your go to plant-based recipe for your Instant Pot.

Prep Time 5 minutes
Cook Time 40 minutes
Total Time 45 minutes

Ingredients

  • 2 cups uncooked brown rice
  • 1 cup uncooked dry beans
  • 5 cups water
  • 1 6 oz can of tomato paste (or 1 8 oz can tomato sauce with slightly less water)
  • 1 tsp garlic
  • 2 tsp onion powder
  • 2 tsp chili powder
  • 1 tsp sea salt (optional)

Instructions

  1. Dump all of the ingredients into your pressure cooker and stir once or twice.
  2. Close the lid and cook on manual for 28 minutes.
  3. Once done, allow the pressure to come down and open carefully. If you are in a hurry you can do a quick release.

Notes

  • This meal can be eaten alone or served with tortillas or chips and salsa. It travels well and we often take it in our lunches.
  • If your beans are older than one year, soak them before cooking.

Did you make this recipe?

We'd love to see it! Tag us and use #MyPlantBasedFamily!

© Holly Yzquierdo

Filed Under: Daniel Fast Recipes, Instant Pot, Main Dish Recipes, Mexican Food, Recipes Tagged With: gluten free, Mexican Food, Plant Based Diet, Recipes

Potato Kale Soup

February 5, 2015 by Holly Yzquierdo 29 Comments

vegan potato kale soup

If you typically turn your nose up at kale, then this plant based potato kale soup is for you. Using frozen, chopped kale is part of the secret that makes it so good (and easy).

The hardest part of this recipe is cutting up the potatoes. I’m including instructions for making this soup on the stove, in the Crock Pot AND in the Instant Pot!

Potato Kale Soup Recipe

Simple is often the best way to go with vegan food. With only five ingredients, you can taste every flavor in this potato kale soup.

Leave the peels on the potatoes to cut down on time. Using frozen kale eliminates the need to wash and process it. And you should have veggie broth mix or bullion on hand. It truly is a simple soup to put together, yet very satisfying.

How to Make Potato Kale Soup

Ingredients

  • 3 lbs of potatoes, chopped into bite-sized pieces (peeling is optional)
  • 3 carrots, sliced
  • 3 ribs celery, sliced
  • 1 10 oz bag of frozen kale
  • 1/3 cup dry veggie broth mix (or bullion) (you can add more if needed)
  • Enough water to “just” cover everything

Note: This soup can be made on the stove, in the Crock Pot or in the Instant Pot.

Instructions

1. Place all of the veggies into the pot. Sprinkle in Dry Veggie Broth Mix or use your favorite broth or bullion.

2. Cover with water and give it a good stir.

3. Cook covered.

Stove Top version: Cook over medium heat for about 30 minute. The time will vary depending on how large the veggies are.

Crock Pot version: Cook on low for 7 hours or high for 4 hours.

Instant Pot version: Press the Manual or Pressure Cook button, for 10 minutes on high pressure. Then allow the soup to natural release for another 5 minutes and the release the remainder of the pressure.

Serve

This would be great as a starter leading up to a meal but we usually just eat it on it’s own. If you are a baker I recommend making a nice crusty bread to go with it.

This may be the easiest soup you’ll ever make. There is only one measurement involved and a little cutting. Everyone in my family loved it. This is my favorite way to eat kale.

0 Reasons I bought an Instant Pot

If you aren’t sure what an Instant Pot is be sure to check out 10 Reasons I Bought an Instant Pot!

More Delicious Soups

Check out these other plant based soups packed with veggies:

  • Tortilla Soup
  • Instant Pot Lentil Soup – No Oil
  • Hearty Veggie Soup
  • Instant Pot Minestrone Soup
  • Broccoli Potato Soup

Potato Kale Soup

Vegan potato kale soup

Potato Kale Soup that even people who don't like kale will love.

Prep Time 15 minutes
Cook Time 30 minutes
Total Time 45 minutes

Ingredients

  • 3 lbs of potatoes, chopped into bite-sized pieces (peeling is optional)
  • 3 carrots, sliced
  • 3 ribs celery, sliced
  • 1 10 oz bag of frozen kale
  • 1/3 cup dry veggie broth mix (or bullion) (you can add more if needed)
  • Enough water to “just” cover everything

Instructions

    1. Place all of the veggies into the pot. Sprinkle in Dry Veggie Broth Mix or use your favorite broth or bullion.
    2. Cover with water and give it a good stir.
    3. Cook covered. (See Notes for variations)

Notes

  • Stove Top - Cook over medium heat for about 30 minute. The time will vary depending on how large the veggies are.
  • Crock Pot - Cook on low for 7 hours or high for 4 hours.
  • Instant Pot - Press the manual or pressure cook button, for 10 minutes on high pressure. Then allow the soup to natural release for another 5 minutes and the release the remainder of the pressure.

Did you make this recipe?

We'd love to see it! Tag us and use #MyPlantBasedFamily!

© Holly Yzquierdo

Using Frozen Kale in Soup

This soup recipe uses frozen kale because it’s so easy to work with and it’s convenient to keep it in the freezer until you are ready to use it. I never have to worry about using it all before it goes bad. You can use fresh kale instead, simply wash and chop the fresh kale and add it to the recipe. I prefer to remove the stems before using kale. They are fibrous and harder to eat until you love them.

Filed Under: Crock Pot, Daniel Fast Recipes, Instant Pot, Recipes, Soups, Stews, & Chili Tagged With: Dairy Free, gluten free, Healthy, Instant Pot, Plant Based Diet, Recipes, Soup, Vegan

Roasted Red Pepper Dip

October 8, 2014 by Holly Yzquierdo 7 Comments

I love eating dips. LOVE them I tell you. Since transitioning to a plant-based diet, oil-free hummus is in my weekly meal plan rotation. This Roasted Red Pepper Dip is oil-free and one of my favorites!

This page contains affiliate links.

When I want something with a little more flavor than my classic hummus, I’ll make this Roasted Red Pepper hummus. It’s like magic because I can eat way more veggies when I have hummus than I eat without it. 

Since this hummus is made without oil or tahini, there is very little fat! 

Roasted Red Pepper Hummus

What do you eat with hummus?

There are so many foods that pair well with hummus. Raw veggies, pita bread, and crackers are perfect for hummus. I also enjoy hummus on wraps, sandwiches, in salads, and mixed into pasta! Adding roasted red pepper hummus to my Mediterranean Bowl brings it to a whole new level.

Substituting Chickpeas

Hummus doesn’t have to be made with chickpeas. If you can’t eat chickpeas because of an allergy or intolerance, you can substitute another type of bean. I recommend great northern beans or any other white bean. 

I routinely make dips like my Cilantro Jalapeno Hummus, Spinach Artichoke Dip and Green Chili White Bean Dip with white beans. There isn’t a big difference in flavor or texture, especially if it would take another trip to the store, just use what you have.

Do you need tahini in hummus? 

I don’t think you need tahini in hummus. Sure it adds some flavor and creaminess but it’s not necessary in my opinion. I’m not a big tahini fan.

I just leave tahini out of all the hummus recipes I make. 

Kids love dip

I don’t really need an occasion to make humus and I find that my kids love it too. They easily eat twice as many veggies (if not more) when I have a delicious dip to enjoy them with. I’ll often cut up veggies and leave hummus next to them on the counter while I’m cooking. As they smell dinner, they come in to snack while I cook. Without a doubt, they eat way more veggies that they would at dinner.

This dip is really easy to make and is delicious with veggies, crackers, chips or in a wrap.

This dip is allergy-friendly by avoiding nuts, sesame and dairy. It’s also vegan and gluten-free, which is pretty typical around here.

Roasted Red Pepper Hummus

Ingredients

  • 1 15 ounce can of chickpeas, drained
  • 1/4 cup water (more or less)
  • ½ tsp onion powder
  • ½ tsp garlic powder
  • ½ tsp salt
  • ½ cup roasted red pepper

Do

Puree beans, water, spices and red pepper in a Food Processor or high-powered blender and blend until smooth. I use my Blendtec and push the “dip” button for super simple and quick option.

Serve

This is the perfect condiment for your veggie wraps and great with raw veggies. 

Yield: 6

Roasted Red Pepper Hummus

Roasted Red Pepper Hummus

Roasted Red Pepper Hummus is an oil-free, low fat hummus that is perfect for people on a whole food plant-based diet.

Prep Time 10 minutes
Total Time 10 minutes

Ingredients

  • 1 15 ounce can of chickpeas, drained
  • 1/4 cup water (more or less)
  • ½ tsp onion powder
  • ½ tsp garlic powder
  • ½ tsp salt
  • ½ cup roasted red pepper

Instructions

  1. Puree beans, water, spices and red pepper in a Food Processor or high-powered blender and blend until smooth.
  2. If needed, you can add more liquid to get a smoother consistency.

Notes

Store leftover dip in an air tight container in the refrigerator for up to a week.

Recommended Products

As an Amazon Associate and member of other affiliate programs, I earn from qualifying purchases.

  • Blendtec 
    Blendtec 
  • Hamilton Beach 10-Cup Food Processor 
    Hamilton Beach 10-Cup Food Processor 

Did you make this recipe?

We'd love to see it! Tag us and use #MyPlantBasedFamily!

© Holly Yzquierdo
Category: Sauces, Dips, and Salad Dressings

Filed Under: Daniel Fast Recipes, Recipes, Sauces, Dips, and Salad Dressings Tagged With: Dairy Free, gluten free, Healthy, hummus, Plant Based Diet, Recipes, Vegan

« Previous Page
Next Page »

Primary Sidebar

Footer

Find it here!

Amazon Affiliate Disclosure

Holly Yzquierdo of My Plant-Based Family is a participant in the Amazon Services LLC Associates Program, an affiliate advertising program designed to provide a means for sites to earn advertising fees by advertising and linking to amazon.com.

Disclosures

Unauthorized use and/or duplication of any part of this website or content without express and written permission from Holly Yzquierdo is prohibited. Excerpts and links may be used, provided that full credit is given to Holly Yzquierdo and MyPlantBasedFamily.com with links to the original content.

More information on our Privacy Policy and other Disclosures are available.

Copyright © 2026 · Wellness Pro on Genesis Framework · WordPress · Log in