• Skip to primary navigation
  • Skip to main content
  • Skip to primary sidebar
  • Skip to footer

My Plant-Based Family

Eating Whole Food, Plant-Based Diet recipes, On a Budget.

  • Plant-Based Recipes
    • Breakfast
    • Main Dish
    • Instant Pot
    • Daniel Fast Recipes
    • Side Dishes
    • Bread and Muffins
    • Salad and Wraps
    • Soup, Stews, and Chili
    • Sauces, Dips, and Salad Dressings
    • Desserts
    • Crock Pot
    • Mexican Food
  • Videos
  • Resources
    • Getting Started
    • Books
      • The Plant-Based Diet Starter Guide
      • The Plant-Based Holiday Meal Plan & Cookbook
  • Meal Plans
    • Meal Plans 2020
    • Meal Plans 2019
    • Meal Plans 2017
    • Meal Plans 2016
    • Meal Plans 2015
    • Meal Plans 2014
    • Meal Plans 2013
  • About Us
    • Our Family
    • Contact Me
    • Our Food Philosophy
    • Disclosure Policy
      • Privacy Policy
  • Daniel Fast Recipes

Recipes

Oil-Free Pumpkin Granola

September 21, 2017 by Holly Yzquierdo 1 Comment

This oil-free Pumpkin Granola recipe has the best fall flavors mixed in. Pumpkin spice, pecans and even cranberries!

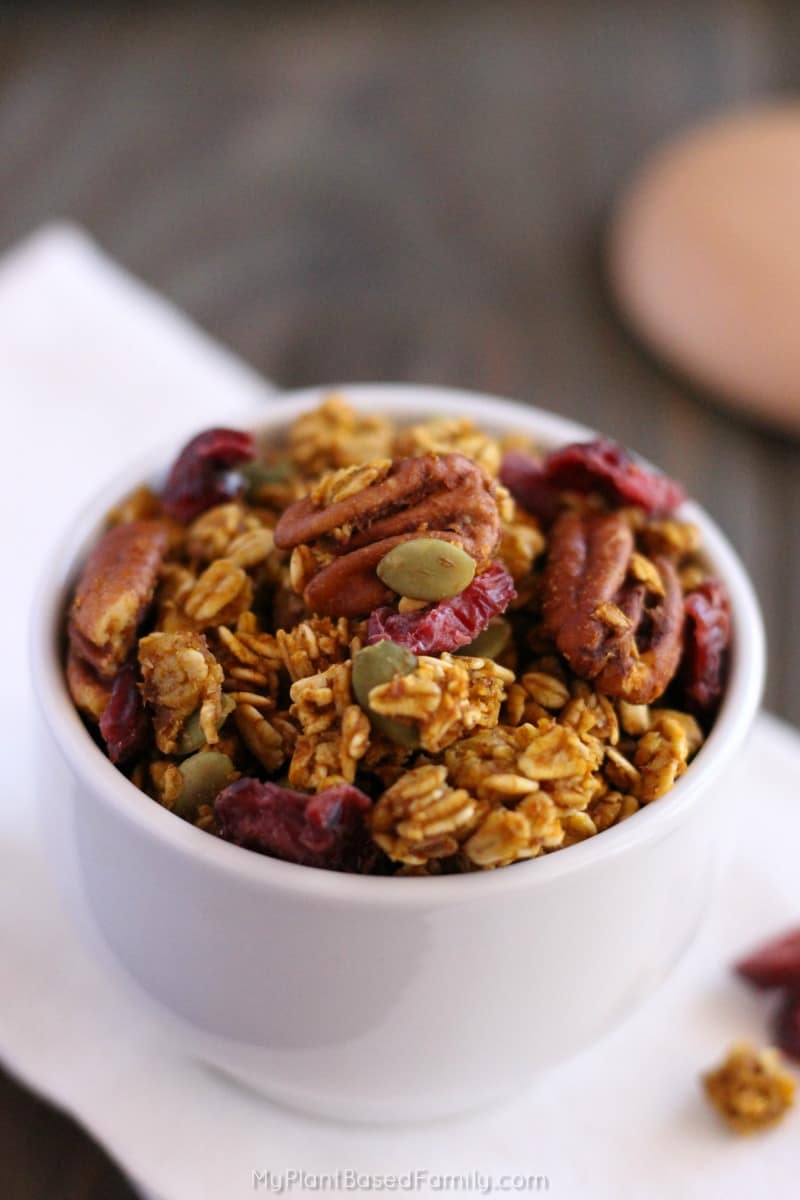
Since September 1st is the beginning of pumpkin season I decided it was time to share my pumpkin granola recipe. This is no ordinary pumpkin granola! It has my favorite fall flavors in an easy to make oil-free granola.

This oil-free Pumpkin Granola recipe has the best fall flavors mixed in. Pumpkin spice, pecans and even cranberries!

This page contains affiliate links.

Most granola recipes are made with oil and it can be tricky to make it without. The payoff is worth it because you get a delicious chewy granola. (My husband loves chewy granola.) Don’t get me wrong. It still has plenty of crunch from raw pepitas and pecans. If you have a nut allergy, you can leave the pecans out but they are my favorite part!

This oil-free Pumpkin Granola recipe has the best fall flavors mixed in. Pumpkin spice, pecans and even cranberries!

I typically make my granola mild, I don’t want flavor too strong so it doesn’t overpower whatever it is served with. The funny thing is, I can’t stop snacking on this one by itself. I finally had to put it away because it’s way too tempting when left on the counter.

If you are looking for an easy and delicious granola recipe that has the best flavors of fall, try this recipe! You get the pumpkin, maple syrup, the classic pumpkin pie spices, raw pepitas, pecans and dried cranberries!

If you aren’t ready for fall after reading that list, nothing will help you! But don’t worry, if you aren’t a cranberry fan, you can leave them out. I made a batch of both but I’m partial to the cranberries!

This oil-free Pumpkin Granola recipe has the best fall flavors mixed in. Pumpkin spice, pecans and even cranberries!

One important note, if you need to be gluten-free because of an allergy or celiac disease, make sure you use gluten-free oats. I completely trust GF Harvest!

Oil-Free Pumpkin Granola

Enjoy this Pumpkin Granola on vegan yogurt, baked fruit, a smoothie bowl, pumpkin pudding, or like me, by the handful!

Ingredients

  • 3 Cups rolled oats (choose certified gluten-free oats if needed)
  • ¾ cup pumpkin puree
  • ½ cup maple syrup
  • ½ teaspoon cinnamon
  • ¼ teaspoon ground ginger
  • ¼ teaspoon ground allspice
  • ⅛ teaspoon ground nutmeg
  • ½ teaspoon vanilla extract
  • ¼ cup plant milk (I used rice milk)
  • ¼ cup raw pepitas
  • ½ cup pecan halves
  • ½ cup dried cranberries (optional)

Instructions

  1. Preheat your oven to 325 degrees and cover a large baking sheet with parchment paper.
  2. In a large mixing bowl, add your rolled oats and set aside.
  3. In a medium mixing bowl, add your pumpkin puree, maple syrup, spices, vanilla and plant milk. Stir well.
  4. Pour the wet ingredients into the oats a little at a time and stir well. Once all the wet ingredients are incorporated into the oats, add the raw pepitas and pecan halves and mix again. Don’t add the dried cranberries yet!
  5. Scoop mixture onto the parchment covered baking sheet. Be careful not to get it too close to the edge. If there isn’t enough room, use two baking sheets.
  6. Bake for 40 minutes total but pull it out every 10 minutes to stir gently. Once done, allow to cool.
  7. After the granola is cool, mix in the dried cranberries and store in an airtight container.

You can skip the parchment if you have a Silpat! It’s a non-stick silicone baking mat (and it makes a great gift).

This oil-free Pumpkin Granola recipe has the best fall flavors mixed in. Pumpkin spice, pecans and even cranberries!

Did I leave out any of your favorite fall flavors? 

Yield: 5 cups

Oil-Free Pumpkin Granola

This oil-free Pumpkin Granola recipe has the best fall flavors mixed in. Pumpkin spice, pecans and even cranberries!

This oil-free Pumpkin Granola recipe has the best fall flavors mixed in. Pumpkin spice, pecans and even cranberries!

Prep Time 5 minutes
Cook Time 40 minutes
Total Time 45 minutes

Ingredients

  • 3 Cups rolled oats (choose certified gluten-free oats if needed)
  • ¾ cup pumpkin puree
  • ½ cup maple syrup
  • ½ teaspoon cinnamon
  • ¼ teaspoon ground ginger
  • ¼ teaspoon ground allspice
  • ⅛ teaspoon ground nutmeg
  • ½ teaspoon vanilla extract
  • ¼ cup plant milk (I used rice milk)
  • ¼ cup raw pepitas
  • ½ cup pecan halves
  • ½ cup dried cranberries (optional)

Instructions

  1. Preheat your oven to 325 degrees and cover a large baking sheet with parchment paper.
  2. In a large mixing bowl, add your rolled oats and set aside.
  3. In a medium mixing bowl, add your pumpkin puree, maple syrup, spices, vanilla and plant milk. Stir well.
  4. Pour the wet ingredients into the oats a little at a time and stir well. Once all the wet ingredients are incorporated into the oats, add the raw pepitas and pecan halves and mix again. Don't add the dried cranberries yet!
  5. Scoop mixture onto the parchment covered baking sheet. Be careful not to get it too close to the edge. If there isn't enough room, use two baking sheets.
  6. Bake for 40 minutes total but pull it out every 10 minutes to stir gently. Once done, allow to cool.
  7. After the granola is cool, mix in the dried cranberries and store in an airtight container.

Notes

You can skip the parchment if you have a Silpat.

Did you make this recipe?

We'd love to see it! Tag us and use #MyPlantBasedFamily!

© Heather Mayes

Filed Under: Breakfast, Holiday Cooking, Recipes Tagged With: Plant Based Diet, Recipes, Vegan

Instant Pot Minestrone Soup

September 6, 2017 by Holly Yzquierdo 11 Comments

Instant Pot Minestrone Soup may just be the perfect plant-based soup! Veggies, beans, broth and pasta create a hearty and healthy soup!

You may have noticed an abundance of Instant Pot recipes lately! I’m working my way through updating old recipes and adapting them for my pressure cooker. My latest success is adapting one of my favorite recipes, Instant Pot Minestrone Soup! I have been in love with the stove top version of this delicious, plant-based soup for years. The only thing I don’t love about it is how long it takes to make it. It still takes time to cut the veggies but making it in the Instant Pot means I can walk away from it and come back when it’s done. If you don’t have a pressure cooker, you’ll love my stove top version of Minestrone Soup that has been a reader favorite for years!

Pressure Cooking with Pasta

Instant Pot Minestrone Soup may just be the perfect plant-based soup! Veggies, beans, broth and pasta create a hearty and healthy soup!

The one thing that concerned me about making Minestrone in a pressure cooker was the noodles. Pasta and pressure cooking don’t always mix. I’ve had the best luck with whole wheat pasta like rotini or penne. I haven’t gotten gluten-free pasta to work in my pressure cooker, yet. If you are gluten-free, I recommend cooking your pasta on the stove and adding it to your soup after it is done. Even if you are not gluten-free, you may want to cook your pasta on the stove anyway. This soup creates a lovely broth, the noodles will soak it up and leave you with a casserole type dish instead of a soup. It tastes great either way but you can avoid that by adding cooked pasta right before serving.

Building Flavor

Instant Pot Minestrone Soup may just be the perfect plant-based soup! Veggies, beans, broth and pasta create a hearty and healthy soup!

One of the reasons I’ve always loved Minestrone Soup is the variety of ingredients. You have veggies, beans, pasta and a flavorful broth. When I cook this on the stove I’ll let it simmer and tweak the flavors as it cooks. You can’t do that in the Instant Pot. I use my dry Veggie Broth Mix to give this soup a robust flavor. If you have a favorite veggie broth, by all means, use it instead of water. I simply add 1 Tablespoon of Veggie Broth Mix for each cup of water. For this recipe, that is 1/2 cup of Veggie Broth Mix. You’ll want to add salt and pepper to taste as well. I prefer to sprinkle both on my bowl right before eating.

Instant Pot Minestrone Soup

This soup has a long ingredient list but it’s really easy to make. If you will be pressed for time, you can precut the onion, carrots, and celery ahead of time. The rest of the ingredients are dumped into the pot.

Ingredients

  • 1 cup diced onion
  • 4 stalks chopped celery
  • 2 cups chopped carrots (2-3 carrots)
  • 1 15 oz can white navy beans, drained and rinsed
  • 1 15 oz can red kidney beans, drained and rinsed
  • 1 15 oz can green beans, drained and rinsed
  • 1 15 oz can diced tomatoes
  • 8 cups of water with ½ cup Veggie Broth Mix (or 8 cups of your favorite veggie broth)
  • 1 teaspoon dried oregano
  • 1 teaspoon garlic powder
  • 2 cups whole wheat noodles (or gluten-free noodles if needed)
  • 2 cups spinach (optional)

Instructions

  1. Dump onion, celery, carrots, and canned items into the pot.
  2. Add water and Veggie Broth Mix (or veggie broth) along with other spices.
  3. If using whole wheat noodles, add them to the Instant Pot. Make sure they are covered with liquid. This should be below the max fill line.
  4. Close the lid, press manual and decrease the minutes to 5 minutes. Adjust the pressure to low.
  5. It will take a while for the Instant Pot to come up to pressure. After it finishes cooking, use the quick pressure release method. Be careful, escaping steam and liquid will be hot.
  6. Carefully remove the lid and add the spinach. Replace the lid, sealing isn’t necessary.
  7. Let sit for 10 minutes, then remove lid and stir.

This delicious soup is easy to adapt if you are missing an ingredient. I usually have all of these on hand but occasionally I’ll be missing green beans or spinach. I forgot to add spinach when I made the recipe for these photos! It still tastes great! You can also use frozen or fresh ingredients instead of canned. It still comes out great! Do you love Minestrone Soup? Have you tried it in the Instant Pot?

Yield: 8 Servings

Instant Pot Minestrone Soup

Instant Pot Minestrone Soup may just be the perfect plant-based soup! Veggies, beans, broth and pasta create a hearty and healthy soup!

Instant Pot Minestrone Soup may just be the perfect plant-based soup! Veggies, beans, broth and pasta create a hearty and healthy soup!

Ingredients

  • 1 cup diced onion
  • 4 stalks chopped celery
  • 2 cups chopped carrots (2-3 carrots)
  • 1 15 oz can white navy beans, drained and rinsed
  • 1 15 oz can red kidney beans, drained and rinsed
  • 1 15 oz can green beans, drained and rinsed
  • 1 15 oz can diced tomatoes
  • 8 cups of water with ½ cup Veggie Broth Mix (or 8 cups of your favorite veggie broth)
  • 1 teaspoon dried oregano
  • 1 teaspoon garlic powder
  • 2 cups whole wheat noodles (or gluten-free noodles if needed)
  • 2 cups spinach (optional)

Instructions

  1. Dump onion, celery, carrots, and canned items into the pot.
  2. Add water and Veggie Broth Mix (or veggie broth) along with other spices.
  3. If using whole wheat noodles, add them to the Instant Pot. Make sure they are covered with liquid. This should be below the max fill line.
  4. Close the lid, press manual and decrease the minutes to 5 minutes. Adjust the pressure to low.
  5. It will take a while for the Instant Pot to come up to pressure. After it finishes cooking, use the quick pressure release method. Be careful, escaping steam and liquid will be hot.
  6. Carefully remove the lid and add the spinach. Replace the lid, sealing isn't necessary.
  7. Let sit for 10 minutes, then remove lid and stir.

Notes

If you will be pressed for time, you can precut the onion, carrots, and celery ahead of time. The rest of the ingredients are dumped into the pot.

Did you make this recipe?

We'd love to see it! Tag us and use #MyPlantBasedFamily!

© Heather Mayes

Filed Under: Instant Pot, Recipes, Soups, Stews, & Chili Tagged With: Plant Based Diet, Recipes, Vegan

Instant Pot Refried Beans

August 30, 2017 by Holly Yzquierdo 70 Comments

Enjoy restaurant style refried beans without sacrificing your health. These oil-free, plant-based refried beans are made in the Instant Pot.

Before we get too far into this post I need to be upfront. These aren’t actually refried beans. They aren’t fried and contain no oil! I call them Instant Pot Refried Beans so you’ll know this recipe is for the Instant Pot and so you’ll know what to expect bean wise.

Enjoy restaurant style refried beans without sacrificing your health. These oil-free, plant-based refried beans are made in the Instant Pot.

This page contains affiliate links.

In 2012 when I started blogging, one of my first recipes was called Unfried Beans. I love that recipe but it has people confused and it doesn’t exactly rank high in Google searches because no one searches for unfried beans.

This new recipe, designed for the Instant Pot, is basically that same delicious recipe I’ve made hundreds of times. Since it’s all being cooked together I add fresh onion and garlic. I usually added those when I cook beans on the stove top as well.

Enjoy restaurant style refried beans without sacrificing your health. These oil-free, plant-based refried beans are made in the Instant Pot.

I first developed the old recipe when we went plant-based. We wanted the same delicious flavors we had always loved without the meat and lard! It’s kinda gross to think about.

Thankfully, this version uses spices we always have on hand because I put them in everything!

Enjoy restaurant style refried beans without sacrificing your health. These oil-free, plant-based refried beans are made in the Instant Pot.

If you have a food processor, it will save you a lot of time. I have a 10 cup Hamilton Beach food processor that we’ve used over 5 years. It’s not too expensive and has never let me down.

If you don’t have a food processor you could use a blender, immersion blender, potato masher or a fork. A food processor works the best though.

Instant Pot Refried Beans

We enjoy these beans on anything and everything! Try them in Nachos, Tostadas, burritos or a big bowl by themselves!

Enjoy restaurant style refried beans without sacrificing your health. These oil-free, plant-based refried beans are made in the Instant Pot.

If you have an Instant Pot, be sure to give these refried beans a try! They are perfect for batch cooking because you can use them in so many other recipes!

How to Make Instant Pot Refried Beans

Ingredients

  • ½ onion, diced
  • 5 cloves garlic, minced or chopped finely
  • 1 teaspoon garlic powder
  • 1 teaspoon onion powder
  • 1 teaspoon chili powder
  • 2 cups dried pinto beans
  • 4 cups water
  • 2 teaspoons salt (to your taste)

Instructions

Step 1 – Add to Instant Pot

Add diced onion, minced garlic, spices, beans and water to the Instant Pot.

Step 2 – Cook

Cook on manual for 40 minutes on high pressure.

Step 3 – Natural Release

After natural pressure release, scoop out excess water. Reserve it in case you need extra.

Step 4 – Salt to Taste

Add 2 teaspoons of salt, more or less to your own taste.

Step 5 – Puree

Use a food processor, potato masher or immersion blender to puree.

Step 6 – Smooth Texture

Add reserved bean water if needed until you get a smooth texture.

Instant Pot Refried Beans

Enjoy restaurant style refried beans without sacrificing your health. These oil-free, plant-based refried beans are made in the Instant Pot.

Enjoy restaurant style refried beans without sacrificing your health. These oil-free, plant-based refried beans are made in the Instant Pot.

Prep Time 10 minutes
Cook Time 40 minutes
Total Time 50 minutes

Ingredients

  • ½ onion, diced
  • 5 cloves garlic, minced or chopped finely
  • 1 teaspoon garlic powder
  • 1 teaspoon onion powder
  • 1 teaspoon chili powder
  • 2 cups dried pinto beans
  • 4 cups water
  • 2 teaspoons salt (to your taste)

Instructions

  1. Add diced onion, minced garlic, spices, beans and water to the Instant Pot.
  2. Cook on manual for 40 minutes on high pressure.
  3. After natural pressure release, scoop out excess water. Reserve it in case you need extra.
  4. Add 2 teaspoons of salt, more or less to your own taste.
  5. Use a food processor, potato masher or immersion blender to puree.
  6. Add reserved bean water if needed until you get a smooth texture.

Notes

While these can be made with a blender, immersion blender, potato masher or fork, it is best to use a food processor.

Did you make this recipe?

We'd love to see it! Tag us and use #MyPlantBasedFamily!

© Holly Yzquierdo

Filed Under: Daniel Fast Recipes, Instant Pot, Mexican Food, Recipes Tagged With: Mexican Food, Plant Based Diet, Recipes, Vegan

Pineapple and Tofu Kabobs

August 17, 2017 by Holly Yzquierdo 5 Comments

These easy Tofu Kabobs are a great way to introduce your family to tofu!

These Pineapple and Tofu Kabobs are the perfect introduction to tofu!

These easy Tofu Kabobs are a great way to introduce your family to tofu!

When we first went plant-based I was a little afraid of tofu. I had never tried it and didn’t know what to expect. Years later, I’m happy to say that we love tofu. We don’t have it often but when we do it’s a crowd pleaser.

Cooking Tofu

There are a few different ways I like to eat tofu; we eat it crumbled in a tofu scramble, diced and cooked in a skillet, or cooked in my Air Fryer.

When I bought my GoWiseUSA Air Fryer I had two things I wanted to make, crispy fries and Tofu Kabobs.

Grilling isn’t an option for us. Our grill is pretty old and since we stopped cooking meat, we stopped using it and it fell into disrepair. Broiling and roasting in the summer is out because we live in Arizona and it’s too hot. In the summer, I don’t use my oven because it heats up the house.

You can definitely make these on the grill or in the oven if you don’t have an Air Fryer. I’ve even cooked them in a skillet but they don’t cook as evenly since the individual veggies and tofu pieces don’t all touch the surface of the pan at the same time.

These easy Tofu Kabobs are a great way to introduce your family to tofu!

When I came up with this recipe, I really wanted to mimic the kabobs we used to make on our grill. Those had meat but the tofu was a great replacement. I also wanted to add my favorite veggies! Grilled bell peppers and onions are my favorite veggies to grill! Turns out, they are also great in the Air Fryer.

These easy Tofu Kabobs are a great way to introduce your family to tofu!

If you are new to making tofu there are a few things to know.

First, tofu will take on the flavors of the other things you are cooking, so season your food well.

Second, tofu is packed in water and absorbs it like a sponge. You’ll want to squeeze it out. I used to put it between two plates and put heavy books on top. I recently bought an EZ Tofu Press and it’s much easier to use.

These easy Tofu Kabobs are a great way to introduce your family to tofu!

Pineapple and Tofu Kabobs

Get your wooden skewers ready for these easy and delicious kabobs.

Ingredients for Tofu Kabobs

  • 1 block firm tofu
  • 1 pineapple, cubed
  • 1 onion, chopped into large chunks
  • 1-2 bell peppers, chopped into large chunks

Ingredients for Marinade

  • 1/2 cup tamari (or soy sauce or Braggs Liquid Aminos)
  • 1/2 cup water
  • 1/4 cup maple syrup
  • 1/2 teaspoon paprika
  • 1/2 teaspoon ground ginger
  • Optional sriracha

Do

  1. Press tofu to remove excess water. This will take about 10 minutes. While the tofu is pressing, soak wooden skewers in water. I broke mine in half so they would fit in my Air Fryer.
  2. Mix up the marinade in a shallow bowl or baking dish.
  3. Cube the tofu, then place the tofu in the marinade to soak for about 10 minutes.
  4. Chop veggies and pineapple and set aside.
  5. Build the kabobs by alternating veggies, tofu, and pineapple on the skewers.
  6. If cooking in Air Fryer, at 320° for 15 minutes, shaking after 10 minutes. If cooking in a skillet, stir or turn tofu, pineapple, and veggies until lightly browned on all sides.
These easy Tofu Kabobs are a great way to introduce your family to tofu!

Use these spices and ingredients as a starting point, add your favorites like mushrooms, grape tomatoes, zucchini, and more!

You should know that the veggies cook way faster than the tofu. If you use small chunks of veggies and big chunks of tofu the veggies will dry out if you cook them longer than 15 minutes.

These easy Tofu Kabobs are a great way to introduce your family to tofu!

One last tip! Use the leftover marinade to cook your quinoa, rice or noodles! If you are sauteing the veggies in a pan instead of making kabobs, use the leftover marinade in the skillet. The photo below is pineapple, tofu, and veggies that were sauteed in a skillet. No oil was used, just the marinade or a little water to keep it from sticking.

What are your favorite (plant-based) kabob ingredients?

Pineapple and Tofu Kabobs

These easy Tofu Kabobs are a great way to introduce your family to tofu!

These easy Tofu Kabobs are a great way to introduce your family to tofu!

Ingredients

  • 1 block firm tofu
  • 1 pineapple, cubed
  • 1 onion, chopped into large chunks
  • 1-2 bell peppers, chopped into large chunks
  • 1/2 cup tamari (or soy sauce or Braggs Liquid Aminos)
  • 1/2 cup water
  • 1/4 cup maple syrup
  • 1/2 teaspoon paprika
  • 1/2 teaspoon ground ginger
  • Optional sriracha

Instructions

  1. Press tofu to remove excess water. This will take about 10 minutes. While the tofu is pressing, soak wooden skewers in water. I broke mine in half so they would fit in my Air Fryer.
  2. Mix up the marinade in a shallow bowl or baking dish.
  3. Cube the tofu, then place the tofu in the marinade to soak for about 10 minutes.
  4. Chop veggies and pineapple and set aside.
  5. Build the kabobs by alternating veggies, tofu, and pineapple on the skewers.
  6. If cooking in Air Fryer, at 320° for 15 minutes, shaking after 10 minutes. If cooking in a skillet, stir or turn tofu, pineapple, and veggies until lightly browned on all sides.

Notes

Veggies cook way faster than the tofu. If you use small chunks of veggies and big chunks of tofu the veggies will dry out if you cook them longer than 15 minutes.

Did you make this recipe?

We'd love to see it! Tag us and use #MyPlantBasedFamily!

© Heather Mayes

Filed Under: Air Fryer, Main Dish Recipes, Recipes Tagged With: Air Fryer, Plant Based Diet, Vegan

Plant-Based Nachos

August 12, 2017 by Holly Yzquierdo 8 Comments

Can Plant-Based Nachos solve every problem in the world today? No, but it might be exactly what you need to help your family start making healthy food choices.

When we first transitioned to a plant-based diet, we made healthier versions of our old favorites. One of those favorites was nachos!

Your whole family will enjoy these healthy, plant-based Nachos!

We put a healthier twist on nachos by making non-dairy cheese sauce and oil-free beans. We include our favorite toppings like tomatoes, onions, cilantro, and more. I like to douse mine in salsa but I leave it on the side when the kids will be sharing. Don’t forget the jalapenos and guacamole!

One of the reasons we love making Plant-Based Nachos is because everyone loves them. I get a lot of emails from people asking how to get their families to eat plant-based. Nachos is the answer!

Of course, you can’t live on nachos but a standing Nacho night isn’t out of the question.

If your whole family will be sharing, make a Nacho Bar so everyone can build their own! You can let them choose between black beans or pinto beans (both are oil-free).

Your whole family will enjoy these healthy, plant-based Nachos!

Make Your Own Chips

The least healthy thing about the nachos are the chips. Granted, chips aren’t healthy. You can choose healthier versions or make them yourself.

To make your own oil-free chips, buy soft corn tortillas, check the ingredients to make sure they only contain corn, water, and maybe lime juice.

Cut them into triangles or strips and bake them until crispy! It’s easy!

Your whole family will enjoy these healthy, plant-based Nachos!

Nacho Victory

Some of you aren’t as concerned about the chips, just getting your family to eat beans is a win! I firmly believe that healthy nachos could be the step to healthy eating for some.

Once you get your family enjoying Plant-Based Nachos, you can get them to try Tostadas, Burritos, Casseroles and more.

Your whole family will enjoy these healthy, plant-based Nachos!

Plant-Based Nachos

This recipe is more art than science. We have our favorite way to make them, but I’ll mix and match different ingredients based on what we have.

If you set up a Nacho Bar, you can have all of the ingredients in bowls for your family.  Each person can make their own nacho masterpiece. If you are creating a group platter, you’ll want to layer chips, beans and cheese sauce in a pan and broil them for a couple of minutes, then add all the toppings.

Ingredients

  • 1 batch Unfried Beans (That is what I call my oil-free refried beans)
  • 1 batch dairy-free cheese sauce
  • Other toppings of your choice like tomatoes, onions, jalapenos, salsa, avocado, etc.
  • Chips or baked corn tortillas

Do

  1. Start cooking the cheese sauce because it takes the longest to make (unless you are cooking the beans from scratch).
  2. Prepare the beans, you can use beans you cook yourself or canned beans.
  3. Chop or prepare the other ingredients
  4. If making a Nacho Bar, place all the ingredients in bowls for your family to build their own serving. If you are making it family style, layer chips, beans, and cheese sauce in a pan. Broil it for a few minutes to get it all warm, then top with your favorite ingredients. I recommend you keep any ingredients that won’t be well received, on the side.

This is one of those recipes that is easy to make on a busy night or to use up leftovers! The dairy-free cheese sauce takes the longest unless you are cooking the beans from scratch, but it reheats well.

I like to plan nachos after I’ve batch cooked beans!

You have to admit, these look good even if you aren’t plant-based. Go ahead and show the video to a family member and see what they think!

I have to thank my friend Melodee from Melodee Lynn Photography for these amazing pictures. She is an artist with the camera!

Filed Under: Mexican Food, Recipes Tagged With: Mexican Food, Plant Based Diet, Recipes

Air Fryer Cheesy Potatoes

June 23, 2017 by Holly Yzquierdo 18 Comments

The Vegan Air Fryer: The Healthier Way to Enjoy Deep-Fried Flavors

I’m not a gadget person. Don’t get me wrong, I love tech that makes my life easier but when it comes to kitchen stuff, I don’t rush out to get every new shiny object that comes around. I’ve been in love with my Instant Pot for years but the thing that has my attention recently is my air fryer. This page contains affiliate links. I also received a free copy of this book for review but I had already pre-ordered my copy.

Cooking with an Air Fryer

The air fryer is the latest craze in kitchen appliances and with good reason. It’s like having a mini convection oven on our counter top.

The beauty of the air fryer is its ability to cook foods and make them crispy, without using oil. For those of us in the whole food, plant-based, no oil camp, the air fryer is like a long awaited miracle. Fries without guilt!

I was so excited to get my air fryer months ago. I thought I’d be able to pick it up as easily as I did the Instant Pot but I struggled. In fact, I had a lot of fails in the beginning. I knew I had to go to the experts. I asked friends and many of you on Facebook who the undisputed air fryer guru was and everyone mentioned JL Fields.

I already had JL’s pressure cooking book so I was really excited to see she had a new air fryer book coming out. I preordered The Vegan Air Fryer: The Healthier Way to Enjoy Deep-Fried Flavors from Amazon so I could get it as soon as possible. It’s out now so you don’t have to wait!

The Vegan Air Fryer: The Healthier Way to Enjoy Deep-Fried Flavors

The book is filled with so much helpful information about how to use the air fryer and of course, delicious recipes. I was given permission to share one of the recipes with you!

From the Vegan Air Fryer, ©2017 by JL Fields. Used by permission. Photo by Michelle Donner.

Air Fryer Cheesy Potatoes

Try these potato wedges if you love potato skins but want that potato, too. This is a great side dish and also a fun recipe to make for game day!

Potatoes

  • 1 pound fingerling potatoes
  • 1 teaspoon extra-virgin olive oil (you can exclude this if you don’t’ eat oil)
  • 1 teaspoon kosher salt
  • 1 teaspoon ground black pepper
  • 1/2 teaspoon garlic powder

Cheese Sauce

  • 1/2 cup raw cashews
  • 1/2 teaspoon ground turmeric
  • 1/2 teaspoon paprika
  • 2 tablespoons nutritional yeast
  • 1 teaspoon fresh lemon juice
  • 2 tablespoons to 1/4 cup water

Potatoes

Preheat the air fryer to 400°F for 3 minutes. Wash the potatoes. Cut the potatoes in half lengthwise and transfer them to a large bowl. Add the oil (if using), salt, pepper, and garlic powder to the potatoes. Toss to coat. Transfer the potatoes to the air fryer. Cook for 16 minutes, shaking halfway through the cooking time.

Cheese Sauce

Combine the cashews, turmeric, paprika, nutritional yeast, and lemon juice in a high-speed blender. Blend on low, slowly increasing the speed and adding water as needed. Be careful to avoid using too much water, as you want a thick, cheesy consistency. Transfer the cooked potatoes to an air fryer-safe pan or a piece of parchment paper. Drizzle the cheese sauce over the potato wedges. Place the pan in the air fryer and cook for 2 more minutes at 400°F.

Air Fryer Cheesy Potatoes

Air Fryer Cheesy Potatoes

Try these potato wedges if you love potato skins but want that potato, too. This is a great side dish and also a fun recipe to make for game day!

Ingredients

  • 1 pound fingerling potatoes
  • 1 teaspoon extra-virgin olive oil (you can exclude this if you don’t’ eat oil)
  • 1 teaspoon kosher salt
  • 1 teaspoon ground black pepper
  • 1/2 teaspoon garlic powder
  • 1/2 cup raw cashews
  • 1/2 teaspoon ground turmeric
  • 1/2 teaspoon paprika
  • 2 tablespoons nutritional yeast
  • 1 teaspoon fresh lemon juice
  • 2 tablespoons to 1/4 cup water

Instructions

Potatoes

  1. Preheat the air fryer to 400°F for 3 minutes.
  2. Wash the potatoes.
  3. Cut the potatoes in half lengthwise and transfer them to a large bowl.
  4. Add the oil (if using), salt, pepper, and garlic powder to the potatoes. Toss to coat.
  5. Transfer the potatoes to the air fryer.
  6. Cook for 16 minutes, shaking halfway through the cooking time.

Cheese Sauce

  1. Combine the cashews, turmeric, paprika, nutritional yeast, and lemon juice in a high-speed blender.
  2. Blend on low, slowly increasing the speed and adding water as needed. Be careful to avoid using too much water, as you want a thick, cheesy consistency.
  3. Transfer the cooked potatoes to an air fryer-safe pan or a piece of parchment paper.
  4. Drizzle the cheese sauce over the potato wedges.
  5. Place the pan in the air fryer and cook for 2 more minutes at 400°F.

Did you make this recipe?

We'd love to see it! Tag us and use #MyPlantBasedFamily!

© Heather Mayes

Filed Under: Air Fryer, Recipes Tagged With: Air Fryer, Plant Based Diet, Vegan

« Previous Page
Next Page »

Primary Sidebar

Footer

Find it here!

Amazon Affiliate Disclosure

Holly Yzquierdo of My Plant-Based Family is a participant in the Amazon Services LLC Associates Program, an affiliate advertising program designed to provide a means for sites to earn advertising fees by advertising and linking to amazon.com.

Disclosures

Unauthorized use and/or duplication of any part of this website or content without express and written permission from Holly Yzquierdo is prohibited. Excerpts and links may be used, provided that full credit is given to Holly Yzquierdo and MyPlantBasedFamily.com with links to the original content.

More information on our Privacy Policy and other Disclosures are available.

Copyright © 2026 · Wellness Pro on Genesis Framework · WordPress · Log in