• Skip to primary navigation
  • Skip to main content
  • Skip to primary sidebar
  • Skip to footer

My Plant-Based Family

Eating Whole Food, Plant-Based Diet recipes, On a Budget.

  • Plant-Based Recipes
    • Breakfast
    • Main Dish
    • Instant Pot
    • Daniel Fast Recipes
    • Side Dishes
    • Bread and Muffins
    • Salad and Wraps
    • Soup, Stews, and Chili
    • Sauces, Dips, and Salad Dressings
    • Desserts
    • Crock Pot
    • Mexican Food
  • Videos
  • Resources
    • Getting Started
    • Books
      • The Plant-Based Diet Starter Guide
      • The Plant-Based Holiday Meal Plan & Cookbook
  • Meal Plans
    • Meal Plans 2020
    • Meal Plans 2019
    • Meal Plans 2017
    • Meal Plans 2016
    • Meal Plans 2015
    • Meal Plans 2014
    • Meal Plans 2013
  • About Us
    • Our Family
    • Contact Me
    • Our Food Philosophy
    • Disclosure Policy
      • Privacy Policy
  • Daniel Fast Recipes

Recipes

Oil-Free Cowboy Caviar

February 29, 2024 by Holly Yzquierdo 28 Comments

Oil-Free Cowboy Caviar

Flavorful, vegan and oil-free cowboy caviar can be eaten as a dip, salad, relish or on a spoon. With my Sweet and Tangy Salad Dressing poured over it, you’ll never miss the oil. Bonus – there’s no added sugar either!

We love to eat this at home with tortilla chips, but it’s also great to make ahead for potlucks and parties. Just be sure to leave the avocado out until you are ready to serve.

What is Cowboy Caviar Made of?

This oil-free cowboy caviar is made with black beans, black eyed peas, corn, tomatoes, bell pepper, onion, jalapeno and cilantro. It all gets tossed in tangy and sweet salad dressing to bring the flavors together. Then avocado is added before serving. Yum!

Is Cowboy Caviar Fattening?

While the traditional Cowboy Caviar made with Italian dressing or olive oil is high in fat, the only ingredient with any significant fat in my oil-free cowboy caviar is avocado, which can be left out if desired. This is a lighter version with big, fresh flavors. The beans are packed with protein and fiber too.

Oil-Free Cowboy Caviar Recipe

Ingredients

  • 1 can black beans, drained and rinsed 
  • 1 can black eyed peas, drained and rinsed 
  • 1 can whole kernel corn, drained and rinsed 
  • 2 cups diced tomatoes (I used 3 Roma tomatoes) 
  • 1/2 cup diced red onion 
  • 1 diced bell pepper (red, yellow or orange) 
  • 1 diced jalapeno pepper (remove seeds if you don’t want it spicy) 
  • ½ cup diced cilantro 
  • 3 avocados, diced (we leave them out and slice some right before each serving, if adding at once, splash with lime juice to keep from browning) 
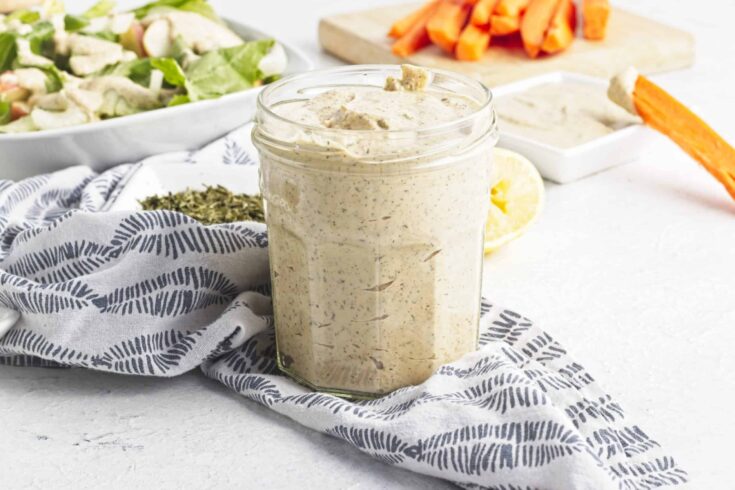
  • 1 recipe of Sweet and Tangy Salad Dressing (see recipe for ingredients and steps) 

Instructions

Step 1 – Make Salad Dressing

First, follow my recipe to make Sweet and Tangy Salad Dressing. It needs a bit of time to thicken while you put together the cowboy caviar.

Step 2 – Mix Peas, Beans and Corn

In a large mixing bowl, add your beans, peas and corn that have been rinsed and drained.

Step 3 – Chop

Now chop all the tomatoes, red onion, bell pepper, cilantro and avocado.

Step 4 – Stir

Stir in everything, minus the avocado (unless it’s covered with lime to prevent browning).

Step 5 – Pour Dressing

Next, pour the Sweet and Tangy Salad Dressing over the cowboy caviar and mix them together.

Step 6 – Refrigerate

Refrigerate the oil-free cowboy caviar until you are ready to serve. Add the avocado immediately before serving.

Serving Options

My kids love scooping this up with tortilla chips. You can also serve it over a bed of lettuce or just eat it with a fork! I love topping baked potatoes with it too.

Storage

Leftovers can be stored in an airtight container in the refrigerator for 3-5 days as long as it doesn’t have avocado in it. Avocado does not store well and will become brown and mushy.

Slice fresh avocado to serve with any leftovers.

More Plant Based Salsas and Dips

If you love this recipe, check out my other dips and salsas. They are all oil-free too!

  • Mango Salsa
  • Oil-Free Hummus
  • Black Bean Corn Salad with Avocado
  • Vegan Spinach Artichoke Dip
  • Pico de Gallo
Yield: 4 Servings

Oil-Free Cowboy Caviar

Oil-Free Cowboy Caviar

Cowboy caviar is a fancy name for bean salsa. It is a blend of fresh flavors without any added oil that's great for dipping or eating alone.

Prep Time 10 minutes
Additional Time 30 minutes
Total Time 40 minutes

Ingredients

  • 1 can black beans, drained and rinsed
  • 1 can black eyed peas, drained and rinsed
  • 1 can whole kernel corn, drained and rinsed
  • 2 cups diced tomatoes (I used 3 Roma tomatoes)
  • 1/2 cup diced red onion
  • 1 diced bell pepper (red, yellow or orange)
  • 1 diced jalapeno pepper (remove seeds if you don’t want it spicy)
  • ½ cup diced cilantro
  • 3 avocados, diced (we leave out and slice some right before each serving, if adding at once, splash with lime juice to keep from browning)
  • 1 recipe of Sweet and Tangy Salad Dressing (see separate recipe for ingredients and steps)

Instructions

  1. Make Sweet and Tangy Salad Dressing first so it can thicken. 
  2. In a large mixing bowl, add beans, peas and corn that have been drained and rinsed. 
  3. Chop all veggies. 
  4. Stir in all the veggies, minus the avocado (unless it's covered with lime to prevent browning).  
  5. Pour in Sweet and Tangy Salad Dressing and stir everything together. 
  6. Refrigerate until ready to serve. Add avocado right before serving. 

Notes

  • Serve with tortilla chips, on a bed of lettuce or eat it with a spoon
  • Refrigerate leftovers in an airtight container for 3-5 days without avocado
  • Slice fresh avocado and add before serving

Did you make this recipe?

We'd love to see it! Tag us and use #MyPlantBasedFamily!

© Holly Yzquierdo

Filed Under: Daniel Fast Recipes, Main Dish Recipes, Recipes, Salads & Wraps, Sauces, Dips, and Salad Dressings, Side Dishes

Spicy Vegan Ranch Dressing

February 19, 2024 by Holly Yzquierdo Leave a Comment

Spicy Vegan Ranch Dressing

My husband loves this spicy vegan ranch dressing. He used it as a dip for veggies and when he ran out of veggies, he ate the rest with a spoon!

It’s not super spicy, so you don’t notice the heat at first. Then it hits you in the back of your mouth and throat. If you like spicy flavors, this spicy vegan ranch recipe is definitely worth a try.

How Do You Spice Up Ranch?

This simple, yet spicy, vegan ranch recipe offers a burst of flavor that will leave your taste buds tingling and wanting more.

Spicy Vegan Ranch

The subtle heat adds a zesty kick that will take your salad, veggies and snacks to a whole new level. But when you make it at home, you have control over the intensity of the spice – from mild to scorching hot, it’s up to you!

Benefits of Spicy Vegan Ranch

  1. Healthier Option: Homemade spicy vegan ranch eliminates dairy, which reduces saturated fats and cholesterol. It’s a healthier alternative without compromising on taste.
  2. Versatility: Spicy vegan ranch isn’t just for salads – use it as a dipping sauce for fries, a drizzle on roasted veggies, or a flavorful spread for sandwiches and wraps.
  3. Customizable: Tailor the spice level and additional flavors to suit your preferences. It’s a versatile dressing for various meals and snacks.

How to Make Spicy Vegan Ranch

Ingredients

  • 1 cup Raw Cashews, soaked overnight
  • 1/2 cup + 2 tbsp Unflavored Plant-Based Milk
  • 2-3 tbsp Fresh Lemon Juice
  • 2 cloves Garlic, peeled and lightly crushed
  • 2 tsp Dijon Mustard
  • 1 tsp Onion Powder
  • 1 tsp Coarse Salt
  • 1/2 tsp Ground Black Pepper
  • 1 tbsp Dried Parsley
  • 2 tsp Dried Dill
  • 1 tsp Smoked Paprika
  • 3/4 tsp Cayenne

Step 1 – Soak Cashews

Soak the cashews in water in the refrigerator overnight or for at least eight hours. Then drain them.

Step 2 – Blend Cashews

Add the drained cashews, peeled and crushed garlic cloves, and the plant-based milk to a blender.

Process them on high until mostly smooth.

Step 3 – Add Spices

Next add the mustard, onion powder, salt, pepper, parsley, dill, paprika, and cayenne to the blender.

Blend until it as is as smooth as you can get it.

Step 4 – Add Lemon Juice

Now add two tablespoons of lemon juice, and blend until it is incorporated.

At this point, taste the spicy ranch and adjust the salt and lemon juice to suit your desired level of tang.

Step 5 – Adjust Consistency

Thin the ranch to reach by adding more plant-based milk or water, one tablespoon at a time. A thinner ranch is great for dressing salads, while a thicker ranch is ideal for dipping.

For the best flavor, place the ranch in a covered container and allow it to sit in the refrigerator for at least one hour before serving.

Storage

Store the spicy ranch in a tightly sealed container in the refrigerator for up to five days.

Flavor Variations

The beauty of making ranch from scratch is that you control the ingredients, including flavor. Play with different flavors to keep your ranch dressing fresh and exciting.

If it doesn’t taste quite right, try adding a bit of granulated sugar a half teaspoon at a time. A touch of maple syrup or agave nectar can also balance out the heat.

Tailor the spiciness by adjusting the amount of cayenne pepper. Start with a small amount, and add more gradually until reaching your desired heat.

Adding fresh lime juice for an added citrus kick will also complement the heat.

More Vegan Dressings

If you enjoyed this recipe, you’ll love these plant-based dressings too:

  • Homemade Vegan Ranch
  • Raspberry Vinaigrette Salad Dressing
  • Creamy Italian Salad Dressing (Oil-Free)
  • Homemade BBQ Sauce
  • Oil-Free Hummus
Yield: 3/4 pint

Spicy Vegan Ranch Dressing

Spicy Vegan Ranch Dressing

Plant based ranch dressing with a spicy twist to kick up your veggies, salads and wraps.

Prep Time 15 minutes
Additional Time 1 hour
Total Time 1 hour 15 minutes

Ingredients

  • 1 cup Raw Cashews, soaked overnight
  • 1/2 cup + 2 tbsp Unflavored Plant-Based Milk
  • 2-3 tbsp Fresh Lemon Juice
  • 2 cloves Garlic, peeled and lightly crushed
  • 2 tsp Dijon Mustard
  • 1 tsp Onion Powder
  • 1 tsp Coarse Salt
  • 1/2 tsp Ground Black Pepper
  • 1 tbsp Dried Parsley
  • 2 tsp Dried Dill
  • 1 tsp Smoked Paprika
  • 3/4 tsp Cayenne

Instructions

  1. Soak cashews in water in the fridge overnight or at least 8 hours. Drain.
  2. Add the drained cashews, peeled and crushed garlic cloves and plant-based milk to a blender.
  3. Process on high until mostly smooth.
  4. Add mustard, onion powder, salt, pepper, parsley, dill, paprika and cayenne to blender.
  5. Blend until as smooth as possible.
  6. Add 2 tbsp of lemon juice.
  7. Blend until incorporated.
  8. Taste and adjust salt and lemon juice to desired tang.
  9. Thin to desired consistency with more plant-based milk or water, 1 tbsp at a time.
  10. Place in a covered container and sit in fridge for at least 1 hour before serving.

Notes

Store in a tightly sealed container in the fridge for up to 5 days.

Did you make this recipe?

We'd love to see it! Tag us and use #MyPlantBasedFamily!

© Holly Yzquierdo

Filed Under: Recipes, Sauces, Dips, and Salad Dressings

Spicy Black Bean Soup

February 5, 2024 by Holly Yzquierdo Leave a Comment

Spicy Black Bean Soup

This Spicy Black Bean Soup is a quick and satisfying dish that combines the goodness of black beans, tomatoes, and green chilis in a rich, creamy, mildly spicy soup. It’s the perfect recipe for busy days when you crave a nourishing meal without the fuss. My family loves it topped with avocado, sliced jalapeno, and diced tomato. 

You probably have most of the ingredients in your pantry. The soup features canned black beans, white onion, canned tomatoes with green chilis, cilantro, red wine vinegar, veggie broth, and common spices (garlic powder, ground cumin, and chili powder). 

Is Black Bean Soup Good for You?

Yes! Black beans are a great source of protein and fiber. Combining them with onion, tomatoes and spices adds appealing flavors to please your taste buds. Then the beans will keep you feeling full and satisfied.

How to Spice up Black Beans

In my experience, black beans are best when combined with onion and garlic flavors. Use that as a base, then experiment with more or less of the other spices to create the perfect flavor for you. Want extra spicy soup? Add more chili powder! It is called ‘Spicy Black Bean Soup’ after all.

How to Make Spicy Black Bean Soup

Ingredients

  • 3 to 4 Tablespoons water 
  • 2 cups white onion, diced (approximately 1 large onion) 
  • 1 Tablespoon chili powder 
  • 2 teaspoons ground cumin 
  • 1 teaspoon garlic powder 
  • 4 (15-ounce) cans black beans, drained and rinsed 
  • 1 (10-ounce) can tomatoes and green chiles  
  • 4 cups (32 ounces) vegetable broth (or 4 cups water and 4 Tablespoons Veggie Broth Mix) 
  • 1 Tablespoon red wine vinegar 
  • ½ cup cilantro, coarsely chopped and divided 
  • Kosher salt and freshly ground pepper, to taste 
  • Optional toppings: cilantro, avocado, green onion, diced tomato, thinly sliced jalapeno or radish 

Step 1 – Cook Onion

Begin by heating a large pot or Dutch oven over medium heat. Add diced white onion and 2 Tablespoons of water. Cook, stirring occasionally, until onions begin to soften and turn translucent. Add small amounts of water as needed if onions start to brown or stick to the pan and cook until tender, 8 to 10 minutes. 

Step 2 – Add Spices

Add chili powder, ground cumin, and garlic powder to the onions, stir, and cook until fragrant, 1-2 minutes. 

Step 3 – Add Beans, Tomatoes and Vegetable Broth

Next add the drained black beans, the can of tomatoes with green chilis, and vegetable broth and stir together. 

Step 4 – Simmer

Now bring the soup to a boil over medium-high heat, then reduce heat to low and simmer for 30 minutes or until everything is tender. 

Step 5 – Blend

Carefully place about 3 cups of soup in a blender and puree until smooth, about 10 seconds, then stir back into the soup pot. Alternatively, an immersion blender can be used for the desired consistency. 

Step 6 – Season

Next stir in the red wine vinegar and half (¼ cup) of the chopped cilantro. Salt and pepper to taste. 

Step 7 – Garnish

Serve hot with cilantro garnish and other optional toppings. 

How to Store Spicy Black Bean Soup

This soup can be refrigerated for up to 4 to 5 days and then reheated on the stovetop or in the microwave. Add broth or water to adjust consistency, as it will thicken in the refrigerator. It tastes even more delicious after the flavors have melded overnight! 

Spicy black bean soup also be frozen in a freezer-safe container or a freezer bag for up to 3 months. When ready to eat, place in the refrigerator overnight to thaw and reheat on the stovetop over medium heat. Add broth or water as needed if it has become too thick.

To Puree or Not to Puree?

If you like pureed soup, you can definitely blend the entire pot. Just be careful to blend it in batches so that your blender is not filled past the maximum fill line and be mindful of the hot steam that will be released from the top. Of course, if you would rather keep the beans whole, you do not need to puree it at all. 

More Plant Based Soup Recipes

If you like this spicy black bean soup, you’ll love these soups too:

  • Tortilla Soup
  • Hearty Veggie Soup
  • Chipotle Black Bean Chili
  • Potato Kale Soup
  • Chickpea and Rice Soup
Yield: 6 Servings

Spicy Black Bean Soup

Spicy Black Bean Soup

This Spicy Black Bean Soup is a quick and satisfying dish that combines the goodness of black beans, tomatoes, and green chilis in a rich, creamy, mildly spicy soup.

Prep Time 10 minutes
Cook Time 40 minutes
Total Time 50 minutes

Ingredients

  • 3 to 4 Tablespoons water
  • 2 cups white onion, diced (approximately 1 large onion)
  • 1 Tablespoon chili powder
  • 2 teaspoons ground cumin
  • 1 teaspoon garlic powder
  • 4 (15-ounce) cans black beans, drained and rinsed
  • 1 (10-ounce) can tomatoes and green chiles 
  • 4 cups (32 ounces) vegetable broth
  • 1 Tablespoon red wine vinegar
  • ½ cup cilantro, coarsely chopped and divided
  • Kosher salt and freshly ground pepper, to taste
  • Optional toppings: cilantro, avocado, green onion, diced tomato, thinly sliced jalapeno or radish

Instructions

  1. Heat a large pot or Dutch oven over medium heat. Add diced white onion and 2 Tablespoons of water. Cook, stirring occasionally, until onions begin to soften and turn translucent. Add small amounts of water as needed if onions start to brown or stick to the pan and cook until tender, 8 to 10 minutes. 
  2. Add chili powder, ground cumin, and garlic powder to the onions, stir, and cook until fragrant, 1-2 minutes. 
  3. Add the drained black beans, the can of tomatoes with green chilis, and vegetable broth and stir together. 
  4. Bring the soup to a boil over medium-high heat, then reduce heat to low and simmer for 30 minutes or until the black beans are tender. 
  5. Place about 3 cups of soup in a blender and puree until smooth, about 10 seconds, then stir back into the soup pot. Alternatively, an immersion blender can be used for the desired consistency. 
  6. Stir in the red wine vinegar and half (¼ cup) of the chopped cilantro. Salt and pepper to taste. 
  7. Serve hot with cilantro garnish and other optional toppings. 

Notes

  • For a pureed soup, you can blend the entire pot.
  • For a chunky soup, don't puree at all.
  • Store in an airtight container in the refrigerator for up to 5 days.
  • Store in a freezer-safe container in the freezer for up to 3 months.

Did you make this recipe?

We'd love to see it! Tag us and use #MyPlantBasedFamily!

© Holly Yzquierdo

Filed Under: Daniel Fast Recipes, Recipes, Soup, Soups, Stews, & Chili

Rice Cooker Cilantro and Lime Rice

January 17, 2024 by Holly Yzquierdo Leave a Comment

RICE COOKER CILANTRO AND LIME RICE

My family loves Mexican flavors, so I’m making this easy rice cooker cilantro and lime rice on repeat. It’s a zesty twist on plain rice that pairs well with Mexican-inspired dishes.

Making this recipe in a rice cooker is super simple, trust me, we eat a lot of rice. Plus, there are several variations to keep the flavors fresh week after week.

Can I Use a Different Kind of Rice?

Yes, you can use different types of rice, but keep in mind that cooking times and water ratios may vary. Adjust the recipe accordingly based on the rice variety you choose.

Can I Make Cilantro and Lime Rice without a Rice Cooker?

Absolutely! You can cook the rice on the stovetop following package instructions for the specific type of rice you are using. Once cooked, proceed with the steps to add cilantro, lime, salt, and pepper.

Can I Adjust the Recipe for a Larger Crowd?

Simply double or triple the quantities of all the ingredients to accommodate a larger group. Ensure that your rice cooker can handle the increased volume. Otherwise, it could overflow making a big mess!

Can I Use Bottled Lime Juice Instead of Fresh Lime Juice?

While fresh lime juice is recommended for the best flavor, you can use bottled lime juice as a convenient alternative.

How to Make Cilantro and Lime Rice in a Rice Cooker

Ingredients

  • 1 cup Basmati Rice
  • 2 cups Water
  • 4 tbsp Chopped Cilantro
  • 2 tbsp Lime Juice
  • 3/4 tsp Salt
  • 1/2 tsp Black Pepper

Step 1 – Rinse Rice

Start by rinsing the basmati rice under cold water until the water runs clear. This helps remove excess starch and prevents the rice from becoming too sticky.

Step 2 – Add to Rice Cooker

In the rice cooker, add the rinsed basmati rice, lime juice and water. Close the lid, and start the rice cooker according to its instructions.

Step 3 – Chop Cilantro

While the rice is cooking, finely chop the cilantro.

Step 4 – Fluff Rice

Once the rice cooker indicates the rice is ready, open the lid and gently fluff the rice with a fork.

Step 5 – Add Cilantro

Now add the cilantro to the fluffed rice.

Step 6 – Salt and Pepper

Sprinkle salt and pepper evenly over the rice. You can adjust the seasoning according to your taste preference.

Step 7 – Mix to Combine

Using a fork, gently mix the rice, cilantro, salt and pepper until everything is well combined.

Step 8 – Serve

Spoon the cilantro and lime rice into a serving dish. Garnish with additional chopped cilantro if desired.

Storage

Allow the rice to cool to room temperature before placing it in an airtight container and placing it in the refrigerator. This helps prevent condensation inside the container, which can make the rice soggy.

Consume the refrigerated rice within 3-4 days for the best quality.

While cilantro and lime rice can be frozen, keep in mind that the texture may change slightly upon thawing. If you choose to freeze the cilantro and lime rice, place it in an airtight container or freezer bag. Label it with the date, and consume within 1-2 months.

Tips for the Best Cilantro and Lime Rice

Here are a few tips to ensure your cilantro and lime rice comes out perfectly every time:

  1. Use fresh cilantro and limes for the best flavor. Fresh ingredients contribute significantly to the overall taste of the dish.
  2. Cooking times may vary depending on your rice cooker model. Follow the manufacturer’s instructions for cooking basmati rice.
  3. Taste the rice before serving, and adjust the seasoning if needed. You can add more lime juice, salt, or pepper according to you preference.
  4. If cilantro isn’t your favorite herb, try experimenting with other fresh herbs like parsley or mint. Each herb brings a unique twist to the dish.

Variations

With a few additional ingredients, this recipe can be varied to create whole new flavors. Fiesta rice and coconut cilantro lime rice are winners for my family.

Fiesta Rice

Add finely diced red bell peppers, corn kernels, and black beans to the rice for a colorful and festive twist. This variation is perfect for serving alongside Mexican-inspired dishes, and you know we love those!

Coconut Cilantro Lime Rice

Replace half the water with coconut milk for a tropical flavor. Then garnish the rice with shredded coconut and chopped fresh cilantro for an exotic pairing for seafood or curry dishes.

More Plant Based Side Dishes

If you enjoyed this rice cooker cilantro and lime rice recipe, you’ll love these simple, vegan side dishes too:

  • Instant Pot Mexican Rice
  • Oil-Free Potato Wedges
  • Black Bean Corn Salad with Avocado
  • Instant Pot Mexican Quinoa
  • BBQ Cauliflower Bites
Yield: 4 Servings

Rice Cooker Cilantro Lime Rice

Rice Cooker Cilantro Lime Rice

Create flavorful cilantro lime rice in minutes with a rice cooker.

Prep Time 5 minutes
Cook Time 10 minutes
Total Time 15 minutes

Ingredients

  • 1 cup Basmati Rice
  • 2 cups Water
  • 4 tbsp Chopped Cilantro
  • 2 tbsp Lime Juice
  • 3/4 tsp Salt
  • 1/2 tsp Black Pepper

Instructions

  1. Rinse basmati rice under cold water until it runs clear.
  2. Add rice, lime juice and water to rice cooker. Close lid and start the rice cooker according to its instructions.
  3. Finely chop cilantro.
  4. When rice cooker indicates rice is ready, open the lid and gently fluff rice with a fork.
  5. Pour cilantro over rice.
  6. Add salt and pepper.
  7. Using a fork, gently mix until well combined.
  8. Spoon cilantro and lime rice into a serving dish.
  9. Garnish with additional chopped cilantro (optional).

Notes

  • Use fresh cilantro and limes for the best flavor
  • Cooking times may vary depending on rice cooker model. Follow the manufacturer's instructions for cooking basmati rice.
  • Taste before serving and adjust seasoning as needed.
  • Store in an airtight container in the refrigerator for up to 4 days

Did you make this recipe?

We'd love to see it! Tag us and use #MyPlantBasedFamily!

Filed Under: Mexican Food, Recipes, Side Dishes

Homemade Vegan Ranch

January 17, 2024 by Holly Yzquierdo Leave a Comment

Homemade Vegan Ranch Dressing

Creamy, plant based ranch dressing? Yes! And it’s oil-free too!

Ranch dressing is the most popular salad dressing in the United States. We’ve been known to add ranch on potatoes and salads, as a dip for veggies and crackers, even foods like nachos or fries. It adds a pop of flavor to any food and is pretty easy to make.

Homemade Vegan Ranch Dressing recipe

Easy Vegan Ranch Dressing Recipe

Elevate your greens, veggies and snacks to a whole new level with homemade vegan ranch. It’s not only a healthier alternative, but a flavorful addition to foods that tend to get boring over time. Adding creamy vegan ranch makes vegetables more enticing for anyone, especially kids!

What is Vegan Ranch Made of?

This homemade vegan ranch is made with cashews, lemon juice and spices. No oil! To make it nut-free, try replacing the cashews with vegan mayonnaise or vegan yogurt. That would be more processed that using cashews but safer if you have food allergies.

No matter which version you make, be sure to mix it in a high-powered blender. A food processor or low-powered blender may result in a grainy texture for your ranch.

Homemade Vegan Ranch Recipe

Is it Cheaper to Make Ranch or Buy it?

The true answer to this question depends on where you live and what brand of ranch you buy. I usually have all the ingredients for this recipe in the pantry, so I only have to buy fresh parsley and cashews when I’m ready to make it.

Making ranch at home is a simple way to control the ingredients and tailor the flavor to your liking. Say goodbye to additives and preservatives.

Close up photo of Homemade Vegan Ranch Recipe

How to Make Homemade Vegan Ranch

Ingredients

  • 1 cup Unsalted Cashews
  • 1/2 cup Cold Water
  • Juice from 1/2 Lemon
  • 1 tablespoon White Wine Vinegar
  • 2 teaspoons Fresh Parsley
  • 2 teaspoons Dried Chives
  • 2 teaspoons Dried Dill
  • 3/4 teaspoon Coarse Kosher Salt
  • 1/2 teaspoon Garlic Powder
  • 1/2 teaspoon Onion Powder
Ingredients for Homemade Vegan Ranch Recipe

Step 1 – Boil Cashews

Boil the cashews for 10 minutes. Alternatively, the cashews can be soaked over night instead of boiling. Drain, but do not rinse.

Then transfer the cashews to a high-powered blender. (Using any other appliance may result in a grainy texture.)

Step 2 – Blend

Add the remainder of the ingredients to the blender.

For the water, add 1/8 cup at a time until your ranch reaches the consistency you like. Less water will create a thicker ranch, which makes a great dip. More water thins the ranch to a consistency better suited for salad dressing.

Mix on high speed for 2-3 minutes until the ranch is creamy and smooth.

Use a spatula to scrape down the sides of the blender. This will help the finished recipe achieve a smooth consistency.

Step 3 – Salt to Taste

Taste the ranch and add more salt if needed.

Enjoy dipping, drizzling and adding your vegan ranch dressing to a variety of foods. You can eat it right away, but I recommend placing it in an airtight container in the refrigerator for an hour or more before serving. Chilling the ranch will help the flavors meld together.

Flavor Variations

Feel free to get creative with your vegan ranch by incorporating additional ingredients to suit your taste. Here are a few ideas:

  • Smoked paprika for a hint of smokiness
  • Apple cider vinegar (instead of white wine vinegar)
  • Dijon mustard to add a little kick
  • A touch of maple syrup for a hint of sweetness

Nut-Free Option

Use vegan mayonnaise or vegan yogurt in place of the cashews to make your ranch nut-free. The result is a much smoother consistency.

Storage

Store any leftovers in an airtight container in the refrigerator for up to five days.

More Plant-Based Dressings

If you enjoyed this recipe, you’ll love these vegan dressing too:

  • Raspberry Vinaigrette Salad Dressing
  • Creamy Italian Salad Dressing (Oil-Free)
  • Homemade BBQ Sauce
  • Creamy Brown Gravy (Gluten-Free)
  • Oil-Free Hummus
Yield: 6 Servings

Homemade Vegan Ranch

Homemade Vegan Ranch Dressing

Smooth and creamy ranch perfect for topping salads, potatoes and other vegetables.

Prep Time 5 minutes
Cook Time 10 minutes
Total Time 15 minutes

Ingredients

  • 1 cup Unsalted Cashews
  • 1/2 cup Cold Water
  • Juice from 1/2 Lemon
  • 1 tblsp White Wine Vinegar
  • 2 tsp Fresh Parsley
  • 2 tsp Dried Chives
  • 2 tsp Dried Dill
  • 3/4 tsp Coarse Kosher Salt
  • 1/2 tsp Garlic Powder
  • 1/2 tsp Onion Powder

Instructions

  1. Boil cashews for 10 minutes. (Alternatively, cashews can be soaked overnight.)
  2. Drain. Do not rinse.
  3. Transfer cashews to a high-powered blender.
  4. Add remainder of ingredients, mixing in 1/8 cup of water at a time.
  5. Mix on high speed 2-3 minutes until creamy and smooth.
  6. Add salt to taste.

Notes

  • Add less water for a thicker ranch dip and more for a thinner dressing
  • Make it nut-free by using vegan mayonnaise or vegan yogurt instead of cashews
  • Store in an airtight container in the refrigerator for up to 5 days

Recommended Products

As an Amazon Associate and member of other affiliate programs, I earn from qualifying purchases.

  • Amazon Brand - Happy Belly Chives Freeze Dried, 0.2 Oz
    Amazon Brand - Happy Belly Chives Freeze Dried, 0.2 Oz
  • Nut Cravings - Raw Whole Cashews, Unsalted, Shelled, Superior to Organic (16oz - 1 LB) Brazil Bulk Nuts Packed Fresh in Resealable Bag Healthy Protein Food Snack All Natural Keto Friendly Vegan Kosher
    Nut Cravings - Raw Whole Cashews, Unsalted, Shelled, Superior to Organic (16oz - 1 LB) Brazil Bulk Nuts Packed Fresh in Resealable Bag Healthy Protein Food Snack All Natural Keto Friendly Vegan Kosher
  • Blendtec Total Blender Classic - Includes FourSide Jar (75 oz) - 10-Speed Professional-Grade Countertop Blender - High-Power Kitchen Blender with 6 Pre-Programmed Cycles - Black
    Blendtec Total Blender Classic - Includes FourSide Jar (75 oz) - 10-Speed Professional-Grade Countertop Blender - High-Power Kitchen Blender with 6 Pre-Programmed Cycles - Black

Did you make this recipe?

We'd love to see it! Tag us and use #MyPlantBasedFamily!

© Holly Yzquierdo
Category: Sauces, Dips, and Salad Dressings

Filed Under: Recipes, Sauces, Dips, and Salad Dressings

BBQ Chickpea Salad

February 12, 2023 by Holly Yzquierdo Leave a Comment

Barbecue Chickpea Salad

This BBQ Chickpea Salad is a delicious source of protein and nutrients that is sure to get you through the day. I pair it with my Homemade BBQ Sauce and a side of sweet potatoes for a satisfying meal full of flavor. You can use your favorite store-bought BBQ sauce if you don’t want to make your own.

You can’t go wrong with chickpeas. They are great to use as a protein base that takes on any flavor, much like chicken. With a bold barbecue sauce, this salad doesn’t even need dressing!

Is Chickpea Salad Healthy?

Chickpeas are a fantastic source of protein. When combined with a variety of vegetables such as corn, tomatoes and onion, this BBQ Chickpea Salad is rich in nutrients. The addition of avocado provides a healthy fat too.

Choosing a BBQ Sauce

Barbecue sauces can be tangy, spicy, sweet or any combination thereof. Any kind will work to coat your chickpeas. I love my own Homemade BBQ Sauce because I can control the ingredients and know exactly what’s in it. My version is sweet and tangy if you want to give it a try. It’s great to have on hand for a variety of recipes. This Spaghetti Squash BBQ Sandwich is one of my favorites.

How to Make BBQ Chickpea Salad

Ingredients

  • 1 can Chickpeas (15 ounce can, drained and rinsed)
  • 1/2 cup Barbecue Sauce
  • 1 head Romaine (or lettuce of your choice, chopped)
  • 1 can Black Beans (15 ounces, drained and rinsed)
  • 1 Tomato (or premade Pico de Gallo)
  • 2 Tbsps White Onion (diced)
  • 1 Jalapeno Pepper (diced for Pico and sliced for garnish, or premade Pico de Gallo)
  • 1 can Corn (drained and rinsed)
  • 1 cup Organic Salsa (divided)
  • 2 Avocado (optional, diced)

Step 1 – Preheat

Preheat your oven to 350 degrees.

Step 2 – Prepare Chickpeas

Drain and rinse the chickpeas. Dry them, and remove any skins by rubbing them with a paper towel.

Step 3 – Bake

Put the chickpeas in a pan and cover with barbecue sauce. Stir so they are covered evenly. Bake for 20 minutes.

Step 4 – Make Pico de Gallo

Dice tomato, onion and a few slices of jalapeno. Stir well. You may add salt or cilantro, but it’s not needed.

Step 5 – Assemble Salad

Divide the lettuce, black beans, corn, BBQ chickpeas, Pico de Gallo (tomatoes, onions and jalapeno) and avocado between bowls. Top with remaining salsa and enjoy!

Additional Toppings

For added flavor, try topping the salad with cilantro, sliced jalapenos or lime wedges. It also taste great with sweet potatoes. I batch cook them at the beginning of the week. Then eat them as a side or mixed into the salad.

Storage

Refrigerate any leftovers in an airtight container for up to five days. To keep avocado from browning, dice just before serving.

More Plant-Based Recipes with Chickpeas

If you enjoyed this recipe, check out these other ideas using chickpeas:

  • Sheet Pan Chickpea and Sweet Potato Tacos
  • Flavor Packed Moroccan Chickpeas
  • Chickpea Nuggets
  • Oil-Free Hummus
  • Plant-Based Mediterranean Bowl
  • Roasted Red Pepper Hummus
  • Instant Pot Chickpea and Rice Soup
Yield: 4 Servings

BBQ Chickpea Salad

BBQ Chickpea Salad

This refreshing take on salad features chickpeas flavored with your favorite barbecue sauce. The southwest flavors combine to create a fulfilling, plant-based meal perfect for lunch or dinner.

Prep Time 30 minutes
Cook Time 20 minutes
Total Time 50 minutes

Ingredients

  • 1 can Chickpeas (15 ounce can, drained and rinsed)
  • 1/2 cup Barbecue Sauce
  • 1 head Romaine (or lettuce of your choice, chopped)
  • 1 can Black Beans (15 ounces, drained and rinsed)
  • 1 Tomato (or premade Pico de Gallo)
  • 2 Tbsps White Onion (diced)
  • 1 Jalapeno Pepper (diced for Pico and sliced for garnish, or premade Pico de Gallo)
  • 1 can Corn (drained and rinsed)
  • 1 cup Organic Salsa (divided)
  • 2 Avocado (optional, diced)

Instructions

  1. Preheat oven to 350 degrees.
  2. Drain and rinse chickpeas. Dry them, and remove any skins by rubbing them with a paper towel.
  3. Put the chickpeas in a pan and cover with barbeque sauce. Stir so they are covered evenly. Bake for 20 minutes.
  4. Dice tomato, onion and a few slices of jalapeno. Stir well. You may add salt or cilantro, but it's not needed.
  5. Divide the lettuce, black beans, corn, BBQ chickpeas, Pico de Gallo (tomatoes, onions and jalapeno) and avocado between bowls. Top with remaining salsa and enjoy!

Notes

  • Leftovers: Refrigerate in an airtight container for up to 5 days. To keep the avocado from browning, dice just before serving.
  • Additional Toppings: Add cilantro, sliced jalapenos, or lime wedges.
  • Sweet Potatoes: This salad also tastes great with sweet potatoes. Bake them while batch cooking. Then add them as a side or mix them into the salad.

Did you make this recipe?

We'd love to see it! Tag us and use #MyPlantBasedFamily!

© Holly Yzquierdo

Filed Under: Recipes, Salads & Wraps

« Previous Page
Next Page »

Primary Sidebar

Footer

Find it here!

Amazon Affiliate Disclosure

Holly Yzquierdo of My Plant-Based Family is a participant in the Amazon Services LLC Associates Program, an affiliate advertising program designed to provide a means for sites to earn advertising fees by advertising and linking to amazon.com.

Disclosures

Unauthorized use and/or duplication of any part of this website or content without express and written permission from Holly Yzquierdo is prohibited. Excerpts and links may be used, provided that full credit is given to Holly Yzquierdo and MyPlantBasedFamily.com with links to the original content.

More information on our Privacy Policy and other Disclosures are available.

Copyright © 2026 · Wellness Pro on Genesis Framework · WordPress · Log in