• Skip to primary navigation
  • Skip to main content
  • Skip to primary sidebar
  • Skip to footer

My Plant-Based Family

Eating Whole Food, Plant-Based Diet recipes, On a Budget.

  • Plant-Based Recipes
    • Breakfast
    • Main Dish
    • Instant Pot
    • Daniel Fast Recipes
    • Side Dishes
    • Bread and Muffins
    • Salad and Wraps
    • Soup, Stews, and Chili
    • Sauces, Dips, and Salad Dressings
    • Desserts
    • Crock Pot
    • Mexican Food
  • Videos
  • Resources
    • Getting Started
    • Books
      • The Plant-Based Diet Starter Guide
      • The Plant-Based Holiday Meal Plan & Cookbook
  • Meal Plans
    • Meal Plans 2020
    • Meal Plans 2019
    • Meal Plans 2017
    • Meal Plans 2016
    • Meal Plans 2015
    • Meal Plans 2014
    • Meal Plans 2013
  • About Us
    • Our Family
    • Contact Me
    • Our Food Philosophy
    • Disclosure Policy
      • Privacy Policy
  • Daniel Fast Recipes

Daniel Fast Recipes

Tofu Scramble

May 3, 2019 by Holly Yzquierdo 3 Comments

Tofu Scramble

Most days we have some version of oatmeal for breakfast. We would reserve other breakfasts that require more cooking for weekends. This Tofu Scramble is so quick and easy, you’ll be able to make it on a weekday!

Tofu Scramble

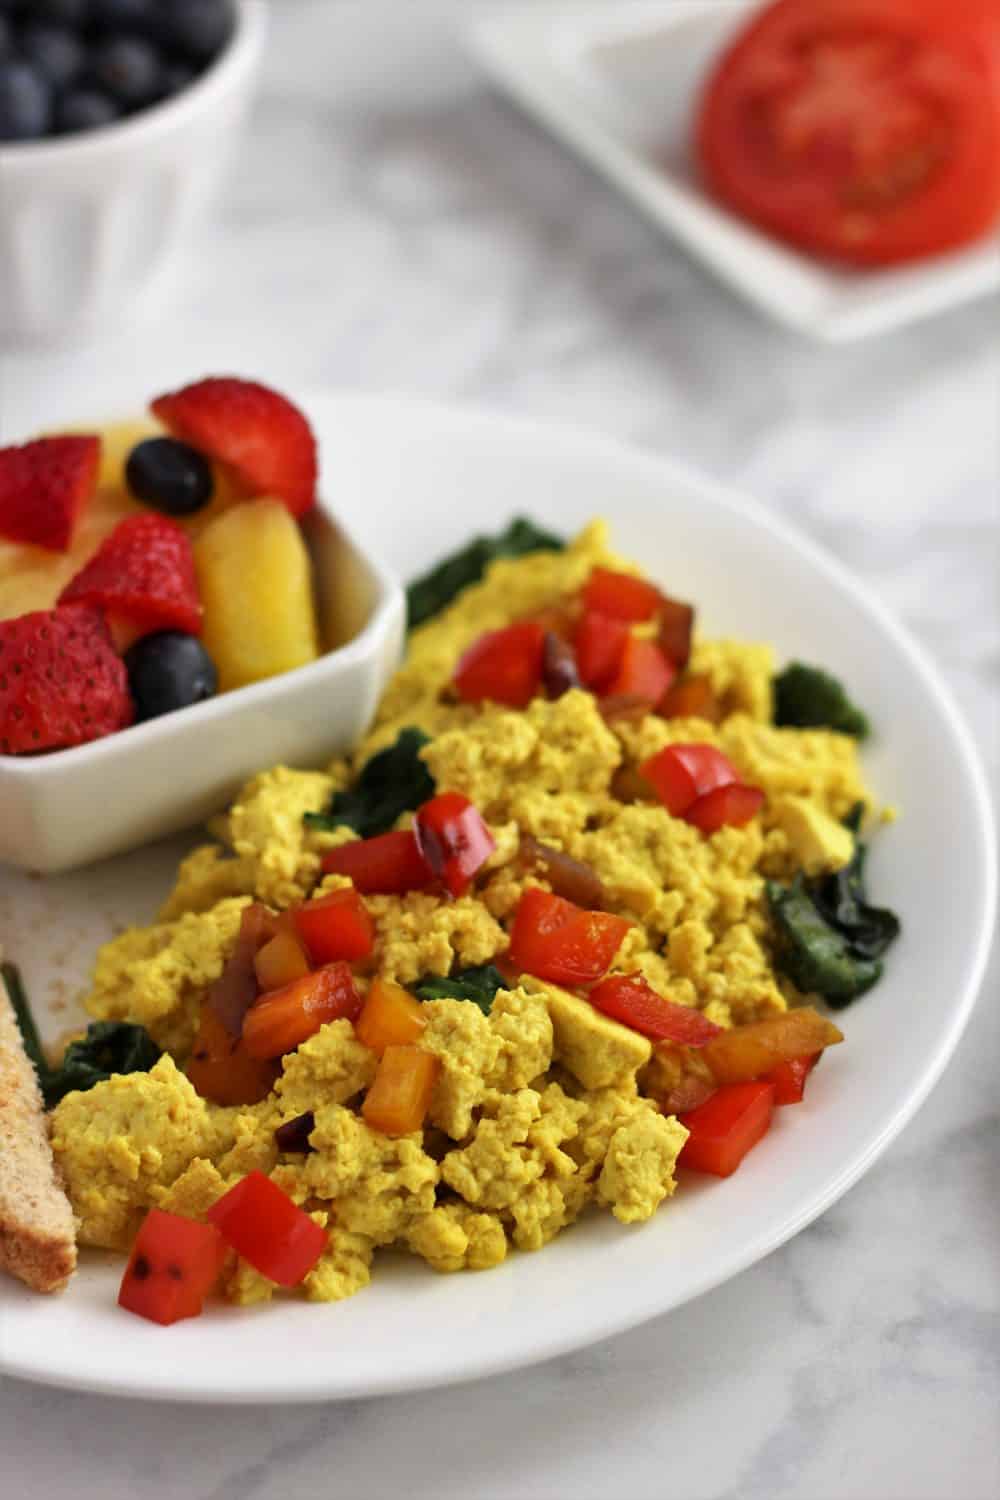
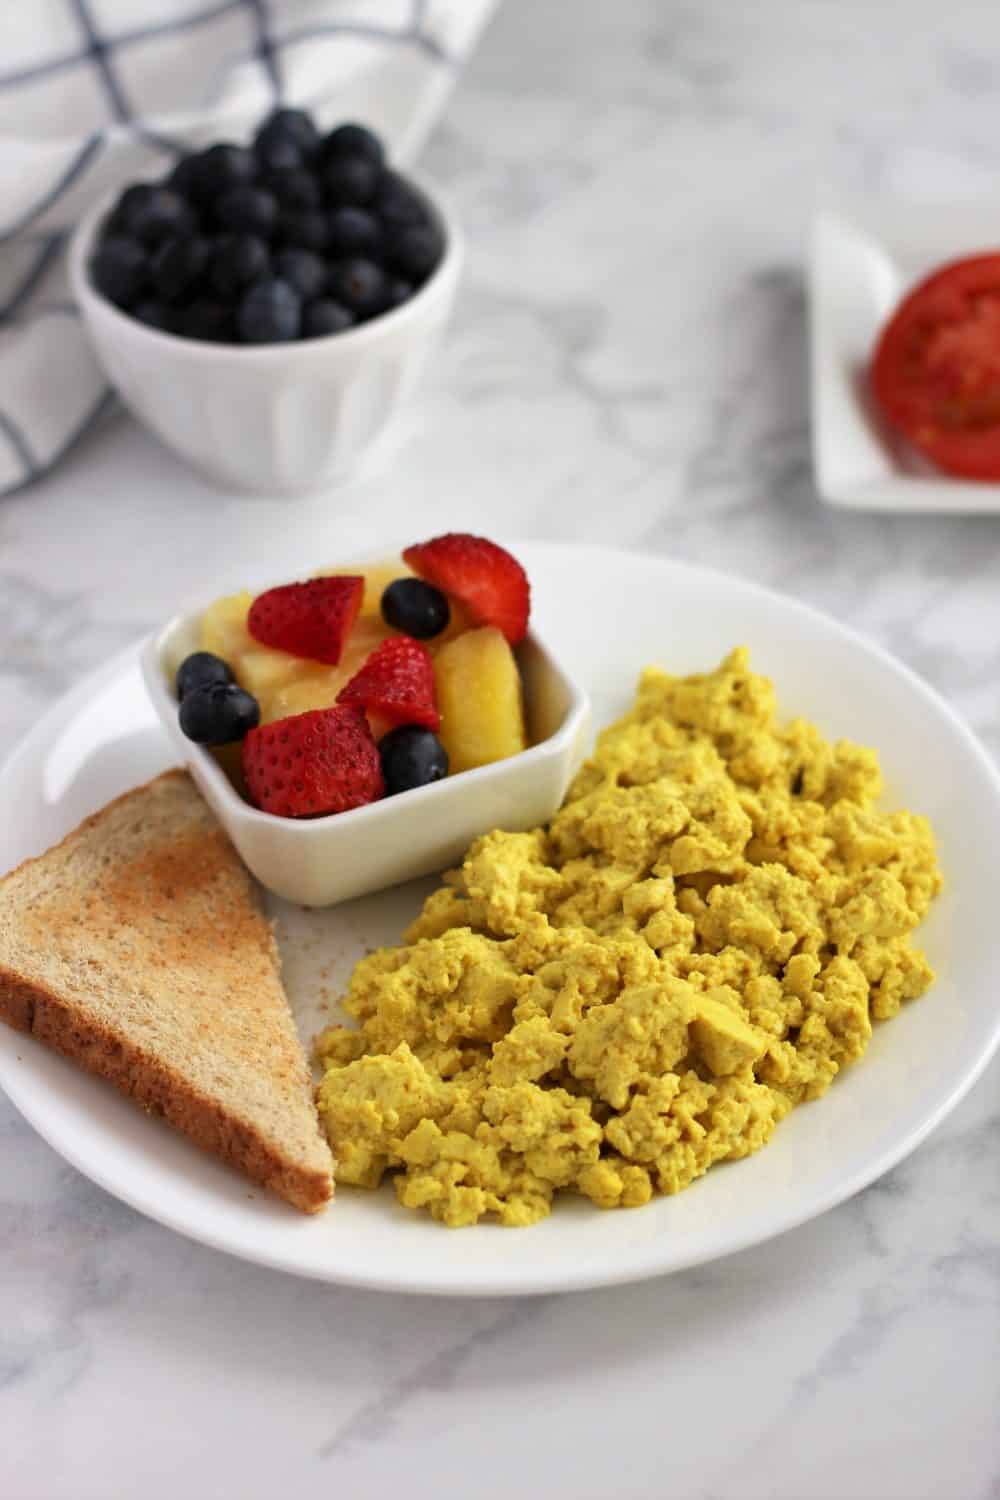
In fact, we love it so much, I’m thinking it’s going to start making an appearance on our dinner meal plan! Just like a traditional scramble, you can add just about anything you want to this. Our kids prefer it plain but I love it with peppers and veggies and always salsa!

Tofu Scramble makes a great meal prep recipe because it stores well in the refrigerator. I’ve got two containers waiting for tomorrow.

Tofu Scramble

I recently shared some tips for choosing and making tofu. For this recipe, I use extra firm tofu since that is what I usually purchase but you could use firm tofu. I don’t press the tofu before using it in this recipe because I prefer to break pieces off and squeeze the water out by hand. I feel like this makes it look more like a traditional scramble.

Tofu Scramble

Tofu Scramble

I love this Tofu Scramble with peppers and onions but my kids prefer it without. I compromise by trying to cook the veggies in half the pan, you could also use a separate pan. For this recipe, I’m designating the onions and peppers as optional but for me, they make the dish.

Ingredients

  • 1 block organic extra firm tofu
  • 1 teaspoon sea salt
  • 1/2 teaspoon garlic powder
  • 1/2 teaspoon onion powder
  • 1/4 teaspoon turmeric
  • 2 tablespoons nutritional yeast (see note below)
  • 1/4 cup water
  • 1 bell pepper, I used half red and half yellow (optional)
  • 1/4 cup diced onion (optional)
  • 1 cup of greens, spinach or mixed greens (optional)

Do

  1. Use your hands to pull bite sized pieces of tofu apart. Squeeze the tofu in your hand to squeeze out excess water, then place it in a non-stick skillet.
  2. Turn the heat up to medium and sprinkle all the salt, garlic powder, onion powder, turmeric and nutritional yeast over the tofu. Give it a stir, then add the water over the top and continue to stir until it’s all combined.
  3. If cooking onions, peppers and greens, add them now. You can try to keep them away from the rest of the tofu if needed or mix it all together.
  4. Continue to cook until all the water has cooked out, stir occasionally, until all the veggies are done and to tofu is warm.
  5. Taste test a bite to see if it needs more seasoning. Black pepper is another good choice.

Enjoy

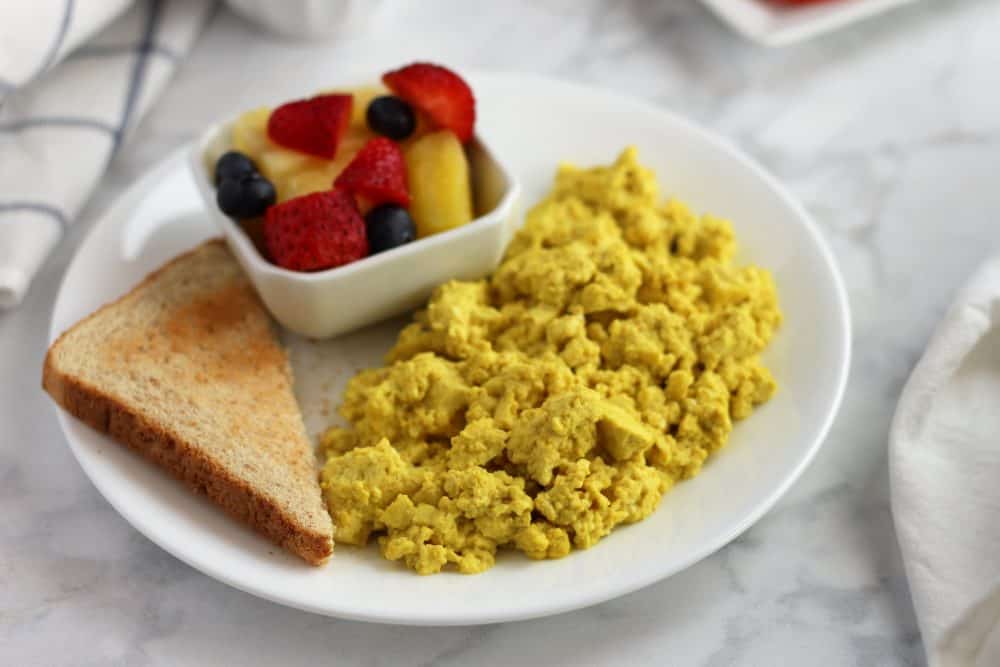
We love this with a side of toast, fruit and potatoes. Sometimes we will even wrap it up in a tortilla or serve with pancakes! This Tofu Scramble reheats really well and is perfect for meal prep!

Tofu Scramble

Note

For years I’ve used a fortified nutritional yeast. Last year I noticed that every time I ate something with a lot of nutritional yeast I would get a lot of inflammation. My friend Anne at Recipe for Life recommended I try unfortified nutritional yeast and even sent me a big bag to try!

So far I haven’t noticed the same inflammation issue but I’ve been a bit gun shy. I haven’t tried recipes with a lot of nutritional yeast but using this recipe and others with just a little haven’t caused any issues.

I have noticed that this unfortified nutritional yeast doesn’t make food as yellow as the fortified version. The turmeric I used helps make the tofu look a bit more egg-like for those folks in our families that want that look.

Want more eggy flavor? A lot of people will use a special kind of salt to give vegan foods an egg like flavor. I don’t typically use it because I don’t feel like I need it or really miss the egg flavor. If you miss the flavor of eggs I recommend you buy it.

Tofu Scramble

Tofu Scramble

Quick and easy Tofu Scramble is the perfect plant-based diet breakfast recipe!

Ingredients

  • 1 block organic extra firm tofu
  • 1 teaspoon sea salt
  • 1/2 teaspoon garlic powder
  • 1/2 teaspoon onion powder
  • 1/4 teaspoon turmeric
  • 2 tablespoons nutritional yeast (see note below)
  • 1/4 cup water
  • 1 bell pepper, I used half red and half yellow (optional)
  • 1/4 cup diced onion (optional)
  • 1 cup of greens, spinach or mixed greens (optional)

Instructions

  1. Use your hands to pull bite sized pieces of tofu apart. Squeeze the tofu in your hand to squeeze out excess water, then place it in a non-stick skillet.
  2. Turn the heat up to medium and sprinkle all the salt, garlic powder, onion powder, turmeric and nutritional yeast over the tofu. Give it a stir, then add the water over the top and continue to stir until it’s all combined.
  3. If cooking onions, peppers and greens, add them now. You can try to keep them away from the rest of the tofu if needed or mix it all together.
  4. Continue to cook until all the water has cooked out, stir occasionally, until all the veggies are done and to tofu is warm.
  5. Taste test a bite to see if it needs more seasoning. Black pepper is another good choice.

Notes

Want more eggy flavor? A lot of people will use a special kind of salt to give vegan foods an egg like flavor. I don’t typically use it because I don’t feel like I need it or really miss the egg flavor. If you miss the flavor of eggs I recommend you buy it.

Did you make this recipe?

We'd love to see it! Tag us and use #MyPlantBasedFamily!

© Holly Yzquierdo

Filed Under: Breakfast, Daniel Fast Recipes, Recipes Tagged With: Breakfast, Plant Based Diet, Vegan

Oil-Free Hummus

April 11, 2019 by Holly Yzquierdo 986 Comments

Oil-Free Hummus

Oil-Free Hummus was one of the first recipes I created when I first started a plant-based diet in 2011. Hummus isn’t required for plant-based eating but almost everyone I know who eats plant-based loves hummus.

This page contains affiliate links.

Oil-Free Hummus

Oil-Free Hummus

If you are eating an oil-free, whole food, plant-based diet, it’s important that you make your own hummus. Almost all store bought containers of hummus have added oil. I avoid added oil and don’t cook with oil. The only exception I made is that I will use cooking spray when making pancakes or muffins so they don’t stick to the pan. Since I don’t make either very often I’m ok with that exception.

My hummus is not traditional. I don’t use olive oil or tahini. I’ve used tahini in a few recipes but I don’t notice much difference so I just leave it out. That’s one less ingredient, one less measuring cup, and less fat.

Oil-Free Hummus

Homemade Hummus is Easy

When it comes to cooking, hummus is one of the easiest things there is. You don’t really need to cook and you only need a few ingredients. This time, I used canned chickpeas but when I’m batch cooking, I’ll make a big batch of chickpeas so I can make hummus, have chickpeas for Chickpea Nuggets and leftovers to add to salads.

You do need a high-speed blender or food processor. I’ve used both with good results. I’ve had this Hamilton Beach 10 cup food processor for 8 years and it still works great. I also have a Blendtec blender that we got many years ago at Costco. I’ve made countless sauces and dips in these two.

Oil-Free Hummus

Choosing Chickpeas

My favorite chickpeas, a.k.a. garbanzo beans, come from Palouse Brand. They are non-GMO and USA grown. In fact, you are given the field location and harvest date. They are the best chickpeas I’ve ever eaten.

When I’m out of Palouse Brand, or when I don’t have time to cook up a batch in my Instant Pot, I’ll use canned chickpeas. Which ever you choose to use, don’t toss out the liquid that comes with the chickpea, you’ll use it.

Oil-Free Hummus

Oil-Free Hummus

This hummus is only flavored with lemon juice, garlic and optional salt. I like to sprinkle a little paprika on top as well but it’s optional.

Ingredients

  • 1 15 oz can of chickpeas (or 2 cups of cooked chickpeas), reserve the liquid
  • 4 cloves of garlic
  • 1 lemon, or 1/4 cup lemon juice
  • 1/4 to 1/2 cup of chickpea liquid
  • salt to taste, optional
  • paprika for garnish, optional

Do

  1. Pour your chickpeas into your blender or food processor. Save the liquid to use soon.
  2. Add your garlic and lemon juice. If your lemon isn’t juicy enough for 1/4 cup of lemon juice, you may want to add another lemon or some lemon zest to give it more flavor.
  3. Add 1/4 cup of the chickpea liquid, this is also known as aqua faba and some people whip it like eggs to make vegan meringues and other interesting dishes.
  4. Add optional salt if using.
  5. Blend or process until your hummus is creamy and smooth. If it’s not smooth enough, add another 1/4 cup of chickpea liquid and blend again.
  6. Pour into a bowl and garnish if desired. Enjoy with veggies, on sandwiches or any other thing you think of.

I love hummus. I often use it as a salad dressing or a sandwich spread. It’s so versatile and filling. Plus, this recipe is lower in fat with no oil or tahini so you don’t have to worry about over eating it. It’s like having a serving of beans with your veggies.

If you like this recipe, make sure to try my Cilantro Jalapeno Hummus, Spinach Artichoke Dip and Red Pepper Dip!

Oil-Free Hummus

Oil-Free Hummus

This hummus is only flavored with lemon juice, garlic and optional salt. I like to sprinkle a little paprika on top as well but it’s optional.

Use this as your base recipe and add your favorite flavors.

Prep Time 10 minutes
Total Time 10 minutes

Ingredients

  • 1 15 oz can of chickpeas (or 2 cups of cooked chickpeas), reserve the liquid
  • 4 cloves of garlic
  • 1 lemon, or 1/4 cup lemon juice
  • 1/4 to 1/2 cup of chickpea liquid
  • salt to taste, optional
  • paprika for garnish, optional

Instructions

  1. Pour your chickpeas into your blender or food processor. Save the liquid to use soon.
  2. Add your garlic and lemon juice. If your lemon isn’t juicy enough for 1/4 cup of lemon juice, you may want to add another lemon or some lemon zest to give it more flavor.
  3. Add 1/4 cup of the chickpea liquid, this is also known as aqua faba and some people whip it like eggs to make vegan meringues and other interesting dishes.
  4. Add optional salt if using.
  5. Blend or process until your hummus is creamy and smooth. If it’s not smooth enough, add another 1/4 cup of chickpea liquid and blend again.
  6. Pour into a bowl and garnish if desired. Enjoy with veggies, on sandwiches or any other thing you think of.

Notes

Use this hummus as a salad dressing or a sandwich spread. It’s so versatile and filling. Plus, this recipe is lower in fat with no oil or tahini so you don’t have to worry about over eating it.

Recommended Products

As an Amazon Associate and member of other affiliate programs, I earn from qualifying purchases.

  • Hamilton Beach 10-Cup Food Processor 
    Hamilton Beach 10-Cup Food Processor 

Did you make this recipe?

We'd love to see it! Tag us and use #MyPlantBasedFamily!

© Holly Yzquierdo
Category: Sauces, Dips, and Salad Dressings

Filed Under: Daniel Fast Recipes, Recipes, Sauces, Dips, and Salad Dressings Tagged With: Plant Based Diet, Recipes

Plant-Based Mediterranean Bowl

March 8, 2019 by Holly Yzquierdo 6 Comments

Every once in a while I get on a kick where I only want to eat one thing, fortunately for me that one thing is a super simple, whole food, Plant-Based Mediterranean Bowl!

Plant-Based Mediterranean Bowl

The temperatures in Arizona area finally on the rise. I’m slowly putting my soups aside and embracing fresh, raw veggies! If you are still frozen I’m sorry! Maybe you can enjoy this bowl in front of the fire and think about warmer days ahead!

The great thing about Mediterranean Bowls is that you can easily adapt it based on what you have and what you like.

This page contains affiliate links.

Gluten-Free Mediterranean Bowl

Most of the Mediterranean Bowls I’ve seen use quinoa but some use rice or no grain (or pseudo-grain) at all. Quinoa is great because it’s gluten-free, easy to cook, and I always have some in my pantry.

While the quinoa cooked, I got the veggies ready. Romaine lettuce is my favorite but you can choose your favorite greens. I love red and yellow bell peppers, cucumbers, tomatoes, and red onion. Chickpeas were the perfect addition because I also made hummus! My Cilantro Jalapeno Hummus was perfect in this but I may try my Red Pepper Dip next time.

I set out all the veggies, chickpeas and quinoa and my son made his own bowl. His was pretty much the same except he added apples and cuties and left out the hummus and peppers.

After cutting up all the veggies, I have enough for lunches all week plus some snacks! I’ve been able to make a quick salad with the veggies too. It’s so much easier to eat healthy meals when they are prepped and ready to go!

There are endless combinations you can choose for your bowl if this one isn’t exactly your thing.

  • Sweet Peppers
  • Artichokes
  • Avocado
  • Pickled Onions
  • Carrots
  • Sprouts
  • Micro Greens
  • Roasted Veggies
  • Fresh Herbs
  • Spinach

The list is endless! Please leave a comment and let me know what you want to eat in your bowl!

Plant-Based Mediterranean Bowl

Oil-Free Mediterranean Bowl

Most Mediterranean Bowls are topped with oil or and oil and vinegar type dressing. The hummus does a great job replacing the need for oil and the extra squeeze of lemon gives it an extra boost of acidity. You do not need the oil!

My boys love balsamic vinegar, if you are a fan, you could try it in this bowl. I didn’t think it would mix well with the hummus so I left it out this time.

When I made this bowl I bought olives to go with it. Our grocery store has an olive bar that I’d been wanting to try. My kids and husband love olives so I thought this would make the bowl a little more fun for them.

I, however, do not like olives. I’ve never found an olive I didn’t want to spit out! HA! While I put a few olives in my bowl I didn’t actually eat them. I loved my bowl so much I couldn’t risk it. More for my family.

Plant-Based Mediterranean Bowl

Plant-Based Mediterranean Bowl

This Plant-Based Mediterranean Bowl is gluten-free, nut-free, and perfect for the veggie lovers in your house. This meal is easy to make ahead during meal prep and take for lunch or enjoy it at the end of a long day. These measurements make 4+ bowls.

Ingredients

  • 1 cup uncooked quinoa
  • 2 cups water
  • 1 head romaine lettuce (or your favorite lettuce).
  • 1 cucumber
  • 1-2 bell peppers (I used 1 red and 1 yellow)
  • 1/4 cup sliced red onion
  • 1 cup grape tomatoes (or equivalent fresh diced tomatoes)
  • 1 can chickpeas, drained and rinsed
  • 1 lemon
  • Kalamata olives (optional)
  • 1 cup hummus

Do

  1. Bring 2 cups water to boil, then add the quinoa and cover with a lid. Turn pot down to simmer. Cook for 10 minutes or until quinoa is done and water is absorbed. Fluff quinoa and set aside.
  2. While quinoa is cooking, prepare the veggies. If you haven’t already, wash and dry them. I prefer to peel the cucumbers, dice the red onion, tear or slice the lettuce, and dice the bell pepper. I like to leave my bell peppers in pretty big chunks but its just a personal preference. I’ll leave the tomatoes whole if I’m saving the bowl for later and cut the tomatoes in half if I’m having it now.
  3. Create an assembly line with all the veggies. Drain and rinse your chickpeas.
  4. If you are making hummus from scratch, make it now.
  5. Assemble your bowls.
    1. Make a bed of lettuce with 1 cup romaine.
    2. Scoop in 1/4-1/2 cup cooked quinoa.
    3. Arrange fresh veggies on both sides of the quinoa.
    4. Add a dollop of hummus. Since it’s oil-free, I used about 1/4 cup.
    5. Spoon in about 1/3 cup of chickpeas.
    6. Garnish with lemon wedge and olives.

Serve

This Mediterranean Bowl is perfect for a weekend meal prep that can be enjoyed all week. It tastes just as good coming out of a lunch bag as it does when it’s freshly made, you can’t say that about most lunches!

Yield: 4 Bowls

Plant-Based Mediterranean Bowl

Plant-Based Mediterranean Bowl

This Plant-Based Mediterranean Bowl is gluten-free, nut-free, and perfect for the veggie lovers in your house. This meal is easy to make ahead during meal prep and take for lunch or enjoy it at the end of a long day.

Ingredients

  • 1 cup uncooked quinoa
  • 2 cups water
  • 1 head romaine lettuce (or your favorite lettuce).
  • 1 cucumber
  • 1-2 bell peppers (I used 1 red and 1 yellow)
  • 1/4 cup sliced red onion
  • 1 cup grape tomatoes (or equivalent fresh diced tomatoes)
  • 1 can chickpeas, drained and rinsed
  • 1 lemon
  • Kalamata olives
  • 1 cup hummus

Instructions

Bring 2 cups water to boil, then add the quinoa and cover with a lid. Turn pot down to simmer. Cook for 10 minutes or until quinoa is done and water is absorbed. Fluff quinoa and set aside.

While quinoa is cooking, prepare the veggies. If you haven’t already, wash and dry them. I prefer to peel the cucumbers, dice the red onion, tear or slice the lettuce, and dice the bell pepper. I like to leave my bell peppers in pretty big chunks but its just a personal preference. I’ll leave the tomatoes whole if I’m saving the bowl for later and cut the tomatoes in half if I’m having it now.

Create an assembly line with all the veggies. Drain and rinse your chickpeas.

If you are making hummus from scratch, make it now.

Assemble your bowls by making a bed of lettuce with 1 cup romaine. Scoop in 1/4-1/2 cup cooked quinoa, then arrange fresh veggies on both sides of the quinoa.

Add a dollop of hummus. Since it’s oil-free, I used about 1/4 cup.

Spoon in about 1/3 cup of chickpeas and garnish with lemon wedge and olives.

Did you make this recipe?

We'd love to see it! Tag us and use #MyPlantBasedFamily!

© Holly Yzquierdo
Do you eat Mediterranean Bowls? What are your favorite ingredients?

Filed Under: Daniel Fast Recipes, Main Dish Recipes, Recipes, Salads & Wraps Tagged With: Plant Based Diet, Quinoa, Recipes, Vegan

Chipotle Black Bean Chili

February 20, 2019 by Holly Yzquierdo 7 Comments

Chipotle Black Bean Chili

Nothing beats a bowl of hot chili when it’s cold outside!

Chipotle Black Bean Chili

My Texas Style Chili will always have my heart but sometimes I like to mix it up with different recipes. This recipe uses more ingredients but also has a more complex flavor. With ingredients like chipotle peppers, quinoa, and cinnamon all in one dish, you know you are getting something unexpected.

Chipotle Black Bean Chili

This recipe is easy to dump in the Crock Pot or Instant Pot after some quick chopping and measuring spices. I use canned beans and tomatoes for ease. If you aren’t a fan of spicy, you may want to reduce or omit the chipotle peppers. They give it a great flavor but it’s spicy!

Chipotle Black Bean Chili ingredients

Chipotle Black Bean Chili

Like all my recipes, you can easily change-up the ingredients based on your likes and dislikes, or what you have in your pantry!

Ingredients:

  • ½ of a 7 oz. can Chipotle peppers in adobo sauce
  • 2 cans black beans, drained and rinsed
  • 1 cup frozen or canned corn
  • ¾ cup uncooked quinoa
  • 1 small red onion, chopped
  • 5 garlic cloves, minced
  • 1 green bell pepper, chopped
  • 1 red bell pepper, chopped
  • 1 large cinnamon stick
  • 1 Tbsp. chili powder
  • 1 Tbsp. oregano (Mexican oregano if you have it!)
  • 2 cups vegetable broth
  • 2 (14 oz.) cans petite diced tomatoes with juice
  • ¼ cup fresh chopped cilantro


Chipotle Black Bean Chili ingredients

Directions:

  1. Place everything up through broth in slow-cooker or Instant Pot. Add in half of the chopped cilantro. (Save the other half of cilantro for garnishing).
  2. If you are cooking in a slow cooker, dump the tomatoes in and give it a stir. If you are using the Instant Pot, set the tomatoes aside for a minute and stir well. Then add the tomatoes, just dump them on top but don’t stir. Sometimes tomatoes and tomato sauces can cause Instant Pot recipes to burn or stick. Leaving the tomatoes on top of the other ingredients will keep that from happening.
  3. If using a slow cooker, cover with the lid then cook on low for 7 to 8 hours, or high for 4 to 6 hours. If using an Instant Pot, close the lid and close the vent. Cook on high, pressing Manual or Pressure Cook (depending on your model) and adjust the time to 10 minutes. I prefer letting the Instant Pot version NPR (natural pressure release) for at least 10 minutes after it’s done.
  4. Stir well and remove the cinnamon stick.
  5. Serve in bowls, garnish with fresh cilantro or add your favorite toppings.

Chili Topping Ideas

There are so many great toppings you can add to chili. My favorites are tortilla chips to give it a little crunch and avocado to help tame the spiciness. Other great ideas are:

  • Cilantro
  • Diced avocados
  • Diced tomatoes
  • Lime wedges
  • Hot sauce
  • Diced green onion
  • Tortilla chips

Chipotle Black Bean Chili

My mom is visiting and loved this chili too. You don’t know my mom but that is saying something. She lives in Oklahoma where she raises horses, dogs, and cattle. She let all her Facebook friends know she ate vegan chili and liked it!

I think it’s safe to say for meat loving friends and family will love it too!

Instant Pot Chipotle Black Bean Chili

Chipotle Black Bean Chili

This interesting plant-based chili recipe is perfect for fall. With ingredients like chipotle peppers, quinoa, and cinnamon all in one dish, you know you are getting something unexpected.

Prep Time 5 minutes
Cook Time 10 minutes
Additional Time 15 minutes
Total Time 30 minutes

Ingredients

  • ½ of a 7 oz. can Chipotle peppers in adobo sauce
  • 2 cans black beans, drained and rinsed
  • 1 cup frozen or canned corn
  • ¾ cup uncooked quinoa
  • 1 small red onion, chopped
  • 5 garlic cloves, minced
  • 1 green bell pepper, chopped
  • 1 red bell pepper, chopped
  • 1 large cinnamon stick
  • 1 Tbsp. chili powder
  • 1 Tbsp. oregano (Mexican oregano if you have it!)
  • 2 cups vegetable broth
  • 2 (14 oz.) cans petite diced tomatoes with juice
  • ¼ cup fresh chopped cilantro

Instructions

1. Place everything up through broth in your Instant Pot. Add in half of the chopped cilantro. (Save the other half of cilantro for garnishing).

2. Set the tomatoes aside for a minute and stir well. Then add the tomatoes, just dump them on top but don’t stir. Sometimes tomatoes and tomato sauces can cause Instant Pot recipes to burn or stick. Leaving the tomatoes on top of the other ingredients will keep that from happening.

3. Close the lid on your Instant Pot and close the vent. Cook on high, pressing Manual or Pressure Cook (depending on your model) and adjust the time to 10 minutes. I prefer letting the Instant Pot version NPR (natural pressure release) for at least 10 minutes after it’s done.

4. Stir well and remove the cinnamon stick.

5. Serve in bowls, garnish with fresh cilantro or add your favorite toppings.

Notes

This recipe has a nice little kick thanks to the adobe peppers. This recipe is suitable for people who like spicy food, children may not enjoy the heat of this recipe.

Did you make this recipe?

We'd love to see it! Tag us and use #MyPlantBasedFamily!

© Holly Yzquierdo
Category: Soups, Stews, & Chili
Don’t forget to pin this recipe and add it to your meal plan! You can follow my Instant Pot board on Pinterest too!

Chipotle Black Bean Chili

Filed Under: Crock Pot, Daniel Fast Recipes, Instant Pot, Main Dish Recipes, Recipes, Soups, Stews, & Chili Tagged With: Crock Pot, Instant Pot, Plant-Based

Instant Pot Breakfast Rice

February 5, 2019 by Holly Yzquierdo 10 Comments

Instant Pot Breakfast Rice

Oatmeal is our typical quick and easy breakfast but when I’m in the mood for something a little different I choose Breakfast Rice.

Instant Pot Breakfast Rice

I like my Breakfast Rice with the same type of flavors as my oatmeal, apples, cinnamon, chia seed and a bit of maple syrup.

Short grain brown rice is my favorite tasting rice. It’s got a slightly nutty flavor and stays bulkier than quick cooking rice. I feel like it’s more filling but you could switch it up and try your favorite type of rice, you will need to adjust the cooking time though.

Since short grain brown rice takes longer to cook than many other types of rice, I like to cook it in my Instant Pot. The best thing about the Instant Pot is being able to get everything started and walk away until its done. No need to stand and watch or stir throughout the cooking time. Just set it and come back when its ready.

Instant Pot Breakfast Rice

This recipe does double duty though because I cook the rice plain, then add the other ingredients after the rice is cooked. I’ve made it the other way and cooked it all together but this way, I can have a batch of cooked brown rice for later, if I double the recipe. Also, when you add the apples and raisins before cooking, they get too soft for my preference. I like my apples and raisins uncooked.

Instant Pot Breakfast Rice

This Breakfast Rice also tastes excellent the next day. I heat it up quickly in the microwave but you could reheat it in on the stove or in the Instant Pot. The only thing I do when I reheat it is add more liquid, usually rice milk but any plant-based milk would work. The rice will absorb any extra liquid when you store it.

Instant Pot Breakfast Rice

My boys love their Breakfast Rice swimming in rice milk. They always add a lot of extra milk to their oatmeal too.

There are many other options besides apples and raisins. Dried cranberries, blueberries, ginger, nutmeg, pears, pretty much anything you can imagine.

Instant Pot Breakfast Rice

Ingredients

  • 2 cups brown rice
  • 4 cups water
  • 2 cups rice milk
  • 1 Tbsp. cinnamon
  • 1 apple, diced
  • 1/4 cup raisins or other dried fruit
  • maple syrup to taste
  • 1 Tbsp. chia seeds, optional

Do

  1. Pour brown rice and water into your Instant Pot. Press manual and adjust time to 22 minutes.
  2. Once done, allow your pot to come to (NPR) natural pressure release for 10 minutes. Then release any remaining pressure.
  3. If you doubled your recipe to have brown rice for dinner, take it out and set aside now. If not, skip this step.
  4. Pour in your milk, cinnamon, diced apples, and raisins. Stir together.
  5. Top with maple syrup to taste and chia seeds.

Serve

This breakfast is perfect for people who want a warm, hearty breakfast that will keep them full all morning. If you have more time you can try the Stove Top Version of Breakfast Rice! It’s even creamier!

Instant Pot Breakfast Rice

Have you tried Breakfast Rice? What do you think? Share your favorite additions to this dish!

Instant Pot Breakfast Rice

Instant Pot Breakfast Rice

Elevate your mornings with our Instant Pot Breakfast Rice recipe, a delightful blend of rice, and sweet fruits cooked to perfection in a fraction of the time. This nourishing dish is the perfect way to start your day with a comforting and satisfying meal that's both delicious and easy to prepare.

Ingredients

  • 2 cups brown rice
  • 4 cups water
  • 2 cups rice milk
  • 1 Tbsp. cinnamon
  • 1 apple, diced
  • 1/4 cup raisins or other dried fruit
  • maple syrup to taste
  • 1 Tbsp. chia seeds, optional

Instructions

  1. Pour brown rice and water into your Instant Pot. Press manual and adjust time to 22 minutes.
  2. Once done, allow your pot to come to (NPR) natural pressure release for 10 minutes. Then release any remaining pressure.
  3. If you doubled your recipe to have brown rice for dinner, take it out and set aside now. If not, skip this step.
  4. Pour in your milk, cinnamon, diced apples, and raisins. Stir together.
  5. Top with maple syrup to taste and chia seeds.

Notes

There are many other options besides apples and raisins. Dried cranberries, blueberries, ginger, nutmeg, pears, pretty much anything you can imagine.

Did you make this recipe?

We'd love to see it! Tag us and use #MyPlantBasedFamily!

© Holly Yzquierdo

Filed Under: Breakfast, Daniel Fast Recipes, Instant Pot, Recipes Tagged With: Breakfast, Instant Pot, Plant Based Diet, Recipes

Instant Pot Refried Beans

August 30, 2017 by Holly Yzquierdo 60 Comments

Enjoy restaurant style refried beans without sacrificing your health. These oil-free, plant-based refried beans are made in the Instant Pot.

Before we get too far into this post I need to be upfront. These aren’t actually refried beans. They aren’t fried and contain no oil! I call them Instant Pot Refried Beans so you’ll know this recipe is for the Instant Pot and so you’ll know what to expect bean wise.

Enjoy restaurant style refried beans without sacrificing your health. These oil-free, plant-based refried beans are made in the Instant Pot.

This page contains affiliate links.

In 2012 when I started blogging, one of my first recipes was called Unfried Beans. I love that recipe but it has people confused and it doesn’t exactly rank high in Google searches because no one searches for unfried beans.

This new recipe, designed for the Instant Pot, is basically that same delicious recipe I’ve made hundreds of times. Since it’s all being cooked together I add fresh onion and garlic. I usually added those when I cook beans on the stove top as well.

Enjoy restaurant style refried beans without sacrificing your health. These oil-free, plant-based refried beans are made in the Instant Pot.

I first developed the old recipe when we went plant-based. We wanted the same delicious flavors we had always loved without the meat and lard! It’s kinda gross to think about.

Thankfully, this version uses spices we always have on hand because I put them in everything!

Enjoy restaurant style refried beans without sacrificing your health. These oil-free, plant-based refried beans are made in the Instant Pot.

If you have a food processor, it will save you a lot of time. I have a 10 cup Hamilton Beach food processor that we’ve used over 5 years. It’s not too expensive and has never let me down.

If you don’t have a food processor you could use a blender, immersion blender, potato masher or a fork. A food processor works the best though.

Instant Pot Refried Beans

We enjoy these beans on anything and everything! Try them in Nachos, Tostadas, burritos or a big bowl by themselves!

Enjoy restaurant style refried beans without sacrificing your health. These oil-free, plant-based refried beans are made in the Instant Pot.

If you have an Instant Pot, be sure to give these refried beans a try! They are perfect for batch cooking because you can use them in so many other recipes!

How to Make Instant Pot Refried Beans

Ingredients

  • ½ onion, diced
  • 5 cloves garlic, minced or chopped finely
  • 1 teaspoon garlic powder
  • 1 teaspoon onion powder
  • 1 teaspoon chili powder
  • 2 cups dried pinto beans
  • 4 cups water
  • 2 teaspoons salt (to your taste)

Instructions

Step 1 – Add to Instant Pot

Add diced onion, minced garlic, spices, beans and water to the Instant Pot.

Step 2 – Cook

Cook on manual for 40 minutes on high pressure.

Step 3 – Natural Release

After natural pressure release, scoop out excess water. Reserve it in case you need extra.

Step 4 – Salt to Taste

Add 2 teaspoons of salt, more or less to your own taste.

Step 5 – Puree

Use a food processor, potato masher or immersion blender to puree.

Step 6 – Smooth Texture

Add reserved bean water if needed until you get a smooth texture.

Instant Pot Refried Beans

Enjoy restaurant style refried beans without sacrificing your health. These oil-free, plant-based refried beans are made in the Instant Pot.

Enjoy restaurant style refried beans without sacrificing your health. These oil-free, plant-based refried beans are made in the Instant Pot.

Prep Time 10 minutes
Cook Time 40 minutes
Total Time 50 minutes

Ingredients

  • ½ onion, diced
  • 5 cloves garlic, minced or chopped finely
  • 1 teaspoon garlic powder
  • 1 teaspoon onion powder
  • 1 teaspoon chili powder
  • 2 cups dried pinto beans
  • 4 cups water
  • 2 teaspoons salt (to your taste)

Instructions

  1. Add diced onion, minced garlic, spices, beans and water to the Instant Pot.
  2. Cook on manual for 40 minutes on high pressure.
  3. After natural pressure release, scoop out excess water. Reserve it in case you need extra.
  4. Add 2 teaspoons of salt, more or less to your own taste.
  5. Use a food processor, potato masher or immersion blender to puree.
  6. Add reserved bean water if needed until you get a smooth texture.

Notes

While these can be made with a blender, immersion blender, potato masher or fork, it is best to use a food processor.

Did you make this recipe?

We'd love to see it! Tag us and use #MyPlantBasedFamily!

© Holly Yzquierdo

Filed Under: Daniel Fast Recipes, Instant Pot, Mexican Food, Recipes Tagged With: Mexican Food, Plant Based Diet, Recipes, Vegan

« Previous Page
Next Page »

Primary Sidebar

Footer

Find it here!

Amazon Affiliate Disclosure

Holly Yzquierdo of My Plant-Based Family is a participant in the Amazon Services LLC Associates Program, an affiliate advertising program designed to provide a means for sites to earn advertising fees by advertising and linking to amazon.com.

Disclosures

Unauthorized use and/or duplication of any part of this website or content without express and written permission from Holly Yzquierdo is prohibited. Excerpts and links may be used, provided that full credit is given to Holly Yzquierdo and MyPlantBasedFamily.com with links to the original content.

More information on our Privacy Policy and other Disclosures are available.

Copyright © 2026 · Wellness Pro on Genesis Framework · WordPress · Log in