• Skip to primary navigation
  • Skip to main content
  • Skip to primary sidebar
  • Skip to footer

My Plant-Based Family

Eating Whole Food, Plant-Based Diet recipes, On a Budget.

  • Plant-Based Recipes
    • Breakfast
    • Main Dish
    • Instant Pot
    • Daniel Fast Recipes
    • Side Dishes
    • Bread and Muffins
    • Salad and Wraps
    • Soup, Stews, and Chili
    • Sauces, Dips, and Salad Dressings
    • Desserts
    • Crock Pot
    • Mexican Food
  • Videos
  • Resources
    • Getting Started
    • Books
      • The Plant-Based Diet Starter Guide
      • The Plant-Based Holiday Meal Plan & Cookbook
  • Meal Plans
    • Meal Plans 2020
    • Meal Plans 2019
    • Meal Plans 2017
    • Meal Plans 2016
    • Meal Plans 2015
    • Meal Plans 2014
    • Meal Plans 2013
  • About Us
    • Our Family
    • Contact Me
    • Our Food Philosophy
    • Disclosure Policy
      • Privacy Policy
  • Daniel Fast Recipes

Recipes

Sugar-Free Oatmeal PLUS Bonus recipe!

November 4, 2014 by Holly Yzquierdo Leave a Comment

Sugar Free Oatmeal

This shop is part of a social shopper marketing insights campaign with Pollinate Media Group® and Pure Via®, but all opinions are my own. #PMedia #PureViaSweet  http://my-disclosur.es/OBsstV

Sugar Free Oatmeal

Breakfast sets the tone of the day. If I start the day with a healthy breakfast, I’m more likely to continue to make good choices the rest of the day.

Sometimes we have good intentions but get off track. Oatmeal is a healthy filling breakfast but if we add lots of unhealthy ingredients we can sabotage ourselves. Instead start the day with this delicious recipe for Sugar-Free Oatmeal!

Sugar Free Oatmeal

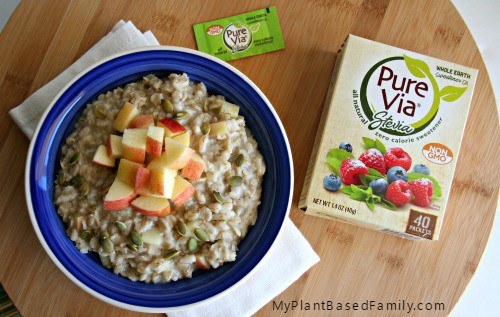
Sugar-Free Apple and Raw Pepita Oatmeal

Ingredients

  • 1/2 cup rolled oats + 1 cup water (per person)
  • 1 packet Pure Via
  • 1 apple, diced
  • 1 Tbsp Raw Pepitas

Do

  1. Bring a pot of water to boil. Once it is at a rapid boil pour in oats.
  2. Add about half of the apples.
  3. Stir regularly adding more liquid (even plant-milk) if needed.
  4. Cook for 10-20 minutes until the oatmeal reaches the desired consistency.
  5. Remove from heat and pour in 1 packet of Pure Via.

Serve

Serve this oatmeal warm with fresh apples and raw pepitas.

Pure Via is a great tasting natural alternative to sugar. It is made from the stevia plant, has zero calories and can be added to food or drinks to sweeten them. My husband has used Pure Via in his coffee everyday for years.

I was excited to find them at my local Walmart. Right now you can save 55¢ on one box of 40 count packets while supplies last. The packets are very convenient and easy to keep in your desk or bag while away from home. You can also take advantage of a free song and cookbook/songbook download from Jewel.

Sugar-Free Instant Oatmeal

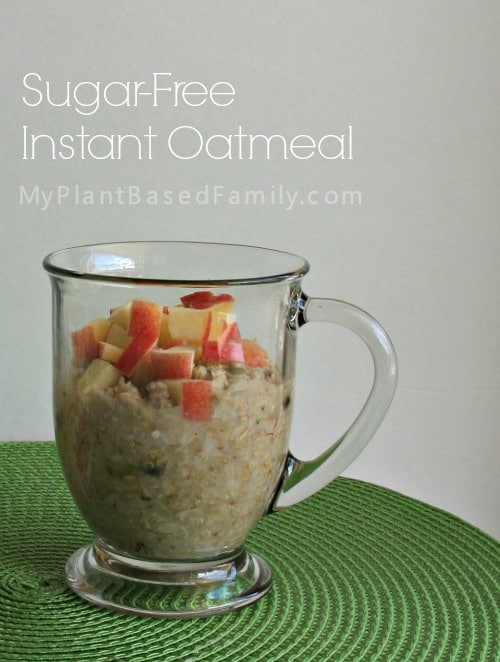
I often hear that people don’t have time to cook oatmeal and I have a solution for you. Make your own instant oatmeal by buying quick oats or making your own with a food processor or blender. Once you’ve whizzed them through the blender you have instant oatmeal. Follow the recipe below for your very own sugar-free instant oatmeal packet.

Instant Oatmeal

  • 1/3 to 1/2 cup instant oats
  • 1 packet Pure Via
  • 2-3 Tbsp raisins
  • 1 tsp Raw Pepitas, ground flax seeds or chia seeds
  • 3/4 cup-1 cup water

Pour the instant oatmeal into a mug and add hot water. If you don’t have access to hot water add the water and microwave until ready. Keep an eye on it so it doesn’t overflow while heating.

Instant Oatmeal

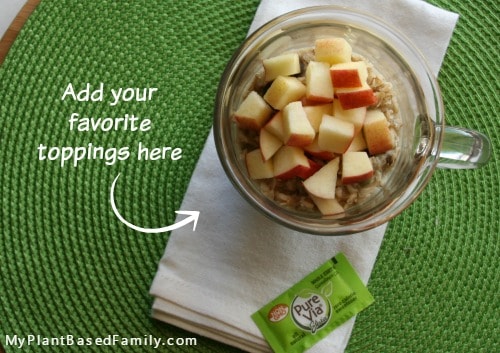
Top your oatmeal with fresh fruit like apples, bananas or blueberries.

What is your favorite oatmeal topping?

Filed Under: Breakfast, Recipes Tagged With: Breakfast, Oatmeal, Plant Based Diet, Recipes, sugarfree, Vegan

Fiesta Pasta

October 29, 2014 by Holly Yzquierdo 13 Comments

Fiesta Pasta is Vegan, Gluten-free, Dairy-Free and Nut-Free

I’ve been sitting on this recipe for a long time, like over a year. My apologies. I think you will agree that it is worth the wait. I’m the kind of girl who loves a vegan, gluten-free, nut-free pasta that tastes like it belongs in a restaurant. It’s also soy-free if that is important to you.

Fiesta Pasta is Vegan, Gluten-free, Dairy-Free and Nut-Free

What’s better than pasta? Pasta with Mexican flare. I often use macaroni noodles and call this Fiesta Mac but you use whichever noodles you like but if you are feeding toddlers small noodles are usually best.

Fiesta Pasta

Ingredients for the sauce

  • 2 Tbsp Nutritional Yeast
  • 2 Tbsp Brown Rice Flour*
  • 1 tsp salt (optional)
  • 1/2 tsp onion powder
  • 1/2 tsp garlic powder
  • 1/2 tsp chili powder
  • 1 1/2 cups unsweetened plant-milk

Ingredients for the pasta

  • 1 package (16 oz) Gluten-Free Pasta (any shape)
  • 1 can black beans, drained and rinsed
  • 1 cup organic corn (I use frozen)
  • 1 cup diced tomatoes

*cornstarch can be used instead

Do

  1. Dump all of the dry ingredients for the sauce into a medium sauce pan on medium heat. Pour in 1/2 cup plant-milk and stir with a whisk.
  2. In a separate pot bring water to boil to cook pasta. Follow the package directions.
  3. Alternate between whisking the sauce and scraping the bottom with a silicone spatula. As the sauce thickens add another 1/2 cup of plant milk until the full 1 1/2 cups is used.
  4. Pour beans and corn into the pasta in its last few minutes of cooking time.
  5. Drain pasta (and corn and beans), pour Fiesta Sauce on top of pasta and mix well.
  6. Dump tomatoes on top and mix one more time.

Serve

Fiesta Pasta is perfect for a potluck and can be used as the Main Dish or a Side Dish! The Fiesta Sauce gives it just the right amount of cheezy flavor without the dairy. You can also add an 8 oz can of tomato sauce (no need to change other measurements, just cook it a bit longer) for a slightly more savory flavor.

This recipe made me fall in love with nutritional yeast all over again. You can easily alter it to suit your preferences.

Yield: 4 Servings

Fiesta Pasta

Fiesta Pasta is Vegan, Gluten-free, Dairy-Free and Nut-Free

Pasta with a Mexican flare! Fiesta Pasta is Vegan, Gluten-free, Dairy-Free and Nut-Free

Prep Time 10 minutes
Cook Time 20 minutes
Total Time 30 minutes

Ingredients

  • 2 Tbsp Nutritional Yeast
  • 2 Tbsp Brown Rice Flour or Corn Starch
  • 1 tsp salt (optional)
  • 1/2 tsp onion powder
  • 1/2 tsp garlic powder
  • 1/2 tsp chili powder
  • 1 1/2 cups unsweetened plant-milk
  • 1 package (16 oz) Gluten-Free Pasta (any shape)
  • 1 can black beans, drained and rinsed
  • 1 cup organic corn (I use frozen)
  • 1 cup diced tomatoes

Instructions

  1. Dump all of the dry ingredients for the sauce into a medium sauce pan on medium heat. Pour in 1/2 cup plant-milk and stir with a whisk.
  2. In a separate pot bring water to boil to cook pasta. Follow the package directions.
  3. Alternate between whisking the sauce and scraping the bottom with a silicone spatula. As the sauce thickens add another 1/2 cup of plant milk until the full 1 1/2 cups is used.
  4. Pour beans and corn into the pasta in its last few minutes of cooking time.
  5. Drain pasta (and corn and beans), pour Fiesta Sauce on top of pasta and mix well.
  6. Dump tomatoes on top and mix one more time.

Notes

You can also add an 8 oz can of tomato sauce (no need to change other measurements, just cook it a bit longer) for a slightly more savory flavor.

Did you make this recipe?

We'd love to see it! Tag us and use #MyPlantBasedFamily!

© Heather Mayes

Filed Under: Main Dish Recipes, Mexican Food, Recipes, Side Dishes, Uncategorized Tagged With: Dairy Free, gluten free, Mexican Food, Plant Based Diet, Recipes, Vegan

Roasted Red Pepper Dip

October 8, 2014 by Holly Yzquierdo 7 Comments

I love eating dips. LOVE them I tell you. Since transitioning to a plant-based diet, oil-free hummus is in my weekly meal plan rotation. This Roasted Red Pepper Dip is oil-free and one of my favorites!

This page contains affiliate links.

When I want something with a little more flavor than my classic hummus, I’ll make this Roasted Red Pepper hummus. It’s like magic because I can eat way more veggies when I have hummus than I eat without it. 

Since this hummus is made without oil or tahini, there is very little fat! 

Roasted Red Pepper Hummus

What do you eat with hummus?

There are so many foods that pair well with hummus. Raw veggies, pita bread, and crackers are perfect for hummus. I also enjoy hummus on wraps, sandwiches, in salads, and mixed into pasta! Adding roasted red pepper hummus to my Mediterranean Bowl brings it to a whole new level.

Substituting Chickpeas

Hummus doesn’t have to be made with chickpeas. If you can’t eat chickpeas because of an allergy or intolerance, you can substitute another type of bean. I recommend great northern beans or any other white bean. 

I routinely make dips like my Cilantro Jalapeno Hummus, Spinach Artichoke Dip and Green Chili White Bean Dip with white beans. There isn’t a big difference in flavor or texture, especially if it would take another trip to the store, just use what you have.

Do you need tahini in hummus? 

I don’t think you need tahini in hummus. Sure it adds some flavor and creaminess but it’s not necessary in my opinion. I’m not a big tahini fan.

I just leave tahini out of all the hummus recipes I make. 

Kids love dip

I don’t really need an occasion to make humus and I find that my kids love it too. They easily eat twice as many veggies (if not more) when I have a delicious dip to enjoy them with. I’ll often cut up veggies and leave hummus next to them on the counter while I’m cooking. As they smell dinner, they come in to snack while I cook. Without a doubt, they eat way more veggies that they would at dinner.

This dip is really easy to make and is delicious with veggies, crackers, chips or in a wrap.

This dip is allergy-friendly by avoiding nuts, sesame and dairy. It’s also vegan and gluten-free, which is pretty typical around here.

Roasted Red Pepper Hummus

Ingredients

  • 1 15 ounce can of chickpeas, drained
  • 1/4 cup water (more or less)
  • ½ tsp onion powder
  • ½ tsp garlic powder
  • ½ tsp salt
  • ½ cup roasted red pepper

Do

Puree beans, water, spices and red pepper in a Food Processor or high-powered blender and blend until smooth. I use my Blendtec and push the “dip” button for super simple and quick option.

Serve

This is the perfect condiment for your veggie wraps and great with raw veggies. 

Yield: 6

Roasted Red Pepper Hummus

Roasted Red Pepper Hummus

Roasted Red Pepper Hummus is an oil-free, low fat hummus that is perfect for people on a whole food plant-based diet.

Prep Time 10 minutes
Total Time 10 minutes

Ingredients

  • 1 15 ounce can of chickpeas, drained
  • 1/4 cup water (more or less)
  • ½ tsp onion powder
  • ½ tsp garlic powder
  • ½ tsp salt
  • ½ cup roasted red pepper

Instructions

  1. Puree beans, water, spices and red pepper in a Food Processor or high-powered blender and blend until smooth.
  2. If needed, you can add more liquid to get a smoother consistency.

Notes

Store leftover dip in an air tight container in the refrigerator for up to a week.

Recommended Products

As an Amazon Associate and member of other affiliate programs, I earn from qualifying purchases.

  • Blendtec 
    Blendtec 
  • Hamilton Beach 10-Cup Food Processor 
    Hamilton Beach 10-Cup Food Processor 

Did you make this recipe?

We'd love to see it! Tag us and use #MyPlantBasedFamily!

© Holly Yzquierdo
Category: Sauces, Dips, and Salad Dressings

Filed Under: Daniel Fast Recipes, Recipes, Sauces, Dips, and Salad Dressings Tagged With: Dairy Free, gluten free, Healthy, hummus, Plant Based Diet, Recipes, Vegan

Vegan Spinach Artichoke Dip

September 24, 2014 by Holly Yzquierdo 28 Comments

Vegan Spinach Artichoke Dip

Are you looking for an all around great tasting dip that is perfect for friendly get together’s, holiday parties or comfort food. Let me introduce you to my guilt-free, low-fat Vegan Spinach Artichoke Dip.

Vegan Spinach Artichoke Dip

Unlike your typical spinach artichoke dip, this healthy Vegan Spinach Artichoke Dip is dairy-free, gluten-free, oil-free and nut-free!

Many people use cashews to make cheesy plant-based dips, but that adds fat and allergens. Since I consider this perfect party food, I want it to be suitable for people with nut allergies.

Vegan Spinach Artichoke Dip

Plant-Based Pantry Staples

I like to keep a jar of artichoke hearts in my pantry just in case I want to make this dip! I usually have all the other ingredients on hand so this is an easy dip to make.

  • White Beans
  • Spices + Nutritional Yeast
  • Spinach
  • Artichokes
  • Lemon Juice
Easy Vegan Spinach Artichoke Dip.

Quick and Easy Spinach Artichoke Dip

Nothing has to be prepared ahead of time and I don’t have to buy any special ingredients. This dip comes together quickly in my Blendtec Blender but a food processor would work too.

Plant-Based Party Food

This Plant-Based Spinach Artichoke Dip is perfect for holiday’s like Christmas and New Year’s Eve parties! It’s a game day must have! It also travels really well so it’s easy to take with you.

You don’t have to save it for parties or football season. It’s perfectly suited for movie nights, pre-dinner (or post-dinner) snacks, on a sandwich or wrap, or to make when you are all by yourself and don’t want to share.

vegan Spinach Artichoke Dip

Spinach Artichoke Dip

Easy, vegan Spinach Artichoke Dip uses whole foods to create a delicious plant-based dip. See F.A.Q.’s for substitutions.

Ingredients

  • 1 ½ cup warm white beans (I use Great Northern)
  • ½ cup water (more or less)
  • ½ tsp onion powder
  • ½ tsp garlic powder
  • ½ tsp salt
  • 2 Tbsp nutritional yeast
  • ½ cup artichoke hearts (I use jarred, without oil)
  • 1 tsp lemon juice
  • 1 cup raw spinach

Do

  1. Puree beans, water and spices in a food processor or high-powered blender, I use my Blendtec.
  2. Add artichoke hearts and lemon juice and pulse slightly until it reaches desired texture.
  3. Pour dip into heat safe container (I use an oven safe casserole dish). Rip spinach into smaller pieces and mix into dip.
  4. Bake for 20 minutes at 350° or until warm.

Serve

This dip is great with crackers or chips but also really good on bread or in a wrap. This is oil-free and diary-free but tastes sinfully good.

Yield: 8 servings

Vegan Spinach Artichoke Dip

Vegan Spinach Artichoke Dip

Vegan Spinach Artichoke Dip is perfect for parties or football season. This easy recipe is dairy-free, nut-free, gluten-free, oil-free and delicious.

Prep Time 10 minutes
Cook Time 20 minutes
Total Time 30 minutes

Ingredients

  • 1 15 ounce can of white beans, drained and warmed (I use Great Northern)
  • ½ cup water (more or less)
  • ½ tsp onion powder
  • ½ tsp garlic powder
  • ½ tsp salt
  • 2 Tbsp nutritional yeast
  • ½ cup artichoke hearts (I use jarred, without oil)
  • 1 tsp lemon juice
  • 1 cup raw spinach

Instructions

  1. Drain your beans then warm them slightly. Puree beans, water and spices in a food processor or high-powered blender, I use my Blendtec.
  2. Add artichoke hearts and lemon juice and pulse slightly until it reaches desired texture.
  3. Pour dip into heat safe container (I use an oven safe 9x9 casserole dish). Rip spinach into smaller pieces and mix into dip.
  4. Bake for 20 minutes at 350° or until warm.

Notes

This dip is great with crackers or chips but also really good on bread or in a wrap. I love it with fresh, raw veggies.

Store covered in the fridge for a few days.

See F.A.Q.'s in the post for more information.

Recommended Products

As an Amazon Associate and member of other affiliate programs, I earn from qualifying purchases.

  • Hamilton Beach 10-Cup Food Processor 
    Hamilton Beach 10-Cup Food Processor 
  • Blendtec 
    Blendtec 

Did you make this recipe?

We'd love to see it! Tag us and use #MyPlantBasedFamily!

© Holly Yzquierdo
Category: Sauces, Dips, and Salad Dressings

Frequently Asked Questions

Why do you use white beans?

White beans give the dip a creamy base that is low in fat. It’s also more allergy-friendly than dips with a nut base. White beans are full of fiber so you’ll feel more satisfied.

Does Vegan Spinach Artichoke Dip taste cheesy?

This dip is dairy-free and doesn’t contain cheese so it isn’t real cheesy. It does contain nutritional yeast which gives it some cheesy flavor.

Can I use frozen chopped spinach instead of fresh?

Yes you can. I recommend allowing the spinach to thaw a bit and squeeze out extra moisture.

Can I use fresh garlic?

Yes, fresh garlic, and even roasted garlic is delicious in this. I originally used garlic powder for ease but fresh is a great option.

For more football food ideas visit my Party Food Pinterest Board! It’s full of delicious dips and finger foods.

Need More Dip Ideas

  • Oil-Free Hummus
  • Roasted Red Pepper Dip
  • Cilantro Jalapeno Hummus
This page contains affiliate links.

Filed Under: Recipes, Sauces, Dips, and Salad Dressings Tagged With: Dairy Free, dips, party food, Plant Based Diet, Recipes, Vegan

Roasted Stuffed Winter Squash from the Forks Over Knives Plan

September 17, 2014 by Holly Yzquierdo 6 Comments

Roasted Stuffed Winter Squash from the Forks Over Knives Plan

Yesterday I shared a review of the new book The Forks Over Knives Plan by Alonda Pulde, MD and Matthew Lederman, MD. Today I’m going to share a recipe from the book! This recipe is shared with permission.

It’s perfect timing too because fall is on the way and soon we will be looking for comforting recipes just like this one.

Roasted Stuffed Winter Squash from the Forks Over Knives Plan

Roasted Stuffed Winter Squash

Winter squashes, such as acorn and butternut, can be tricky to work with because their tough skin is hard to peel. Preparing squash this way — stuffed with a savory filling and roasted — puts that sturdy shell to good use. The rice should be quite moist after it cooks in step 3; it provides good contrast to the squash and helps the stuffing mixture stay together without becoming chewy or dry during baking. — Darshana Thacker

Makes 4 stuffed squash halves

  • 2 medium acorn squash
  • ½ cup wild rice medley
  • 1 cup low-sodium vegetable broth, plus more as needed
  • ½ medium red onion, finely chopped
  • 1 teaspoon garlic powder
  • 1 teaspoon ground ginger
  • 1½ teaspoons dried rosemary
  • ½ cup finely chopped carrot
  • ½ cup finely chopped red bell pepper
  • ½ cup small broccoli florets
  • ½ cup small cauliflower florets
  • ¼ teaspoon freshly ground black pepper
  • Sea salt
  • 3 tablespoons pine nuts

1. Cut each acorn squash in half through the stem. Trim the stem and remove and discard the seeds (keep the skin on).

2. Bring a large saucepan or pot of water to a boil. Add the squash halves and cook until the squash is slightly soft when pierced with a fork, 15 to 20 minutes. Remove from the water and drain well. Set aside until cool enough to handle.

3. Meanwhile, bring 1½ cups water to a boil in a small saucepan. Add the wild rice medley and cook, covered, over medium heat for 25 minutes. (Alternatively, follow the cooking instructions on the rice package, using a bit more water than called for so that the rice is moist after steaming.) Remove from the heat and set aside.

4. Use a spoon to scoop out the inner edges of each cooled squash half to create a wider and deeper hollow for the stuffing; leave about half of the squash flesh attached to the peel. Reserve the scooped-out squash flesh for the stuffing. Set the squash shells aside.

5. Preheat the oven to 350°F.

6. In a skillet with a lid, combine the vegetable broth, onion, garlic powder, ginger, and rosemary. Cover and bring to a boil over high heat. Reduce the heat to medium and cook, covered, until the onion is translucent, about 10 minutes, stirring occasionally.

7. Add the carrot, cover, and cook for about 10 minutes. Add the bell pepper, broccoli, cauliflower, black pepper, and salt to taste, cover, and cook until the vegetables are tender, about 10 minutes more.

8. Add the reserved squash flesh and wild rice. Use a wooden spoon to mix the stuffing together; it should be a bit creamy. If all the liquid has dried up, add about ¼ cup broth or as much as is needed to make it slightly creamy. Taste and adjust the seasoning. Remove from the heat.

9. Arrange the acorn squash shells on a baking sheet and divide the stuffing evenly among them. Sprinkle the pine nuts on top.

10. Bake until the pine nuts are browned and the stuffing is heated through, about 20 minutes. Remove from the oven and let stand for a few minutes before serving. Serve hot.

The above is an excerpt from the book The Forks Over Knives Plan: How to Transition to the Life-Saving, Whole-Food, Plant-Based Diet by Alona Pulde, MD, and Matthew Lederman, MD. Please refer to the finished book for accuracy and references.

Filed Under: Recipes Tagged With: Dairy Free, Forks Over Knives, Forks Over Knives Plan, Plant Based Diet, Recipes, squash, Vegan

Oven Roasted Salsa

September 10, 2014 by Holly Yzquierdo 10 Comments

Roasted Tomato Salsa

Let me be up front about this. This is not one of my quick recipes, BUT it is incredibly easy AND delicious. This Roasted Salsa taste better than my favorite Mexican restaurant.

If you have an abundance of tomatoes from your garden or if you just can’t resist the low prices at the store and farmers markets then I have a recipe you really need to try. I’m addicted to it.

Roasted Tomato Salsa

Roasted Salsa

Ingredients

  • 8 Roma Tomatoes (more or less)
  • 2 Jalapeno Peppers
  • 1 head garlic
  • 1/4 of an onion
  • salt to taste (optional)

Do

  1. Preheat oven to 350 degrees.
  2. Wash your produce. Put tomatoes and garlic in one oven safe pan and put your jalapenos in a separate pan. You do not need oil! I didn’t roast the onion because I didn’t have much left but you could. Watch it so that it doesn’t burn.
  3. Roast veggies (1 hour for jalapenos, 2 hours for tomatoes and garlic).
  4. Remove from oven and allow everything to cool so that it can be handled.
  5. Once everything is cool put the tomatoes, jalapenos, half of the garlic and the onion in a high-powered blender. I used my Blendtec and pushed the “Dip” button. I also removed the skins from my tomatoes and the seeds from the jalapenos and tomatoes before blending them. You don’t have to do this, it’s just an extra step. (If you don’t have a Blendtec I recommend putting it on your Christmas List. You can even get a Reconditioned Blendtec for a great deal.)
  6. Blend until there are no large chunks, add a little salt if needed.

Serve

This is heaven with tortilla chips but I’ve also eaten it on Black Bean Tostadas and Tacos. Today I’ll have it on my Baked Potato.

You can mix things up and use roasted onion, roasted corn, whatever you have in abundance. This made about 2 cups for me but it will depend on the size of your tomatoes.

Yield: 2 cups

Oven Roasted Salsa

Roasted Tomato Salsa

Roasted tomato salsa with fresh tomatoes

Prep Time 10 minutes
Cook Time 2 hours
Additional Time 40 minutes
Total Time 2 hours 50 minutes

Ingredients

  • 8 Roma Tomatoes (more or less)
  • 2 Jalapeno Peppers
  • 1 head garlic
  • 1/4 of an onion
  • salt to taste (optional)

Instructions

  1. Preheat oven to 350 degrees.
  2. Wash your produce. Put tomatoes and garlic in one oven safe pan and put your jalapenos in a separate pan. You do not need oil! I didn’t roast the onion because I didn’t have much left but you could. Watch it so that it doesn’t burn.
  3. Roast veggies (1 hour for jalapenos, 2 hours for tomatoes and garlic).
  4. Remove from oven and allow everything to cool so that it can be handled.
  5. Once everything is cool put the tomatoes, jalapenos, half of the garlic and the onion in a high-powered blender. I also removed the skins from my tomatoes and the seeds from the jalapenos and tomatoes before blending them. You don’t have to do this, it’s just an extra step.
  6. Blend until there are no large chunks, add a little salt if needed.

Notes

You can mix things up and use roasted onion, roasted corn, whatever you have in abundance. This made about 2 cups for me but it will depend on the size of your tomatoes.

Did you make this recipe?

We'd love to see it! Tag us and use #MyPlantBasedFamily!

© Holly Yzquierdo

Filed Under: Daniel Fast Recipes, Mexican Food, Recipes, Sauces, Dips, and Salad Dressings Tagged With: gluten free, Mexican Food, Plant Based Diet, Unprocessed, Vegan

« Previous Page
Next Page »

Primary Sidebar

Footer

Find it here!

Amazon Affiliate Disclosure

Holly Yzquierdo of My Plant-Based Family is a participant in the Amazon Services LLC Associates Program, an affiliate advertising program designed to provide a means for sites to earn advertising fees by advertising and linking to amazon.com.

Disclosures

Unauthorized use and/or duplication of any part of this website or content without express and written permission from Holly Yzquierdo is prohibited. Excerpts and links may be used, provided that full credit is given to Holly Yzquierdo and MyPlantBasedFamily.com with links to the original content.

More information on our Privacy Policy and other Disclosures are available.

Copyright © 2026 · Wellness Pro on Genesis Framework · WordPress · Log in