• Skip to primary navigation
  • Skip to main content
  • Skip to primary sidebar
  • Skip to footer

My Plant-Based Family

Eating Whole Food, Plant-Based Diet recipes, On a Budget.

  • Plant-Based Recipes
    • Breakfast
    • Main Dish
    • Instant Pot
    • Daniel Fast Recipes
    • Side Dishes
    • Bread and Muffins
    • Salad and Wraps
    • Soup, Stews, and Chili
    • Sauces, Dips, and Salad Dressings
    • Desserts
    • Crock Pot
    • Mexican Food
  • Videos
  • Resources
    • Getting Started
    • Books
      • The Plant-Based Diet Starter Guide
      • The Plant-Based Holiday Meal Plan & Cookbook
  • Meal Plans
    • Meal Plans 2020
    • Meal Plans 2019
    • Meal Plans 2017
    • Meal Plans 2016
    • Meal Plans 2015
    • Meal Plans 2014
    • Meal Plans 2013
  • About Us
    • Our Family
    • Contact Me
    • Our Food Philosophy
    • Disclosure Policy
      • Privacy Policy
  • Daniel Fast Recipes

Sauces, Dips, and Salad Dressings

Greek Salad Dressing (No Oil)

May 16, 2025 by Holly Yzquierdo Leave a Comment

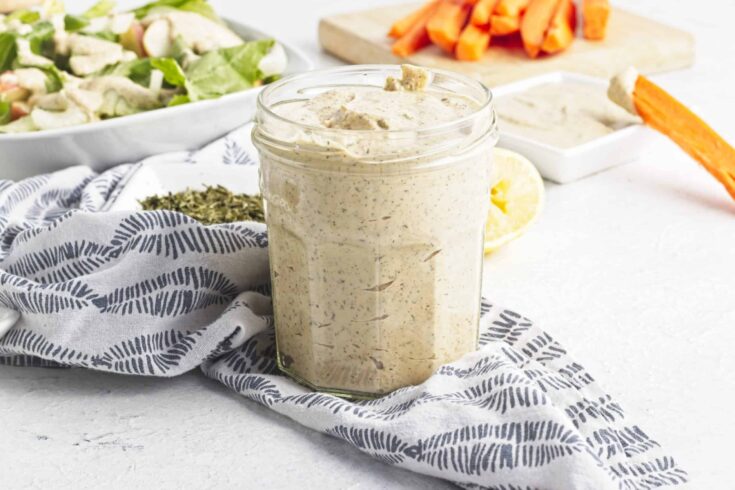
Salads are only as good as their dressing, and if you’re tired of store-bought bottles full of oils and preservatives, this creamy Greek salad dressing is your new go-to. Made with cannellini beans as a base, it’s creamy, tangy, herby, and naturally plant-powered. Best of all? No oil, no dairy, and no fuss.

This recipe is perfect for anyone trying to eat a little cleaner without sacrificing flavor—or creaminess. Whether you’re topping a classic Greek salad, using it as a dip for raw veggies, or spreading it on a wrap, this dressing is proof that healthy can taste amazing.

Why You’ll Love This Greek Salad Dressing

Let’s be real: the right dressing can make or break a salad. And while traditional Greek dressings are often loaded with olive oil, this version flips the script. It’s:

  • Creamy and satisfying without any dairy or oil
  • High in protein thanks to cannellini beans
  • Easy to blend up in minutes
  • Naturally gluten-free, vegan, and nut-free
  • Loaded with zesty Greek-inspired herbs
  • Perfect as a dressing, dip, or sandwich spread

If you’re looking for a way to elevate your lunch salads or add a flavorful twist to your meal prep routine, this one’s for you.

The Secret Ingredient: Cannellini Beans

The creamy texture of this dressing comes from a can of humble cannellini beans. These soft white beans are mild in flavor, blend up beautifully smooth, and bring a dose of plant-based protein and fiber to your meal. They also thicken the dressing naturally without any emulsifiers or starches.

Using beans as a base is a brilliant way to replace heavy oils or dairy-based ingredients in dressings. Plus, it keeps the recipe hearty and satisfying enough to turn a basic salad into a filling meal.

Ways to Use This Dressing

While it’s perfect on a classic Greek salad—think romaine, cucumber, tomato, olives, and red onion—this dressing is super versatile. Try it:

  • Drizzled over grain bowls or roasted vegetables
  • As a dip for fresh veggie sticks or pita chips
  • Spread inside wraps or sandwiches in place of mayo
  • As a dressing for a cold pasta salad or chickpea salad
  • Thinned with a little extra water or lemon to make a marinade for tofu or tempeh

How to Make Greek Salad Dressing

Ingredients

  • 1 15 ounce can of cannellini beans, drained and rinsed
  • Juice from one lemon (or about 3 Tablespoons of lemon juice)
  • ½ teaspoon garlic powder
  • 2 teaspoons dried parsley
  • 1 teaspoon onion powder
  • 1 teaspoon dried oregano
  • 1 teaspoon salt
  • 1 Tablespoon Dijon mustard
  • ½ Tablespoon red wine vinegar
  • ½ teaspoon maple syrup

Instructions

Step 1 – Add All Ingredients to a Blender

Place the beans, lemon juice, garlic powder, parsley, onion powder, oregano, salt, Dijon mustard, red wine vinegar, and maple syrup into your blender or food processor. A high-powered blender like a Blendtec works best, especially if you’re aiming for a super smooth finish.

Step 2 – Blend Until Creamy

Blend until the dressing is completely smooth. If it’s too thick, add a tablespoon or two of water at a time until you reach your desired consistency. You want it pourable, but still thick enough to cling to greens.

Step 3 – Taste and Adjust

Give it a taste and tweak as needed. Add more lemon juice for brightness, more mustard for bite, or a pinch more salt if it feels flat.

Step 4 – Store

Transfer to a jar or airtight container. The dressing will thicken slightly in the fridge. Store for up to 5 days. Give it a stir (or shake) before each use.

Recipe Tips and Variations

Here are a few ways to customize the recipe or switch it up depending on what you have:

Use Other Beans – If you don’t have cannellini beans, you can use great northern beans or even chickpeas. Just note that chickpeas will give a slightly grainier texture.

Add Fresh Herbs – Have fresh parsley or oregano on hand? Swap in fresh herbs for dried (triple the amount), or blend in some fresh basil or dill for extra Mediterranean flair.

Make It Spicy – Add a pinch of red pepper flakes or a splash of hot sauce for a spicy version.

Make It Extra Creamy – Want it thicker for a dip? Reduce the lemon juice slightly and skip the added water altogether. Perfect for dunking raw veggies.

More Plant Based Salad Dressings

If you like this recipe, you love these plant based recipes too:

  • Spicy Vegan Ranch Dressing
  • Raspberry Vinaigrette Salad Dressing
  • Creamy Italian Salad Dressing (Oil-Free)
  • Homemade Vegan Ranch
  • Oil-Free Blueberry Vinaigrette

Greek Salad Dressing (No Oil)

Greek Salad Dressing (No Oil)

This creamy Greek salad dressing is oil-free, protein-packed, and made with cannellini beans. Easy, healthy, and ready in minutes—perfect for any salad!

Prep Time 10 minutes
Total Time 10 minutes

Ingredients

  • 1 15 ounce can of cannellini beans, drained and rinsed
  • Juice from one lemon (or about 3 Tablespoons of lemon juice)
  • ½ teaspoon garlic powder
  • 2 teaspoons dried parsley
  • 1 teaspoon onion powder
  • 1 teaspoon dried oregano
  • 1 teaspoon salt
  • 1 Tablespoon Dijon mustard
  • ½ Tablespoon red wine vinegar
  • ½ teaspoon maple syrup

Instructions

  1. Place the beans, lemon juice, garlic powder, parsley, onion powder, oregano, salt, Dijon mustard, red wine vinegar, and maple syrup into your blender or food processor. A high-powered blender like a Blendtec works best, especially if you’re aiming for a super smooth finish.
  2. Blend until the dressing is completely smooth. If it’s too thick, add a tablespoon or two of water at a time until you reach your desired consistency. You want it pourable, but still thick enough to cling to greens.
  3. Give it a taste and tweak as needed. Add more lemon juice for brightness, more mustard for bite, or a pinch more salt if it feels flat.

Notes

Transfer to a jar or airtight container. The dressing will thicken slightly in the fridge. Store for up to 5 days. Give it a stir (or shake) before each use.

Did you make this recipe?

We'd love to see it! Tag us and use #MyPlantBasedFamily!

© Holly Yzquierdo

Filed Under: Recipes, Sauces, Dips, and Salad Dressings

Cashew Queso

April 29, 2025 by Holly Yzquierdo Leave a Comment

Queso is a beloved dip known for its creamy texture and rich, cheesy flavor, often enjoyed with tortilla chips, tacos, and other Tex-Mex favorites. But for those who follow a plant-based lifestyle, finding a delicious, dairy-free alternative can be a challenge. Enter cashew queso—an irresistibly creamy, completely plant-based alternative that delivers all the indulgence of traditional queso without any dairy.

What Is Cashew Queso?

Cashew queso is a dairy-free, cheese-like dip made from blended cashews, seasonings, and other plant-based ingredients. It mimics the rich, smooth texture and tangy, savory flavor of traditional queso, making it a versatile and satisfying alternative. Unlike store-bought vegan cheese products, which often contain processed ingredients, it is typically made with whole-food components, making it a healthier and more natural option.

How to Enjoy Cashew Queso

As a Dip

The classic way to enjoy cashew queso is as a dip for tortilla chips, crackers, or raw veggies like carrots, celery, and bell peppers. Its creamy texture and bold flavor make it an instant crowd-pleaser at gatherings or movie nights.

Drizzled Over Tacos & Burritos

Take your tacos and burritos to the next level by drizzling cashew queso over the top. It adds a rich, cheesy element that pairs perfectly with plant-based fillings like black beans, lentils, roasted vegetables, and avocado.

Poured Over Nachos

Upgrade your nachos by smothering them in warm cashew queso. Layer tortilla chips with beans, salsa, jalapeños, and guacamole for a fully loaded, dairy-free snack or meal.

Mixed into Pasta

Cashew queso can double as a creamy pasta sauce! Simply mix it with cooked pasta for a quick and delicious plant-based mac and cheese alternative.

As a Topping for Roasted Vegetables

Drizzle cashew queso over roasted broccoli, cauliflower, or Brussels sprouts to add a burst of flavor and a creamy texture to your veggies.

Spread on Sandwiches & Burgers

Use cashew queso as a spread for plant-based sandwiches, wraps, or veggie burgers for an extra layer of savory goodness.

Customizing Your Cashew Queso

One of the best things about cashew queso is how easily it can be customized to suit your taste preferences. Here are a few ways to change it up:

Adjust the Spice Level

If you love heat, add diced jalapeños, cayenne pepper, or chipotle powder for a spicy kick. Prefer a milder version? Stick with smoked paprika and a pinch of black pepper.

Make It Smokier

For a deeper, smoky flavor, add a little liquid smoke or extra smoked paprika.

Boost the Umami

A splash of tamari, soy sauce, or miso paste can enhance the umami flavor, making the queso even more savory and rich.

Add a Veggie Base

Blend in cooked butternut squash, sweet potatoes, or roasted red peppers for an extra layer of flavor and nutrients.

Thicken or Thin It Out

For a thicker queso, reduce the liquid and blend until creamy. If you prefer a thinner consistency for drizzling, add a little extra plant-based milk or water until you reach the desired texture.

How to Make Cashew Queso

Ingredients

  • 1 cup Cashews (150 grams)
  • Nutritional Yeast ½ cup (42 grams)
  • 1/2 cup Vegetable broth (260 grams)
  • 2 Tbsp Hot Sauce (I used Chollulas)
  • ½ teaspoon Cumin
  • 1 teaspoon Garlic powder
  • 1 teaspoon Onion Powder
  • ½ teaspoon of salt

Instructions

Step 1 – Soak Cashews

Boil water and pour over the cashews until completely covered. Let soak for 15-20 minutes.

Step 2 – Process

Once your cashews have soaked, drain out the water and pour your cashews into a food processor.

Step 3 – Add Remaining Ingredients

Add the rest of your ingredients to your food processor.

Step 4 – Blend

Blend on high until completely smooth.

Step 5 – Serve

Serve immediately with chips. You can top the dip with more hot sauce, chili peppers, or salsa.

Storing and Reheating

Cashew queso stores well, making it a great option for meal prep. Here’s how to keep it fresh:

  • Refrigeration – Store in an airtight container in the fridge for up to a week.
  • Freezing – For longer storage, freeze in small portions and thaw as needed.
  • Reheating – Warm gently on the stovetop or in the microwave, adding a splash of water or plant-based milk to maintain a smooth consistency.

More Plant Based Dips

If you like this recipe, you’ll love these plant based dips too:

  • Homemade Ketchup: No Sugar Added
  • Spicy Vegan Ranch Dressing
  • Oil-Free Hummus
  • Vegan Spinach Artichoke Dip
  • Homemade Vegan Ranch

Cashew Queso

Cashew Queso

Creamy, flavorful, and completely dairy-free, cashew queso is the perfect plant-based dip! Enjoy this rich, cheesy alternative with chips, veggies, or tacos.

Prep Time 30 minutes
Total Time 30 minutes

Ingredients

  • 1 cup Cashews (150 grams)
  • Nutritional Yeast ½ cup (42 grams)
  • 1/2 cup Vegetable broth (260 grams)
  • 2 Tbsp Hot Sauce (I used Chollulas)
  • ½ teaspoon Cumin
  • 1 teaspoon Garlic powder
  • 1 teaspoon Onion Powder
  • ½ teaspoon of salt

Instructions

  1. Boil water and pour over the cashews until completely covered. Let soak for 15-20 minutes.
  2. Once your cashews have soaked, drain out the water and pour your cashews into a food processor.
  3. Add the rest of your ingredients to your food processor.
  4. Blend on high until completely smooth.
  5. Serve immediately with chips. You can top the dip with more hot sauce, chili peppers, or salsa.

Notes

Store in the fridge in an air-tight container.

Did you make this recipe?

We'd love to see it! Tag us and use #MyPlantBasedFamily!

© Holly Yzquierdo

Filed Under: Mexican Food, Recipes, Sauces, Dips, and Salad Dressings, Side Dishes

Quick Pickled Onions

March 11, 2025 by Holly Yzquierdo Leave a Comment

Pickled Onions

Quick pickled onions are an easy way to add a pop of flavor to your meals. These zesty, crisp onions take just minutes to prepare and instantly elevate everything from tacos and sandwiches to salads and grain bowls. With their vibrant color and bold taste, they’re not just a garnish—they’re a game-changer!

They have a bright, tangy, and slightly sweet flavor with a crisp texture that adds a refreshing bite to any dish. The vinegar provides a zesty sharpness that mellows the onion’s natural pungency, while a touch of sweetness balances the acidity. Depending on the spices and herbs used, they can also have subtle spicy, smoky, or citrusy notes. The result is a bold yet well-rounded taste that enhances both rich and fresh flavors in your meals.

Keep a jar of quick pickled onions in the fridge to top avocado toast, baked potatoes or salads. The extra touch feels elevates every dish.

How Does Quick Pickling Work?

The magic of quick pickling lies in the combination of vinegar, salt, and a touch of sweetness. The acidity breaks down the onion’s sharpness, mellowing its bite while enhancing its natural sweetness. The result? A perfectly balanced, tangy, and slightly crunchy topping that pairs well with both rich and fresh flavors.

Why You’ll Love Quick Pickled Onions

  • Fast & Easy – Unlike traditional pickling methods, which require days of waiting, quick pickled onions are ready in a little over an hour.
  • Versatile – Use them to brighten up tacos, grain bowls, salads, or even avocado toast.
  • Customizable – Adjust the flavors to your liking with different vinegars, spices, and sweeteners.
  • Long-Lasting – Keep a jar in your fridge for up to two weeks, ready to add a burst of tangy goodness to any dish.

Ways to Customize Quick Pickled Onions

Want to make your pickled onions even more flavorful? Try these plant-based variations:

  • Spicy Kick – Add red pepper flakes, sliced jalapeños, or a dash of hot sauce for heat.
  • Citrus Twist – Swap some of the vinegar for fresh lime or lemon juice for a zesty, bright flavor.
  • Herb Infusion – Add fresh cilantro, thyme, rosemary, or bay leaves for extra aroma.
  • Garlic & Ginger – Thinly sliced garlic or fresh ginger adds a warm, savory depth.
  • Smoky Flavor – A pinch of smoked paprika or a splash of liquid smoke creates a rich, smoky taste.
  • Sweet & Tangy – Use maple syrup or agave instead of sugar for a plant-based sweetness.
  • Earthy Warmth – Add whole cumin seeds, mustard seeds, or coriander seeds for a subtle spice.

How to Make Quick Pickled Onions

Ingredients

  • 2 large red onions
  • 2 cups white vinegar
  • 2 cups water
  • 1/4 cup white cane sugar
  • 2 garlic cloves
  • 1 teaspoon coarse kosher salt
  • 1 teaspoon red pepper flakes

Instructions

Step 1 – Boil

To the pot add all the ingredients. Stir and bring to a boil.

Step 2 – Remove from Heat

Immediately remove from the heat.

Step 3 – Fill Jars

Evenly transfer the onions and garlic cloves to the mason jars.

Step 4 – Pour Liquid

Pour the liquid into each jar.

Step 5 – Cool

Allow them to cool for at least one hour.

Step 6 – Refrigerate

Place a lid on top and store them in the fridge.

How to Store Quick Pickled Onions

Proper storage ensures your pickled onions stay fresh and flavorful:

  • Refrigeration – Quick pickled onions should always be stored in an airtight glass jar in the refrigerator. They typically stay fresh for up to two weeks.
  • Avoid Contamination – Use a clean utensil every time you take onions from the jar to prevent bacteria from getting into the brine.
  • Check for Freshness – If the onions develop an off smell, unusual texture, or appear cloudy, it’s best to discard them and make a fresh batch.

More Recipes

If you like this recipe, you’ll love these too:

  • Mango Salsa
  • Black Bean Salad with Avocado
  • Homemade Ketchup: No Sugar Added
  • Oil-Free Cowboy Caviar
  • Pico de Gallo
Yield: 2 Mason Jars

Quick Pickled Onions

Quick Pickled Onions

Add a tangy crunch to any dish with quick pickled onions! This easy recipe delivers zesty, crisp onions in minutes—perfect for tacos, salads, and more.

Prep Time 5 minutes
Cook Time 5 minutes
Additional Time 1 hour
Total Time 1 hour 10 minutes

Ingredients

  • 2 large red onions
  • 2 cups white vinegar
  • 2 cups water
  • 1/4 cup white cane sugar
  • 2 garlic cloves
  • 1 teaspoon coarse kosher salt
  • 1 teaspoon red pepper flakes

Instructions

  1. To the pot add all the ingredients. Stir and bring to a boil.
  2. Immediately remove from the heat.
  3. Evenly transfer the onions and garlic cloves to the mason jars.
  4. Pour the liquid into each jar.
  5. Allow them to cool for at least one hour.
  6. Place a lid on top and store them in the fridge.

Notes

Store pickled onions in the fridge for up to 2 weeks.

Did you make this recipe?

We'd love to see it! Tag us and use #MyPlantBasedFamily!

© Holly Yzquierdo

Filed Under: Recipes, Sauces, Dips, and Salad Dressings

Homemade Ketchup: No Sugar Added

November 2, 2024 by Holly Yzquierdo Leave a Comment

homemade ketchup

Making homemade ketchup without added sugar is easier than you might think, and it’s a fantastic way to enjoy a healthier version of this classic condiment. By using natural ingredients like tomato sauce, tomato paste, and maple syrup, you can create a rich, flavorful ketchup that pairs perfectly with your favorite foods.

Why Make Homemade Ketchup with No Added Sugar?

Store-bought ketchups often contain high-fructose corn syrup, refined sugar, and preservatives that can make them less healthy than they seem. With homemade ketchup, you’re in control of every ingredient, allowing you to avoid added sugars and artificial ingredients while creating a fresher, more wholesome condiment. Plus, the flavor of homemade ketchup is often richer and more balanced, as you can adjust the sweetness, tanginess, and spice level to your taste.

This homemade ketchup recipe uses maple syrup as a natural sweetener, which has a lower glycemic index than refined sugar, meaning it doesn’t cause rapid spikes in blood sugar. Maple syrup also adds a subtle depth of flavor that complements the tomatoes without overpowering them, making this ketchup a delicious and versatile choice for a range of dishes.

Tips for Making Perfect Homemade Ketchup

  1. Adjust the Sweetness: If you like your ketchup a little sweeter, feel free to add more maple syrup in small increments. Maple syrup is naturally sweet, but it has a milder flavor than refined sugar, so adding a bit more won’t make the ketchup too sweet.
  2. Control the Thickness: If you prefer a thicker ketchup, reduce the amount of water or add a bit more tomato paste. For a thinner consistency, add a small amount of water until you reach the desired texture. Since the consistency may thicken slightly as it cools, keep that in mind when adjusting.
  3. Balance the Tanginess: Apple cider vinegar provides a balanced acidity, but you can increase or decrease it depending on your taste. For a stronger tang, add an extra tablespoon of vinegar, or reduce it slightly for a milder flavor.
  4. Spice it Up: If you’re a fan of spicy ketchup, add a pinch of cayenne pepper or smoked paprika. These spices will add warmth and a subtle kick without drastically changing the flavor profile. Smoked paprika is especially great for adding a touch of smokiness.

Creative Ways to Use Homemade Ketchup

Homemade ketchup can be used just like store-bought ketchup, but its richer, fresher flavor makes it even more versatile. Here are some ideas for incorporating it into your meals:

  • Dipping Sauce: Use your homemade ketchup as a dip for fries, sweet potato wedges, and vegetable sticks. Its natural sweetness pairs well with savory snacks.
  • Topping for Burgers and Sandwiches: Spread your ketchup on veggie burgers, sandwiches, or wraps for an extra layer of flavor. It’s especially tasty with plant-based burgers and adds a nice contrast to fresh vegetables.
  • Base for Barbecue Sauce: Homemade ketchup makes an excellent base for barbecue sauce. Simply add some liquid smoke, a bit more vinegar, and extra spices to create a tangy, smoky sauce.
  • Flavor Boost for Soups and Stews: Adding a tablespoon of ketchup to soups or stews can enhance the tomato flavor and give a hint of sweetness. It works well in vegetable stews or bean-based chilis.
  • Salad Dressing Ingredient: For a unique twist, add a spoonful of homemade ketchup to a vinaigrette for a touch of sweetness and acidity. It’s especially good in dressings for salads with hearty greens like kale or arugula.

How to Make Homemade Ketchup Without Added Sugar

Ingredients

  • 8-ounce can tomato sauce 
  • 6-ounce can tomato paste 
  • ¼ cup apple cider vinegar 
  • ¼ cup water  
  • ¼ cup maple syrup 
  • ¼ teaspoon coarse kosher salt 
  • ¼ teaspoon black pepper 
  • ¼ teaspoon garlic powder 
  • ¼ teaspoon onion powder 

Instructions

Step 1 – Combine All Ingredients

Combine all the ingredients in a saucepan over medium heat. Stir until combined.  

Step 2 – Simmer

Simmer on low for 15 minutes. Stir throughout.

Step 3 – Transfer

Remove from the heat. Transfer to a glass mason jar.

Step 4 – Chill

Allow the ketchup to cool for at least 60 minutes so it is cool enough to go into the fridge.

Storage Tips and Shelf Life

Homemade ketchup without added sugar should be stored in an airtight container or glass jar and kept in the refrigerator. It typically lasts for about two weeks. To preserve its freshness, always use a clean spoon when scooping it out. If you make a large batch, you can also freeze some of it in smaller portions, then defrost it as needed.

Making homemade ketchup with no added sugar is a simple way to enjoy a healthier version of a beloved condiment. With just a few pantry ingredients, you can whip up a batch that’s not only delicious but also free from refined sugars and unnecessary additives. Give it a try, and you may never go back to store-bought ketchup!

More Plant Based Dips and Sauces

If you like this recipe, you’ll love these homemade dips and sauces too:

  • Homemade Vegan Ranch
  • Oil-Free Hummus
  • Creamy Vegan Brown Gravy
  • Homemade BBQ Sauce
  • Roasted Red Pepper Dip
Yield: 1 1/2 cups

Homemade Ketchup: No Sugar Added

Homemade Ketchup: No Sugar Added

Quick and easy homemade ketchup without added sugar! Made with tomato sauce, tomato paste, and spices for a healthy, flavorful condiment for any dish.

Prep Time 5 minutes
Cook Time 15 minutes
Additional Time 1 hour
Total Time 1 hour 20 minutes

Ingredients

  • 8-ounce can tomato sauce
  • 6-ounce can tomato paste
  • ¼ cup apple cider vinegar
  • ¼ cup water
  • ¼ cup maple syrup
  • ¼ teaspoon coarse kosher salt
  • ¼ teaspoon black pepper
  • ¼ teaspoon garlic powder
  • ¼ teaspoon onion powder

Instructions

  1. Combine all the ingredients in a saucepan over medium heat. Stir until combined.  
  2. Simmer on low for 15 minutes. Stir throughout.  
  3. Remove from the heat. Transfer to a glass mason jar.  
  4. Allow the ketchup to cool for at least 60 minutes so it is cool enough to go into the fridge.  

Notes

Ketchup can be stored in an airtight container in the refrigerator for up to two weeks.

Did you make this recipe?

We'd love to see it! Tag us and use #MyPlantBasedFamily!

© Holly Yzquierdo

Filed Under: Recipes, Sauces, Dips, and Salad Dressings

Oil-Free Cowboy Caviar

February 29, 2024 by Holly Yzquierdo 2 Comments

Oil-Free Cowboy Caviar

Flavorful, vegan and oil-free cowboy caviar can be eaten as a dip, salad, relish or on a spoon. With my Sweet and Tangy Salad Dressing poured over it, you’ll never miss the oil. Bonus – there’s no added sugar either!

We love to eat this at home with tortilla chips, but it’s also great to make ahead for potlucks and parties. Just be sure to leave the avocado out until you are ready to serve.

What is Cowboy Caviar Made of?

This oil-free cowboy caviar is made with black beans, black eyed peas, corn, tomatoes, bell pepper, onion, jalapeno and cilantro. It all gets tossed in tangy and sweet salad dressing to bring the flavors together. Then avocado is added before serving. Yum!

Is Cowboy Caviar Fattening?

While the traditional Cowboy Caviar made with Italian dressing or olive oil is high in fat, the only ingredient with any significant fat in my oil-free cowboy caviar is avocado, which can be left out if desired. This is a lighter version with big, fresh flavors. The beans are packed with protein and fiber too.

Oil-Free Cowboy Caviar Recipe

Ingredients

  • 1 can black beans, drained and rinsed 
  • 1 can black eyed peas, drained and rinsed 
  • 1 can whole kernel corn, drained and rinsed 
  • 2 cups diced tomatoes (I used 3 Roma tomatoes) 
  • 1/2 cup diced red onion 
  • 1 diced bell pepper (red, yellow or orange) 
  • 1 diced jalapeno pepper (remove seeds if you don’t want it spicy) 
  • ½ cup diced cilantro 
  • 3 avocados, diced (we leave them out and slice some right before each serving, if adding at once, splash with lime juice to keep from browning) 
  • 1 recipe of Sweet and Tangy Salad Dressing (see recipe for ingredients and steps) 

Instructions

Step 1 – Make Salad Dressing

First, follow my recipe to make Sweet and Tangy Salad Dressing. It needs a bit of time to thicken while you put together the cowboy caviar.

Step 2 – Mix Peas, Beans and Corn

In a large mixing bowl, add your beans, peas and corn that have been rinsed and drained.

Step 3 – Chop

Now chop all the tomatoes, red onion, bell pepper, cilantro and avocado.

Step 4 – Stir

Stir in everything, minus the avocado (unless it’s covered with lime to prevent browning).

Step 5 – Pour Dressing

Next, pour the Sweet and Tangy Salad Dressing over the cowboy caviar and mix them together.

Step 6 – Refrigerate

Refrigerate the oil-free cowboy caviar until you are ready to serve. Add the avocado immediately before serving.

Serving Options

My kids love scooping this up with tortilla chips. You can also serve it over a bed of lettuce or just eat it with a fork! I love topping baked potatoes with it too.

Storage

Leftovers can be stored in an airtight container in the refrigerator for 3-5 days as long as it doesn’t have avocado in it. Avocado does not store well and will become brown and mushy.

Slice fresh avocado to serve with any leftovers.

More Plant Based Salsas and Dips

If you love this recipe, check out my other dips and salsas. They are all oil-free too!

  • Mango Salsa
  • Oil-Free Hummus
  • Black Bean Corn Salad with Avocado
  • Vegan Spinach Artichoke Dip
  • Pico de Gallo
Yield: 4 Servings

Oil-Free Cowboy Caviar

Oil-Free Cowboy Caviar

Cowboy caviar is a fancy name for bean salsa. It is a blend of fresh flavors without any added oil that's great for dipping or eating alone.

Prep Time 10 minutes
Additional Time 30 minutes
Total Time 40 minutes

Ingredients

  • 1 can black beans, drained and rinsed
  • 1 can black eyed peas, drained and rinsed
  • 1 can whole kernel corn, drained and rinsed
  • 2 cups diced tomatoes (I used 3 Roma tomatoes)
  • 1/2 cup diced red onion
  • 1 diced bell pepper (red, yellow or orange)
  • 1 diced jalapeno pepper (remove seeds if you don’t want it spicy)
  • ½ cup diced cilantro
  • 3 avocados, diced (we leave out and slice some right before each serving, if adding at once, splash with lime juice to keep from browning)
  • 1 recipe of Sweet and Tangy Salad Dressing (see separate recipe for ingredients and steps)

Instructions

  1. Make Sweet and Tangy Salad Dressing first so it can thicken. 
  2. In a large mixing bowl, add beans, peas and corn that have been drained and rinsed. 
  3. Chop all veggies. 
  4. Stir in all the veggies, minus the avocado (unless it's covered with lime to prevent browning).  
  5. Pour in Sweet and Tangy Salad Dressing and stir everything together. 
  6. Refrigerate until ready to serve. Add avocado right before serving. 

Notes

  • Serve with tortilla chips, on a bed of lettuce or eat it with a spoon
  • Refrigerate leftovers in an airtight container for 3-5 days without avocado
  • Slice fresh avocado and add before serving

Did you make this recipe?

We'd love to see it! Tag us and use #MyPlantBasedFamily!

© Holly Yzquierdo

Filed Under: Daniel Fast Recipes, Main Dish Recipes, Recipes, Salads & Wraps, Sauces, Dips, and Salad Dressings, Side Dishes

Spicy Vegan Ranch Dressing

February 19, 2024 by Holly Yzquierdo Leave a Comment

Spicy Vegan Ranch Dressing

My husband loves this spicy vegan ranch dressing. He used it as a dip for veggies and when he ran out of veggies, he ate the rest with a spoon!

It’s not super spicy, so you don’t notice the heat at first. Then it hits you in the back of your mouth and throat. If you like spicy flavors, this spicy vegan ranch recipe is definitely worth a try.

How Do You Spice Up Ranch?

This simple, yet spicy, vegan ranch recipe offers a burst of flavor that will leave your taste buds tingling and wanting more.

Spicy Vegan Ranch

The subtle heat adds a zesty kick that will take your salad, veggies and snacks to a whole new level. But when you make it at home, you have control over the intensity of the spice – from mild to scorching hot, it’s up to you!

Benefits of Spicy Vegan Ranch

  1. Healthier Option: Homemade spicy vegan ranch eliminates dairy, which reduces saturated fats and cholesterol. It’s a healthier alternative without compromising on taste.
  2. Versatility: Spicy vegan ranch isn’t just for salads – use it as a dipping sauce for fries, a drizzle on roasted veggies, or a flavorful spread for sandwiches and wraps.
  3. Customizable: Tailor the spice level and additional flavors to suit your preferences. It’s a versatile dressing for various meals and snacks.

How to Make Spicy Vegan Ranch

Ingredients

  • 1 cup Raw Cashews, soaked overnight
  • 1/2 cup + 2 tbsp Unflavored Plant-Based Milk
  • 2-3 tbsp Fresh Lemon Juice
  • 2 cloves Garlic, peeled and lightly crushed
  • 2 tsp Dijon Mustard
  • 1 tsp Onion Powder
  • 1 tsp Coarse Salt
  • 1/2 tsp Ground Black Pepper
  • 1 tbsp Dried Parsley
  • 2 tsp Dried Dill
  • 1 tsp Smoked Paprika
  • 3/4 tsp Cayenne

Step 1 – Soak Cashews

Soak the cashews in water in the refrigerator overnight or for at least eight hours. Then drain them.

Step 2 – Blend Cashews

Add the drained cashews, peeled and crushed garlic cloves, and the plant-based milk to a blender.

Process them on high until mostly smooth.

Step 3 – Add Spices

Next add the mustard, onion powder, salt, pepper, parsley, dill, paprika, and cayenne to the blender.

Blend until it as is as smooth as you can get it.

Step 4 – Add Lemon Juice

Now add two tablespoons of lemon juice, and blend until it is incorporated.

At this point, taste the spicy ranch and adjust the salt and lemon juice to suit your desired level of tang.

Step 5 – Adjust Consistency

Thin the ranch to reach by adding more plant-based milk or water, one tablespoon at a time. A thinner ranch is great for dressing salads, while a thicker ranch is ideal for dipping.

For the best flavor, place the ranch in a covered container and allow it to sit in the refrigerator for at least one hour before serving.

Storage

Store the spicy ranch in a tightly sealed container in the refrigerator for up to five days.

Flavor Variations

The beauty of making ranch from scratch is that you control the ingredients, including flavor. Play with different flavors to keep your ranch dressing fresh and exciting.

If it doesn’t taste quite right, try adding a bit of granulated sugar a half teaspoon at a time. A touch of maple syrup or agave nectar can also balance out the heat.

Tailor the spiciness by adjusting the amount of cayenne pepper. Start with a small amount, and add more gradually until reaching your desired heat.

Adding fresh lime juice for an added citrus kick will also complement the heat.

More Vegan Dressings

If you enjoyed this recipe, you’ll love these plant-based dressings too:

  • Homemade Vegan Ranch
  • Raspberry Vinaigrette Salad Dressing
  • Creamy Italian Salad Dressing (Oil-Free)
  • Homemade BBQ Sauce
  • Oil-Free Hummus
Yield: 3/4 pint

Spicy Vegan Ranch Dressing

Spicy Vegan Ranch Dressing

Plant based ranch dressing with a spicy twist to kick up your veggies, salads and wraps.

Prep Time 15 minutes
Additional Time 1 hour
Total Time 1 hour 15 minutes

Ingredients

  • 1 cup Raw Cashews, soaked overnight
  • 1/2 cup + 2 tbsp Unflavored Plant-Based Milk
  • 2-3 tbsp Fresh Lemon Juice
  • 2 cloves Garlic, peeled and lightly crushed
  • 2 tsp Dijon Mustard
  • 1 tsp Onion Powder
  • 1 tsp Coarse Salt
  • 1/2 tsp Ground Black Pepper
  • 1 tbsp Dried Parsley
  • 2 tsp Dried Dill
  • 1 tsp Smoked Paprika
  • 3/4 tsp Cayenne

Instructions

  1. Soak cashews in water in the fridge overnight or at least 8 hours. Drain.
  2. Add the drained cashews, peeled and crushed garlic cloves and plant-based milk to a blender.
  3. Process on high until mostly smooth.
  4. Add mustard, onion powder, salt, pepper, parsley, dill, paprika and cayenne to blender.
  5. Blend until as smooth as possible.
  6. Add 2 tbsp of lemon juice.
  7. Blend until incorporated.
  8. Taste and adjust salt and lemon juice to desired tang.
  9. Thin to desired consistency with more plant-based milk or water, 1 tbsp at a time.
  10. Place in a covered container and sit in fridge for at least 1 hour before serving.

Notes

Store in a tightly sealed container in the fridge for up to 5 days.

Did you make this recipe?

We'd love to see it! Tag us and use #MyPlantBasedFamily!

© Holly Yzquierdo

Filed Under: Recipes, Sauces, Dips, and Salad Dressings

Next Page »

Primary Sidebar

Footer

Find it here!

Amazon Affiliate Disclosure

Holly Yzquierdo of My Plant-Based Family is a participant in the Amazon Services LLC Associates Program, an affiliate advertising program designed to provide a means for sites to earn advertising fees by advertising and linking to amazon.com.

Disclosures

Unauthorized use and/or duplication of any part of this website or content without express and written permission from Holly Yzquierdo is prohibited. Excerpts and links may be used, provided that full credit is given to Holly Yzquierdo and MyPlantBasedFamily.com with links to the original content.

More information on our Privacy Policy and other Disclosures are available.

Copyright © 2025 · Wellness Pro on Genesis Framework · WordPress · Log in