• Skip to primary navigation
  • Skip to main content
  • Skip to primary sidebar
  • Skip to footer

My Plant-Based Family

Feeding My Family a Whole Food, Plant-Based Diet, On a Budget

  • Plant-Based Recipes
    • Breakfast
    • Main Dish
    • Instant Pot
    • Side Dishes
    • Bread and Muffins
    • Salad and Wraps
    • Soup, Stews, and Chili
    • Sauces, Dips, and Salad Dressings
    • Desserts
    • Crock Pot
    • Mexican Food
  • Videos
  • Resources
    • Getting Started
    • Custom Meal Plans
    • Plant-Based eCourse
    • Books
      • The Plant-Based Diet Starter Guide
      • The Plant-Based Holiday Meal Plan & Cookbook
  • Meal Plans
    • Meal Plans 2020
    • Meal Plans 2019
    • Meal Plans 2017
    • Meal Plans 2016
    • Meal Plans 2015
    • Meal Plans 2014
    • Meal Plans 2013
  • About Us
    • Our Family
    • Contact Me
    • Our Food Philosophy
    • Disclosure Policy
      • Privacy Policy

Dairy Free

Simplify Your Morning Routine

January 8, 2015 by Holly Yzquierdo Leave a Comment

Simplify your morning routine with Silk

This conversation is sponsored by Silk. All opinions are my own.

I’m always looking for ways to simplify our morning routine. I’m usually out the door by 6:15 and my husband finishes getting our boys ready and to their schools. We don’t have enough time during the week for complicated meals or extra duties.

Simplify your morning routine with Silk

There are a few things we do to make the mornings run smoothly. If we neglect them we have a hard time getting out the door as quickly as we need to. Let’s face it, mornings are difficult enough without chaos.

Tips to Simplify Your Morning Routine

1. We pack lunches the night before

Yes, everyone gets a packed lunch. My husband and I usually have leftovers while the kids get sandwiches, fruit and kid-friendly fare. Both of the boys have to take a snack to school too. I make sure the snack is in the refrigerator right next to the lunches. I try to get these in the back packs before I leave in the morning but if I don’t it’s easy for my husband to grab.

2. Keep a Launching Pad

I don’t know about you but we travel with a lot of stuff on a daily basis. My kids have back packs, lunch bags, sweat shirts that they take to school every day. My husband and I have various things we have to grab like our phones, I have a company computer I tote around along with my purse, my husband carries his wallet, and a few things he needs for work. Let’s not forget our morning travel mug of coffee! When we don’t have all of these things in the correct spot then we forget something. Some people call this spot a launching pad but we just use the end of our counter.

3. Easy breakfasts

Simply breakfasts are really important during this season of life. I have my kids sit down for breakfast every morning while I finish things up. Gone are the days of slow cooking oatmeal in the morning, I need fast and easy. When I plan ahead I can have breakfasts prepped on the weekends.

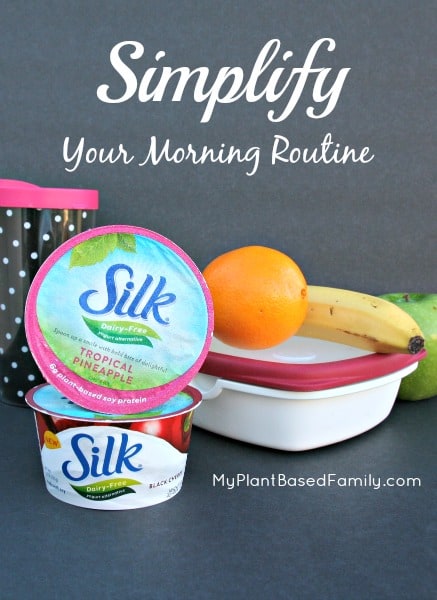
I’m usually so busy that I just grab breakfast to eat at my office. I recently discovered Silk Dairy-Free Yogurt Alternative. It’s make from cultured soy so it’s not a traditional yogurt but it’s so good. We’ve loved every flavor that we’ve tried and with 6 grams of plant-based protein per serving and no artificial flavors or colors it’s a great option for us.

I’ll admit that I was skeptical until I had the first bite, it was smooth, creamy and delicious. My boys have always loved yogurt so I knew they would like it. It’s nice to have another product that is safe for my son with multiple-food allergies. Sign up for Silk’s newsletter here to stay in the loop about new products and join their community.

Do you have tips to help you with your morning routine? I’d love to hear them!

This conversation is sponsored by Silk. The opinions and text are all mine.

Filed Under: Tips for Plant-Based Living Tagged With: Breakfast, Dairy Free, Dessert, gluten free, Healthy, Plant Based Diet, Silk, Vegan, yogurt alternative

Fiesta Pasta

October 29, 2014 by Holly Yzquierdo 13 Comments

Fiesta Pasta is Vegan, Gluten-free, Dairy-Free and Nut-Free

I’ve been sitting on this recipe for a long time, like over a year. My apologies. I think you will agree that it is worth the wait. I’m the kind of girl who loves a vegan, gluten-free, nut-free pasta that tastes like it belongs in a restaurant. It’s also soy-free if that is important to you.

Fiesta Pasta is Vegan, Gluten-free, Dairy-Free and Nut-Free

What’s better than pasta? Pasta with Mexican flare. I often use macaroni noodles and call this Fiesta Mac but you use whichever noodles you like but if you are feeding toddlers small noodles are usually best.

Fiesta Pasta

Ingredients for the sauce

  • 2 Tbsp Nutritional Yeast
  • 2 Tbsp Brown Rice Flour*
  • 1 tsp salt (optional)
  • 1/2 tsp onion powder
  • 1/2 tsp garlic powder
  • 1/2 tsp chili powder
  • 1 1/2 cups unsweetened plant-milk

Ingredients for the pasta

  • 1 package (16 oz) Gluten-Free Pasta (any shape)
  • 1 can black beans, drained and rinsed
  • 1 cup organic corn (I use frozen)
  • 1 cup diced tomatoes

*cornstarch can be used instead

Do

  1. Dump all of the dry ingredients for the sauce into a medium sauce pan on medium heat. Pour in 1/2 cup plant-milk and stir with a whisk.
  2. In a separate pot bring water to boil to cook pasta. Follow the package directions.
  3. Alternate between whisking the sauce and scraping the bottom with a silicone spatula. As the sauce thickens add another 1/2 cup of plant milk until the full 1 1/2 cups is used.
  4. Pour beans and corn into the pasta in its last few minutes of cooking time.
  5. Drain pasta (and corn and beans), pour Fiesta Sauce on top of pasta and mix well.
  6. Dump tomatoes on top and mix one more time.

Serve

Fiesta Pasta is perfect for a potluck and can be used as the Main Dish or a Side Dish! The Fiesta Sauce gives it just the right amount of cheezy flavor without the dairy. You can also add an 8 oz can of tomato sauce (no need to change other measurements, just cook it a bit longer) for a slightly more savory flavor.

This recipe made me fall in love with nutritional yeast all over again. You can easily alter it to suit your preferences.

The page contains affiliate links.

Filed Under: Main Dish Recipes, Mexican Food, Recipes, Side Dishes, Uncategorized Tagged With: Dairy Free, gluten free, Mexican Food, Plant Based Diet, Recipes, Vegan

Roasted Red Pepper Dip

October 8, 2014 by Holly Yzquierdo 5 Comments

I love eating dips. LOVE them I tell you. Since transitioning to a plant-based diet, oil-free hummus is in my weekly meal plan rotation. This Roasted Red Pepper Dip is oil-free and one of my favorites!

This page contains affiliate links.

When I want something with a little more flavor than my classic hummus, I’ll make this Roasted Red Pepper hummus. It’s like magic because I can eat way more veggies when I have hummus than I eat without it. 

Since this hummus is made without oil or tahini, there is very little fat! 

Roasted Red Pepper Hummus

What do you eat with hummus?

There are so many foods that pair well with hummus. Raw veggies, pita bread, and crackers are perfect for hummus. I also enjoy hummus on wraps, sandwiches, in salads, and mixed into pasta! Adding roasted red pepper hummus to my Mediterranean Bowl brings it to a whole new level.

Substituting Chickpeas

Hummus doesn’t have to be made with chickpeas. If you can’t eat chickpeas because of an allergy or intolerance, you can substitute another type of bean. I recommend great northern beans or any other white bean. 

I routinely make dips like my Cilantro Jalapeno Hummus, Spinach Artichoke Dip and Green Chili White Bean Dip with white beans. There isn’t a big difference in flavor or texture, especially if it would take another trip to the store, just use what you have.

Do you need tahini in hummus? 

I don’t think you need tahini in hummus. Sure it adds some flavor and creaminess but it’s not necessary in my opinion. I’m not a big tahini fan.

I just leave tahini out of all the hummus recipes I make. 

Kids love dip

I don’t really need an occasion to make humus and I find that my kids love it too. They easily eat twice as many veggies (if not more) when I have a delicious dip to enjoy them with. I’ll often cut up veggies and leave hummus next to them on the counter while I’m cooking. As they smell dinner, they come in to snack while I cook. Without a doubt, they eat way more veggies that they would at dinner.

This dip is really easy to make and is delicious with veggies, crackers, chips or in a wrap.

This dip is allergy-friendly by avoiding nuts, sesame and dairy. It’s also vegan and gluten-free, which is pretty typical around here.

Roasted Red Pepper Hummus

Ingredients

  • 1 15 ounce can of chickpeas, drained
  • 1/4 cup water (more or less)
  • ½ tsp onion powder
  • ½ tsp garlic powder
  • ½ tsp salt
  • ½ cup roasted red pepper

Do

Puree beans, water, spices and red pepper in a Food Processor or high-powered blender and blend until smooth. I use my Blendtec and push the “dip” button for super simple and quick option.

Serve

This is the perfect condiment for your veggie wraps and great with raw veggies. 

Yield: 6

Roasted Red Pepper Hummus

Roasted Red Pepper Hummus

Roasted Red Pepper Hummus is an oil-free, low fat hummus that is perfect for people on a whole food plant-based diet.

Prep Time 10 minutes
Total Time 10 minutes

Ingredients

  • 1 15 ounce can of chickpeas, drained
  • 1/4 cup water (more or less)
  • ½ tsp onion powder
  • ½ tsp garlic powder
  • ½ tsp salt
  • ½ cup roasted red pepper

Instructions

  1. Puree beans, water, spices and red pepper in a Food Processor or high-powered blender and blend until smooth.
  2. If needed, you can add more liquid to get a smoother consistency.

Notes

Store leftover dip in an air tight container in the refrigerator for up to a week.

Recommended Products

As an Amazon Associate and member of other affiliate programs, I earn from qualifying purchases.

  • Blendtec 
    Blendtec 
  • Hamilton Beach 10-Cup Food Processor 
    Hamilton Beach 10-Cup Food Processor 

Did you make this recipe?

We'd love to see it! Tag us and use #MyPlantBasedFamily!

© Holly Yzquierdo
Category: Sauces, Dips, and Salad Dressings

Filed Under: Recipes, Sauces, Dips, and Salad Dressings Tagged With: Dairy Free, gluten free, Healthy, hummus, Plant Based Diet, Recipes, Vegan

Vegan Spinach Artichoke Dip

September 24, 2014 by Holly Yzquierdo 28 Comments

Vegan Spinach Artichoke Dip

Are you looking for an all around great tasting dip that is perfect for friendly get together’s, holiday parties or comfort food. Let me introduce you to my guilt-free, low-fat Vegan Spinach Artichoke Dip.

Vegan Spinach Artichoke Dip

Unlike your typical spinach artichoke dip, this healthy Vegan Spinach Artichoke Dip is dairy-free, gluten-free, oil-free and nut-free!

Many people use cashews to make cheesy plant-based dips, but that adds fat and allergens. Since I consider this perfect party food, I want it to be suitable for people with nut allergies.

Vegan Spinach Artichoke Dip

Plant-Based Pantry Staples

I like to keep a jar of artichoke hearts in my pantry just in case I want to make this dip! I usually have all the other ingredients on hand so this is an easy dip to make.

  • White Beans
  • Spices + Nutritional Yeast
  • Spinach
  • Artichokes
  • Lemon Juice
Easy Vegan Spinach Artichoke Dip.

Quick and Easy Spinach Artichoke Dip

Nothing has to be prepared ahead of time and I don’t have to buy any special ingredients. This dip comes together quickly in my Blendtec Blender but a food processor would work too.

Plant-Based Party Food

This Plant-Based Spinach Artichoke Dip is perfect for holiday’s like Christmas and New Year’s Eve parties! It’s a game day must have! It also travels really well so it’s easy to take with you.

You don’t have to save it for parties or football season. It’s perfectly suited for movie nights, pre-dinner (or post-dinner) snacks, on a sandwich or wrap, or to make when you are all by yourself and don’t want to share.

vegan Spinach Artichoke Dip

Spinach Artichoke Dip

Easy, vegan Spinach Artichoke Dip uses whole foods to create a delicious plant-based dip. See F.A.Q.’s for substitutions.

Ingredients

  • 1 ½ cup warm white beans (I use Great Northern)
  • ½ cup water (more or less)
  • ½ tsp onion powder
  • ½ tsp garlic powder
  • ½ tsp salt
  • 2 Tbsp nutritional yeast
  • ½ cup artichoke hearts (I use jarred, without oil)
  • 1 tsp lemon juice
  • 1 cup raw spinach

Do

  1. Puree beans, water and spices in a food processor or high-powered blender, I use my Blendtec.
  2. Add artichoke hearts and lemon juice and pulse slightly until it reaches desired texture.
  3. Pour dip into heat safe container (I use an oven safe casserole dish). Rip spinach into smaller pieces and mix into dip.
  4. Bake for 20 minutes at 350° or until warm.

Serve

This dip is great with crackers or chips but also really good on bread or in a wrap. This is oil-free and diary-free but tastes sinfully good.

Yield: 8 servings

Vegan Spinach Artichoke Dip

Vegan Spinach Artichoke Dip

Vegan Spinach Artichoke Dip is perfect for parties or football season. This easy recipe is dairy-free, nut-free, gluten-free, oil-free and delicious.

Prep Time 10 minutes
Cook Time 20 minutes
Total Time 30 minutes

Ingredients

  • 1 15 ounce can of white beans, drained and warmed (I use Great Northern)
  • ½ cup water (more or less)
  • ½ tsp onion powder
  • ½ tsp garlic powder
  • ½ tsp salt
  • 2 Tbsp nutritional yeast
  • ½ cup artichoke hearts (I use jarred, without oil)
  • 1 tsp lemon juice
  • 1 cup raw spinach

Instructions

  1. Drain your beans then warm them slightly. Puree beans, water and spices in a food processor or high-powered blender, I use my Blendtec.
  2. Add artichoke hearts and lemon juice and pulse slightly until it reaches desired texture.
  3. Pour dip into heat safe container (I use an oven safe 9x9 casserole dish). Rip spinach into smaller pieces and mix into dip.
  4. Bake for 20 minutes at 350° or until warm.

Notes

This dip is great with crackers or chips but also really good on bread or in a wrap. I love it with fresh, raw veggies.

Store covered in the fridge for a few days.

See F.A.Q.'s in the post for more information.

Recommended Products

As an Amazon Associate and member of other affiliate programs, I earn from qualifying purchases.

  • Hamilton Beach 10-Cup Food Processor 
    Hamilton Beach 10-Cup Food Processor 
  • Blendtec 
    Blendtec 

Did you make this recipe?

We'd love to see it! Tag us and use #MyPlantBasedFamily!

© Holly Yzquierdo
Category: Sauces, Dips, and Salad Dressings

Frequently Asked Questions

Why do you use white beans?

White beans give the dip a creamy base that is low in fat. It’s also more allergy-friendly than dips with a nut base. White beans are full of fiber so you’ll feel more satisfied.

Does Vegan Spinach Artichoke Dip taste cheesy?

This dip is dairy-free and doesn’t contain cheese so it isn’t real cheesy. It does contain nutritional yeast which gives it some cheesy flavor.

Can I use frozen chopped spinach instead of fresh?

Yes you can. I recommend allowing the spinach to thaw a bit and squeeze out extra moisture.

Can I use fresh garlic?

Yes, fresh garlic, and even roasted garlic is delicious in this. I originally used garlic powder for ease but fresh is a great option.

For more football food ideas visit my Party Food Pinterest Board! It’s full of delicious dips and finger foods.

Need More Dip Ideas

  • Oil-Free Hummus
  • Roasted Red Pepper Dip
  • Cilantro Jalapeno Hummus
This page contains affiliate links.

Filed Under: Recipes, Sauces, Dips, and Salad Dressings Tagged With: Dairy Free, dips, party food, Plant Based Diet, Recipes, Vegan

Roasted Stuffed Winter Squash from the Forks Over Knives Plan

September 17, 2014 by Holly Yzquierdo 6 Comments

Roasted Stuffed Winter Squash from the Forks Over Knives Plan

Yesterday I shared a review of the new book The Forks Over Knives Plan by Alonda Pulde, MD and Matthew Lederman, MD. Today I’m going to share a recipe from the book! This recipe is shared with permission.

It’s perfect timing too because fall is on the way and soon we will be looking for comforting recipes just like this one.

Roasted Stuffed Winter Squash from the Forks Over Knives Plan

Roasted Stuffed Winter Squash

Winter squashes, such as acorn and butternut, can be tricky to work with because their tough skin is hard to peel. Preparing squash this way — stuffed with a savory filling and roasted — puts that sturdy shell to good use. The rice should be quite moist after it cooks in step 3; it provides good contrast to the squash and helps the stuffing mixture stay together without becoming chewy or dry during baking. — Darshana Thacker

Makes 4 stuffed squash halves

  • 2 medium acorn squash
  • ½ cup wild rice medley
  • 1 cup low-sodium vegetable broth, plus more as needed
  • ½ medium red onion, finely chopped
  • 1 teaspoon garlic powder
  • 1 teaspoon ground ginger
  • 1½ teaspoons dried rosemary
  • ½ cup finely chopped carrot
  • ½ cup finely chopped red bell pepper
  • ½ cup small broccoli florets
  • ½ cup small cauliflower florets
  • ¼ teaspoon freshly ground black pepper
  • Sea salt
  • 3 tablespoons pine nuts

1. Cut each acorn squash in half through the stem. Trim the stem and remove and discard the seeds (keep the skin on).

2. Bring a large saucepan or pot of water to a boil. Add the squash halves and cook until the squash is slightly soft when pierced with a fork, 15 to 20 minutes. Remove from the water and drain well. Set aside until cool enough to handle.

3. Meanwhile, bring 1½ cups water to a boil in a small saucepan. Add the wild rice medley and cook, covered, over medium heat for 25 minutes. (Alternatively, follow the cooking instructions on the rice package, using a bit more water than called for so that the rice is moist after steaming.) Remove from the heat and set aside.

4. Use a spoon to scoop out the inner edges of each cooled squash half to create a wider and deeper hollow for the stuffing; leave about half of the squash flesh attached to the peel. Reserve the scooped-out squash flesh for the stuffing. Set the squash shells aside.

5. Preheat the oven to 350°F.

6. In a skillet with a lid, combine the vegetable broth, onion, garlic powder, ginger, and rosemary. Cover and bring to a boil over high heat. Reduce the heat to medium and cook, covered, until the onion is translucent, about 10 minutes, stirring occasionally.

7. Add the carrot, cover, and cook for about 10 minutes. Add the bell pepper, broccoli, cauliflower, black pepper, and salt to taste, cover, and cook until the vegetables are tender, about 10 minutes more.

8. Add the reserved squash flesh and wild rice. Use a wooden spoon to mix the stuffing together; it should be a bit creamy. If all the liquid has dried up, add about ¼ cup broth or as much as is needed to make it slightly creamy. Taste and adjust the seasoning. Remove from the heat.

9. Arrange the acorn squash shells on a baking sheet and divide the stuffing evenly among them. Sprinkle the pine nuts on top.

10. Bake until the pine nuts are browned and the stuffing is heated through, about 20 minutes. Remove from the oven and let stand for a few minutes before serving. Serve hot.

The above is an excerpt from the book The Forks Over Knives Plan: How to Transition to the Life-Saving, Whole-Food, Plant-Based Diet by Alona Pulde, MD, and Matthew Lederman, MD. Please refer to the finished book for accuracy and references.

Giveaway

Don’t forget to enter the giveaway to win you very own copy of the Forks Over Knives Plan and read my full review.

Have you entered the giveaway yet?

Filed Under: Recipes Tagged With: Dairy Free, Forks Over Knives, Forks Over Knives Plan, Plant Based Diet, Recipes, squash, Vegan

Cookie Bars (Vegan, Gluten-Free and Nut-Free)

September 3, 2014 by Holly Yzquierdo 7 Comments

Gluten-Free, Nut-Free, Vegan Cookie bars

I first made this recipe when I was trying to make cookies. It tasted good but the consistency was off. I tweaked it to develop the Sunbutter Cookie Recipe (also GF and Vegan) that I shared last week. This recipe is easier and works really well as Cookie Bars. They are very sturdy and perfect for lunch box packing. My kindergartener ate them daily after school.

Gluten-Free, Nut-Free, Vegan Cookie bars

I make this recipe with Sunbutter because my youngest son is allergic to peanuts and tree nuts. You could try this with peanut or almond butter if you are not allergic. Also, if you do not have brown rice flour and sorghum flour you could use a gluten-free baking mix. If you make it with any adaptations I’d love to hear how they go. I’m considering making them with oat flour next. I imagine they would work fine with wheat flour also but I haven’t tried it.

Gluten-Free, Nut-Free, Vegan Cookie bars

Cookie Bars

Ingredients

  • 1/2 cup SunButter
  • 1/2 cup sugar
  • 1/2 cup Brown Rice Flour (this is the best deal I’ve found)
  • 1/2 cup Sorghum Flour
  • 1/2 tsp Xanthan Gum
  • 1/2 tsp vanilla
  • 1/8 cup rice milk
  • 1/2 cup Enjoy Life Semi-Sweet Chocolate Chips (optional)

Do

  1. Cream Sunbutter and Sugar together.
  2. Dump the rest of the ingredients together, except chocolate chips.
  3. Mix well, adding extra rice milk if needed.
  4. If using chocolate chips mix them in or just sprinkle them on top.
  5. Pour into a 9×9 pan that is lined with parchment paper.
  6. Bake at 350 degrees for 12 minutes.
  7. Allow to cool before removing from pan and cutting into bars. Store at room temperature in an airtight container for about 5 days.

Serve

This is perfect for an after school snack or in the lunch box.

The odd thing is that my super picky kid loved these and the one who eats everything didn’t like them. He doesn’t always want to try new things because of his food allergies so I don’t force it.

Do you need to work around various food allergies or restrictions? I try to make them as accommodating as possible. What restrictions do you deal with?

This recipe is part of the Virtual Vegan Linky Potluck!

This page contains affiliate links. 

Filed Under: Allergies, Back to School, Dessert, Recipes Tagged With: allergies, Back to School, Dairy Free, gluten free, Healthy, kids, Plant Based Diet, Recipes, Vegan

« Previous Page
Next Page »

Primary Sidebar

Footer

Find it here!

Amazon Affiliate Disclosure

Holly Yzquierdo of My Plant-Based Family is a participant in the Amazon Services LLC Associates Program, an affiliate advertising program designed to provide a means for sites to earn advertising fees by advertising and linking to amazon.com.

Disclosures

Unauthorized use and/or duplication of any part of this website or content without express and written permission from Holly Yzquierdo is prohibited. Excerpts and links may be used, provided that full credit is given to Holly Yzquierdo and MyPlantBasedFamily.com with links to the original content.

More information on our Privacy Policy and other Disclosures are available.

Copyright © 2023 · Wellness Pro on Genesis Framework · WordPress · Log in