• Skip to primary navigation
  • Skip to main content
  • Skip to primary sidebar
  • Skip to footer

My Plant-Based Family

Eating Whole Food, Plant-Based Diet recipes, On a Budget.

  • Plant-Based Recipes
    • Breakfast
    • Main Dish
    • Instant Pot
    • Daniel Fast Recipes
    • Side Dishes
    • Bread and Muffins
    • Salad and Wraps
    • Soup, Stews, and Chili
    • Sauces, Dips, and Salad Dressings
    • Desserts
    • Crock Pot
    • Mexican Food
  • Videos
  • Resources
    • Getting Started
    • Books
      • The Plant-Based Diet Starter Guide
      • The Plant-Based Holiday Meal Plan & Cookbook
  • Meal Plans
    • Meal Plans 2020
    • Meal Plans 2019
    • Meal Plans 2017
    • Meal Plans 2016
    • Meal Plans 2015
    • Meal Plans 2014
    • Meal Plans 2013
  • About Us
    • Our Family
    • Contact Me
    • Our Food Philosophy
    • Disclosure Policy
      • Privacy Policy
  • Daniel Fast Recipes

Side Dishes

Oil-Free Potato Wedges

April 9, 2020 by Holly Yzquierdo 7 Comments

oil-free potato wedges

For months, I’ve had a delicious new obsession. Oven Baked Oil-Free Potato Wedges are my favorite plant-based side dish! This easy recipe is the perfect addition to your next plant-based meal.

oil-free potato wedges

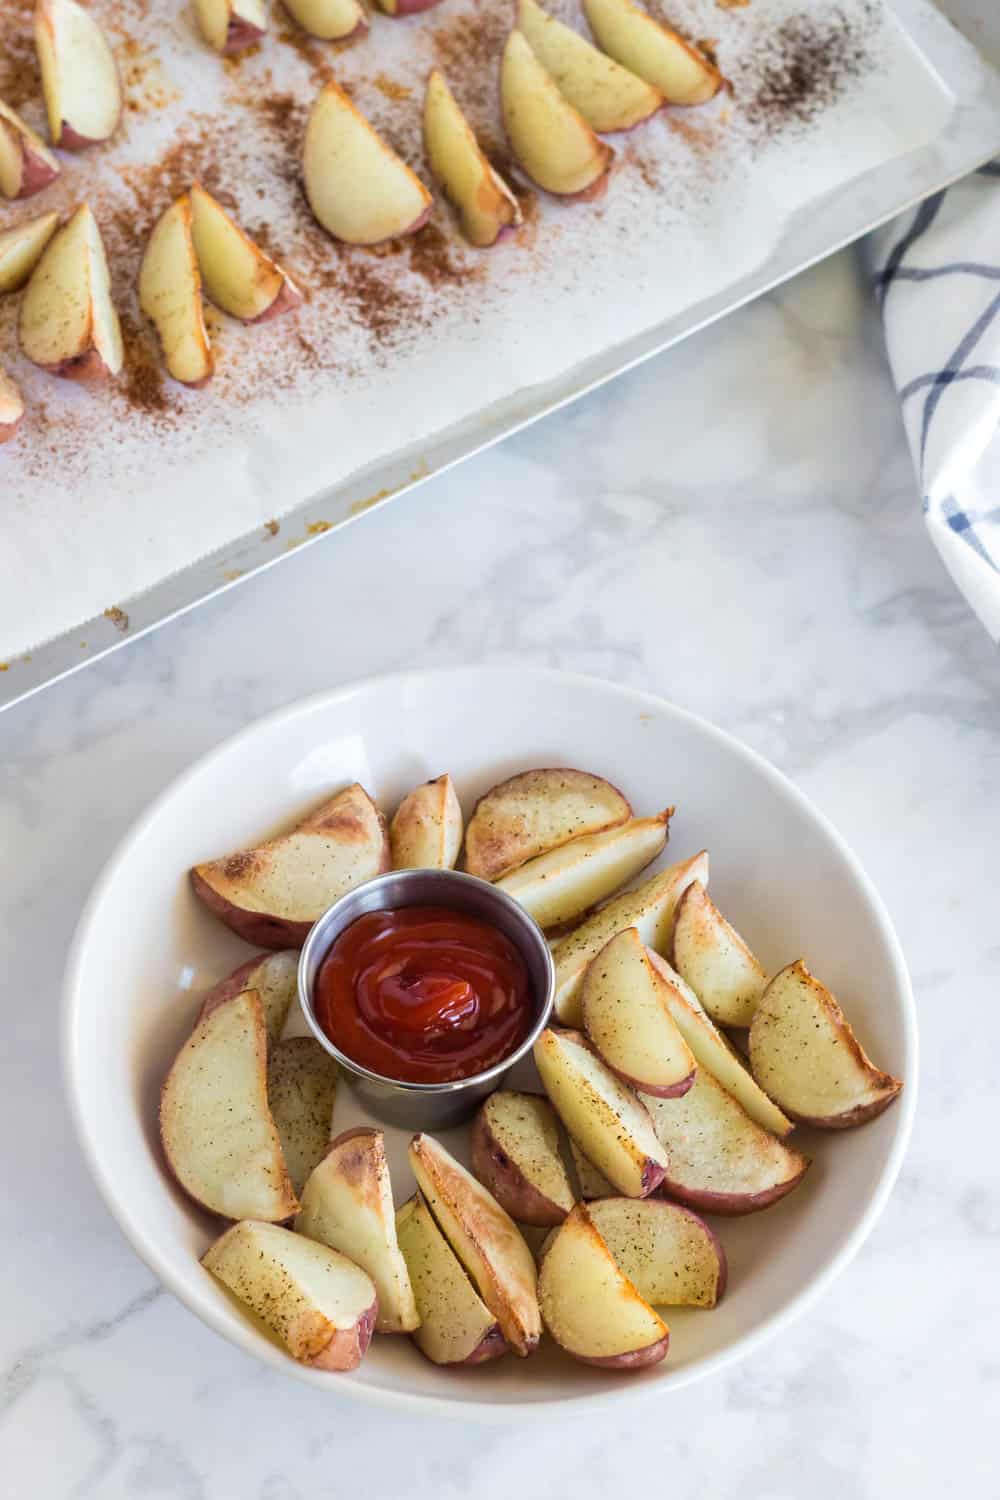
These Oil-Free Potato Wedges are pretty much like eating fries! Making Potato Wedges is easier than making fries though, especially when you use small red new potatoes. 

I’ve always enjoyed eating small red new potatoes because they are easier to wash than other potatoes.  For instance, russet potatoes have thick skin that require a lot of scrubbing. 

Oven baked oil-free potato wedges

The biggest benefit of using the small red new potatoes is their thin skin that most people don’t really notice. One of my kids is a bit on the picky side and doesn’t like the skin. The other doesn’t mind it at all. 

Making Oil-Free Potato Wedges

Oil-Free Potato Wedges are easy to make, too! You can customize them based on what you have but all you really need are potatoes and spices of your choice. At minimum, I use salt and pepper but I prefer to add onion and garlic powder. 

One of my complaints about making oil-free fries in the oven is that they don’t always get crisp. I struggle getting them the same size. Some burn while others are still too raw. I try to flip them at the right time but I struggle at getting them to cook evenly. 

The way I cut the small red new potatoes solves this problem. It is important to find potatoes that are on the small side. Sometimes we get grocery delivery and they give us the larger red new potatoes that are about the size of a lemon and they are a bit trickier to cut, but still work. 

oil free potato wedges

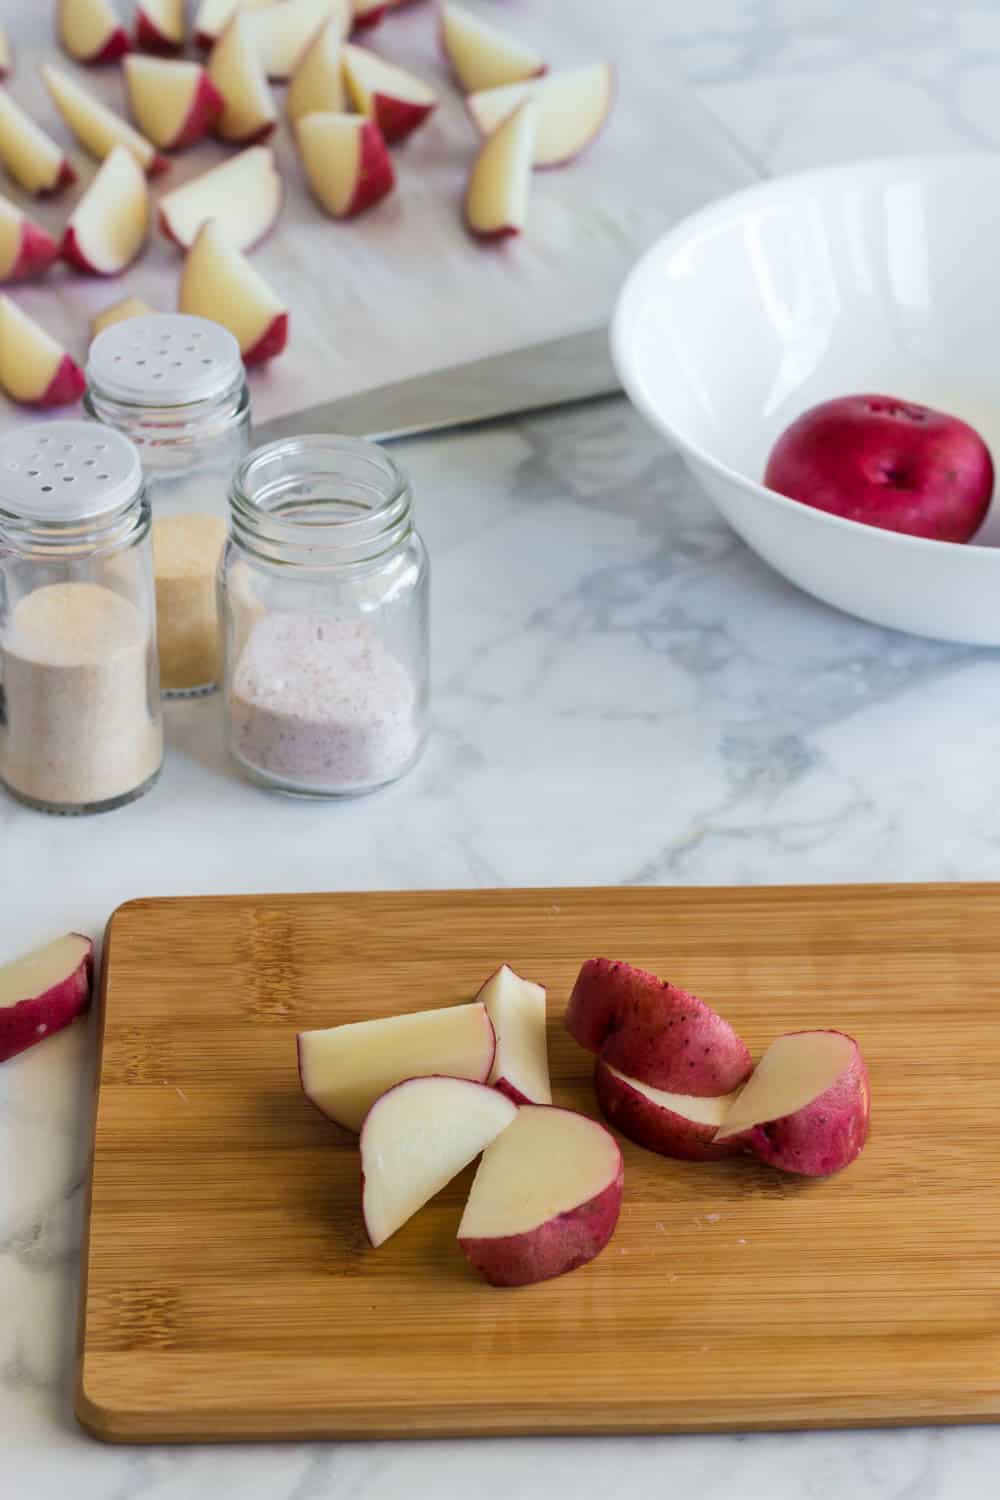
How to Cut Your Potato Wedges

Your cut will depend on the size of your red new potatoes. 

If your potatoes are the size of a grape, don’t cut them, leave them whole. If they are the size of a lime, cut them in half, then cut three wedges in each half, creating six wedges. If they are larger than a lime, cut them in fourths, then cut each of the fourths in half, creating eight wedges. These aren’t hard and fast rules, do what seems right to you. It’s important that all the wedges are of similar size and thickness so they all cook uniformly.

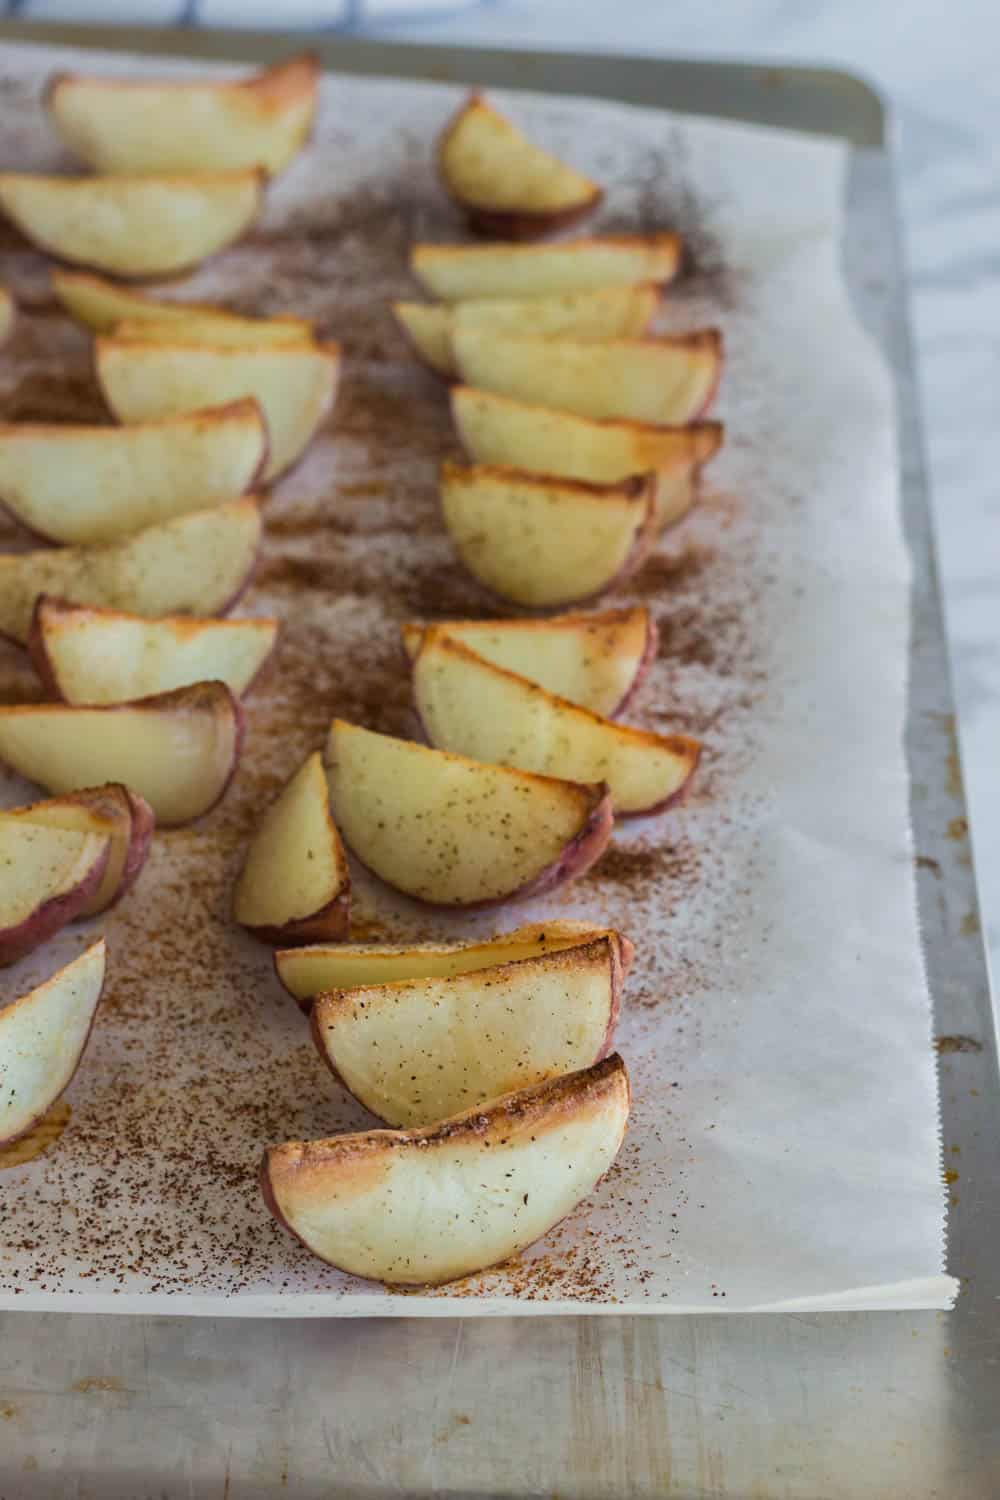
You want to keep the curved part of the potato intact. You’ll arrange each wedge on a cookie sheet covered in parchment or a silicone baking mat. By placing the potatoes with the peel side down and the freshly cut side up, you can avoid having to flip them over in the oven. They will cook evenly.

This also leaves the freshly cut side ready for a sprinkle of seasonings if you want a short cut. You can easily sprinkle salt, pepper, and any other seasoning straight onto the potatoes wedges on the cookie sheet.

The potato wedges will be better covered if you put them in a bowl and sprinkle the seasonings on them and mix them up, but I’ve done it both ways and they both work. 

If you pour the seasonings into the wedges on the cookie sheet, you’ll smell the seasonings as they cook. Toward the end they might start smelling burnt and the spices on the cookie sheet will burn but the spices on the potatoes will be perfect. 

oil-free potato wedges

Once the potato wedges are cut and the spices are applied, it’s time to bake. Like I said, you don’t have to flip these wedges! You do need to preheat your oven to 400 degrees. After moving into this house over the summer, I learned that our oven thermostat was off. We are just renting so it wasn’t worth a service call but I did buy an inexpensive oven thermometer. It’s important that the oven is completely preheated before putting the potato wedges in. 

These need to bake for 40 minutes. That gives me time to make just about anything else! 

Oil-Free Potato Wedges

oil-free potato wedges

Oven baked oil-free potato wedges use only potatoes and spices in this easy plant-based recipe.

Prep Time 10 minutes
Cook Time 40 minutes
Additional Time 5 minutes
Total Time 55 minutes

Ingredients

  • 8-10 small red new potatoes
  • salt and pepper, to taste
  • onion powder, to taste
  • garlic powder, to taste

Instructions

  1. Preheat your oven to 400 degrees.
  2. Wash your small red new potatoes.
  3. Cut them into wedges as describe in the post. They need to be uniform size to cook evenly.
  4. If seasoning them in a bowl, put the potato wedges in a bowl and generously sprinkle seasonings on tip. Stir them with your hands to distribute the seasoning. Then place them on the cookie sheet with the cut side up (as pictured above).
  5. If seasoning them on the cookie sheet, place the potato wedges with the cut side up (as pictured above) on a piece of parchment on a cookie sheet. Generously sprinkle salt, pepper, onion and garlic powder on the wedges.
  6. Place the cookie sheet in the oven for 40 minutes.
  7. Allow the potato wedges to cool for about 5 minutes before eating.

Notes

The potato wedges can be stored in an air tight container in the refrigerator. They need to be reheated in the oven or an air fryer. They don't microwave well.

See notes in the blog post for tips on cutting the wedges.

Recommended Products

As an Amazon Associate and member of other affiliate programs, I earn from qualifying purchases.

  • Kirkland Signature Non Stick Parchment Paper 205 sq ft (Twin Pack)
    Kirkland Signature Non Stick Parchment Paper 205 sq ft (Twin Pack)
  • Calphalon Nonstick Bakeware, Insulated Cookie Sheet, 14-inch by 16-inch
    Calphalon Nonstick Bakeware, Insulated Cookie Sheet, 14-inch by 16-inch

Did you make this recipe?

We'd love to see it! Tag us and use #MyPlantBasedFamily!

© Holly Yzquierdo
Category: Recipes

Filed Under: Daniel Fast Recipes, Recipes, Side Dishes Tagged With: Plant Based Diet, Recipes

Mango Salsa

June 7, 2019 by Holly Yzquierdo 2 Comments

Mango Salsa

Are you looking for something that will bring the WOW back to your regular favorites? Try adding this Mango Salsa to your salads, tacos, burritos and more!

Mango Salsa

I’ve been a fan of fruit salsa’s long before I ate plant-based. There is something about the sweetness and spiciness mixed together that I find irresistible. Fruit salsas, especially Mango Salsa, will elevate your favorite recipes to a whole new level.

It’s no secret that I love salsa. I have salsa almost every day. Mexican food is my favorite and we almost always have something I can pour salsa on. In the summer when my favorite fruits are in season, I might go a little overboard with all the wonderful salsa combinations.

Mango Salsa

Today, I’m going to focus on this incredibly easy Mango Salsa recipe!

Trust me, if you bring this to a potluck or share it with friends, they will devour it and want the recipe. It doesn’t’ matter if they are plant-based, they will love it.

You can serve it on salad, my Mango Black Bean Salad is very similar to this, just add black beans and greens. In fact, I’d rather have Mango Salsa than any salad dressing!

Mango Salsa

Mango Salsa

If you like mango, you are going to love this super simple Mango Salsa. Feel free to change it up to suit your taste.

Ingredients

  • 1 pint grape tomatoes, or your favorite tomato
  • 1 Large mango, diced (approximately 1 Cup)
  • 1-2 Jalapenos, finely diced (depending your heat preference, remove the seeds for a milder heat)
  • 1/3 Cup Red Onion, diced
  • ½ Cup cilantro, chopped
  • 1 Lime, juiced (1/4 Cup juice)
  • Pinch of salt

Do

  1. Dice tomatoes, place tomatoes in a medium sized bowl, then add the remaining diced ingredients and give it a gentle stir.
  2. Add the chopped cilantro, lime juice and a pinch of salt.  Mix well and serve.

This salsa is perfect immediately but it can also be kept in an airtight container in the refrigerator for about 5 days. I love it after the first day when all the flavors have gotten a chance to meld together.

You can serve this salsa with just about anything! If you need some ideas, try it with tortilla chips, Lentil Tacos, Breakfast Tacos, Taco Salad, Veggie Burger, Tofu Scramble or Southwest Tofu Scramble, or anything else you can think of.

I’d love to hear how you enjoy this Mango Salsa! Don’t forget to pin this recipe and add it to your meal plan! I’ve pinned it in my “Favorites” board.

Mango Salsa

Mango Salsa

Mango Salsa

Try adding this Mango Salsa to your salads, tacos, burritos and more!

Prep Time 15 minutes
Total Time 15 minutes

Ingredients

  • 1 pint grape tomatoes, or your favorite tomato
  • 1 Large mango, diced (approximately 1 Cup)
  • 1-2 Jalapenos, finely diced (depending your heat preference, remove the seeds for a milder heat)
  • 1/3 Cup Red Onion, diced
  • ½ Cup cilantro, chopped
  • 1 Lime, juiced (1/4 Cup juice)
  • Pinch of salt (optional)

Instructions

  1. Dice tomatoes, place tomatoes in a medium sized bowl, then add the remaining diced ingredients and give it a gentle stir.
  2. Add the chopped cilantro, lime juice and a pinch of salt.  Mix well and serve.

Notes

This salsa is perfect immediately but it can also be kept in an airtight container in the refrigerator for about 5 days. I love it after the first day when all the flavors have gotten a chance to meld together.

Did you make this recipe?

We'd love to see it! Tag us and use #MyPlantBasedFamily!

© Holly Yzquierdo
Category: Recipes

Filed Under: Daniel Fast Recipes, Recipes, Sauces, Dips, and Salad Dressings, Side Dishes Tagged With: Plant Based Diet, Recipes

One Pot Broccoli and Rice

March 29, 2019 by Holly Yzquierdo 39 Comments

One Pot Broccoli and Rice

If you’re looking for a quick, delicious, and nutritious one-pot meal, this Broccoli and Rice recipe is the perfect option. With minimal ingredients and simple steps, you can make a wholesome vegan dish that’s packed with protein, fiber, and flavor. It’s made with pantry staples like Jasmine rice, nutritional yeast, and spices, plus fresh broccoli, making it ideal for busy weeknights.

One of my husbands favorite plant-based meals has always been my Broccoli Rice Casserole. I’ve simplified it into a quick and easy one pot meal that can be made in a skillet. I hope you love this One Pot Broccoli and Rice Skillet as much as he does!

One Pot Broccoli and Rice

Why You’ll Love This Broccoli and Rice Recipe

This Broccoli and Rice dish is a simple yet flavorful recipe that’s satisfying, nutrient-dense, and easy to customize. With just one pot, minimal ingredients, and less than 30 minutes of cooking time, it’s the perfect meal for those busy nights when you need something quick and comforting. The combination of creamy rice, tender broccoli, and savory spices makes this a go-to vegan recipe that you’ll want to make again and again. Enjoy it as is, or customize it to suit your preferences—it’s a dish that’s both forgiving and adaptable.

This is actually the third version of this recipe on my site! In the first, you have to cook the rice, and the sauce, and the broccoli and combine. It’s not hard but it’s a lot of dishes. The second version is a Crock Pot recipe that is really easy but takes hours to cook. I also make it in the Instant Pot but I haven’t shared that version yet.

This version of my Broccoli and Rice is done in less than half an hour! I changed up the ingredients a bit to make this quicker version. The biggest change was using Jasmine rice. I used to always use brown rice but it take about 45 minutes to cook on the stove.

When I made this, we eat it as a main dish. It works well as a side dish as well. I think it’s one of those perfect dishes, like my Mexican Casserole, that can be made as is to keep plant-based eaters happy but served with a side of meat for family members who aren’t on a plant-based diet.

This recipe makes 4 servings when eaten as a main dish. It reheats well, my husband always takes the leftovers to work for lunch and heats it up in the microwave.

How to Make Broccoli and Rice

Ingredients

  • 3 1/2 cups water
  • 2 cups Jasmine rice
  • 1/2 cup nutritional yeast
  • 1 teaspoon onion powder
  • 1/2 teaspoon salt
  • 1/2 teaspoon garlic powder
  • 1 cup plant-based milk, I used unsweetened rice milk
  • 3 cups chopped broccoli

Instructions

Step 1 – Boil Water

In a skillet with a lid, bring your water to a boil.

Step 2 – Simmer Rice and Seasonings

Add rice and seasoning and stir well. Turn the heat down to a low simmer and cover with a lid.

Step 3 – Cook

Cook for 10 minutes.

Step 4 – Add Plant Milk

Stir well, and add 1 cup of plant-milk and all your broccoli. Cover with the lid. If you feel like it’s too dry, you can add 1/2 a cup of water.

Step 5 – Cook Again

Cook for 5-10 minutes or until broccoli is tender. I cooked for 5 and needed a couple more minutes, it will depend on your heat and the size of your broccoli.

Tips for Making Broccoli and Rice

  • Adjusting Consistency: If you prefer a creamier dish, you can add an extra splash of plant milk at the end. This can give the dish a more risotto-like texture.
  • Adding Other Vegetables: This recipe is very versatile, so feel free to toss in other quick-cooking vegetables like peas, spinach, or diced bell peppers.
  • Using Brown Rice: If you prefer brown rice, note that it will require a longer cooking time and additional water. Brown rice takes roughly 30-40 minutes to cook, so you may need to adjust the timing and check periodically.
  • Amping Up Protein: To increase the protein content, consider adding some chickpeas or tofu cubes to the dish during the final cooking stage. Both would soak up the flavors nicely and make the dish even heartier.

Serving Suggestions

This one-pot Broccoli and Rice recipe is great as a main dish, but it can also serve as a versatile side. Here are a few ideas for serving:

  1. Main Course: Serve it in a bowl with a sprinkle of extra nutritional yeast or a dash of hot sauce for a little kick.
  2. Side Dish: Pair it with a vegan protein source, such as grilled tempeh, roasted tofu, or a chickpea patty, to make a complete meal.
  3. Meal Prep Option: Portion it out into containers for easy, grab-and-go lunches. This dish stores well in the fridge for 3-4 days, so it’s ideal for meal prepping.

Storing and Reheating

  • Refrigerate: Store leftovers in an airtight container in the fridge for up to 4 days. The flavors deepen as it sits, so it can taste even better the next day.
  • Reheat: To reheat, simply add a splash of plant milk or water to prevent it from drying out, then warm in the microwave or on the stovetop over low heat.

More Plant Based Meal Ideas

If you like this quick and easy recipe, try these plant based dinner ideas too:

  • Easy Ramen Stir Fry
  • Grilled Portobello Mushroom Burger
  • Vegan Pad Thai in Less Than 30 Minutes
  • Easy Vegan Sweet Potato Curry
  • Instant Pot Mexican Quinoa
Yield: 4 servings

One Pot Broccoli and Rice

One Pot Broccoli and Rice

Easy vegan one-pot broccoli and rice recipe! Nutritious, flavorful, and perfect for quick weeknight meals—just one pot for a satisfying plant-based dinner.

Prep Time 5 minutes
Cook Time 20 minutes
Total Time 25 minutes

Ingredients

  • 3 1/2 cups water
  • 2 cups Jasmine rice
  • 1/2 cup nutritional yeast
  • 1 teaspoon onion powder
  • 1/2 teaspoon salt
  • 1/2 teaspoon garlic powder
  • 1 cup plant-based milk, I used unsweetened rice milk
  • 3 cups chopped broccoli

Instructions

  1. In a skillet with a lid, bring your water to a boil.
  2. Add rice and seasoning and stir well. Turn the heat down to a low simmer and cover with a lid.
  3. Cook for 10 minutes.
  4. Stir well, and add 1 cup of plant-milk and all your broccoli. Cover with the lid. If you feel like it’s too dry, you can add 1/2 a cup of water.
  5. Cook for 5-10 minutes or until broccoli is tender. I cooked for 5 and needed a couple more minutes, it will depend on your heat and the size of your broccoli.

Did you make this recipe?

We'd love to see it! Tag us and use #MyPlantBasedFamily!

© Heather Mayes
Category: Recipes

Filed Under: Main Dish Recipes, Recipes, Side Dishes Tagged With: Plant Based Diet, Recipes, Vegan

BBQ Cauliflower Bites

May 22, 2015 by Holly Yzquierdo 7 Comments

For a girl that doesn’t eat meat, I really love barbecue sauce. Vegan barbecue is something I fully support. These BBQ Cauliflower Bites hit the spot. If you are looking for a plant-based version of BBQ Wings, give these a try.

Homemade vegan BBQ Cauliflower Bites. Similar to vegan wings.

Years ago, friends and I would share boneless BBQ wings in our late night chats. We’d order a bunch of appetizers and catch up.

Just because I avoid chicken doesn’t mean I have to avoid barbecue sauce. Especially this Homemade BBQ Sauce.

Vegan Barbecue Wings

You can make these with or without the breading. I’m sharing a gluten-free breading for the cauliflower but you can make it with wheat flour or skip the breading all together.

Homemade vegan BBQ cauliflower bites. Similar to vegan wings.

BBQ Cauliflower Bites

Ingredients

  • 1 head of cauliflower
  • 1 cup Gluten-Free flour blend
  • 1 cup unsweetened and unflavored plant milk (I use rice milk)
  • 1 tsp salt
  • 1 tsp onion powder
  • 1/2 tsp garlic powder
  • 1 recipe Homemade BBQ Sauce

Do

  1. Preheat oven to 450 degrees. Cover a cookie sheet with parchment paper and set aside.
  2. Rinse cauliflower and cut into two-bite-sized pieces (about 2 inches or so).
  3. In a medium bowl mix the rest of the ingredients (except BBQ Sauce) together. I recommend adding the milk a little at a time because you may not need the whole cup. Stir with a whisk until the batter is the consistency of pancake batter.
  4. Put a handful of the cauliflower pieces into the batter then remove with a fork and place it on the cookie sheet.
  5. Once all of the cauliflower pieces have been dipped in batter and arranged on the cookie sheet bake for 15 minutes.
  6. After 15 minutes carefully remove the hot cauliflower and dip them into the BBQ Sauce. Put them back on the cookie sheet and bake for 5 more minutes.

Serve

These BBQ Cauliflower Bites are best served right out of the oven.

Vegan BBQ Cauliflower Bites

Vegan BBQ Cauliflower Bites

Sweet and tangy vegan BBQ Cauliflower Bites are the wing substitute you need.

Prep Time 15 minutes
Cook Time 20 minutes
Total Time 35 minutes

Ingredients

  • 1 head of cauliflower
  • 1 cup Gluten-Free flour blend
  • 1 cup unsweetened and unflavored plant milk (I use rice milk)
  • 1 tsp salt
  • 1 tsp onion powder
  • 1/2 tsp garlic powder
  • 1 recipe Homemade BBQ Sauce

Instructions

  1. Preheat oven to 450 degrees. Cover a cookie sheet with parchment paper and set aside.
  2. Rinse cauliflower and cut into two-bite-sized pieces (about 2 inches or so).
  3. In a medium bowl mix the rest of the ingredients (except BBQ Sauce) together. I recommend adding the milk a little at a time because you may not need the whole cup. Stir with a whisk until the batter is the consistency of pancake batter.
  4. Put a handful of the cauliflower pieces into the batter then remove with a fork and place it on the cookie sheet.
  5. Once all of the cauliflower pieces have been dipped in batter and arranged on the cookie sheet bake for 15 minutes.
  6. After 15 minutes carefully remove the hot cauliflower and dip them into the BBQ Sauce. Put them back on the cookie sheet and bake for 5 more minutes.

Notes

These are best fresh from the oven and do not reheat well.

Did you make this recipe?

We'd love to see it! Tag us and use #MyPlantBasedFamily!

© Holly Yzquierdo
Category: Main Dish Recipes

Need more barbecue ideas? Try these delicious recipes!

Vegan BBQ Sandwich...You'll never guess the secret ingredient!

Vegan BBQ Sandwich

Grilled Portobello Burgers and Vegan Potato Salad

Grilled Portobello Burger

Incredible vegan and gluten-free avocado grillers

Avocado Grillers

What are your favorite things to barbecue? Don’t forget the sides like grilled corn, veggie kabob’s, potato salad and pasta salad!

Filed Under: Main Dish Recipes, Recipes, Side Dishes, Uncategorized Tagged With: Recipes, Unprocessed, Vegan

Pizza Stuffed Mushrooms

March 12, 2015 by Holly Yzquierdo 2 Comments

Pizza Stuffed Mushrooms are a great main, side or starter! Gluten-Free and vegan and can accommodate many food restrictions.

I’ve got the answer to your pizza craving right here! You’ve heard of stuffed mushrooms but Pizza Stuffed Mushrooms are a whole new level of awesomeness!

If you like mushrooms you will love these. I recently posted a video on Instagram of my 4 year old enjoying these. If you don’t like mushrooms stay tuned and I’ll share my pizza hack with you!

Pizza Stuffed Mushrooms are vegan and gluten-free!

Pizza Stuffed Mushrooms

Ingredients

  • 2 8 oz packages of whole mushrooms (button or cremini)
  • 1/2 cup diced bell pepper, I used half red and half green
  • 1/2 cup diced tomato
  • 1/2 cup diced onion
  • 1 cup marinara

Do

  1. Preheat oven to 350 degrees.
  2. Wash mushrooms gently and remove stems. Dice the stems and set aside a 1/2 cup for the mix.
  3. Remove the gills. This step is optional but it will allow more “stuffing” in the mushrooms.
  4. Place the mushrooms in a muffin pan, I used a mini muffin pan. If you don’t have a muffin pan use a pan with sides.
  5. In a separate bowl, mix together a 1/2 cup of the diced mushroom stems, bell peppers, tomato and onion. Next pour in the marinara sauce and mix it all together.
  6. Fill the mushroom caps with the veggie marinara filling.
  7. Bake for 20 minutes.
  8. Carefully remove from oven, there will be liquid in the pan. Allow to cool slightly before eating.

You can add other ingredients like artichoke hearts, olives, faux sausage/pepperoni or cheese if you are in to that sort of thing. I wanted a basic veggie pizza flavor. This is completely guilt free as written so go for it!

This recipe made about 20 stuffed Mushrooms. You can also make it with portobellos but expect to cook it a little longer. The portobellos at our store looked pretty beat up so I skipped them this time.

You will probably have extra filling that is great on pasta, potatoes or my Pizza Hack!

Pizza Hack

I’ve been trying out some new gluten-free, vegan, Sprouted for Life bread. Like many healthier breads, it is pretty sturdy. I used it for my pizza crust and OH MY GOODNESS it was so good! I’m still trying the bread out and haven’t used it with a sandwich yet but it tastes amazing with this! Just spoon some of the veggie marinara filling over the toast and bake for 10 minutes.

For more great recipes visit my Recipe Page!

Filed Under: Main Dish Recipes, Recipes, Side Dishes Tagged With: Dairy Free, gluten free, Healthy, Plant Based Diet, Recipes, Unprocessed, Vegan

Oil-Free Fried Rice and Gardein

February 13, 2015 by Holly Yzquierdo 16 Comments

Oil-Free Fried Rice

This is a sponsored conversation written by me on behalf of Gardein . The opinions and text are all mine.
Oil-Free Fried Rice

I’ve been making oil-free fried rice since before we removed meat and dairy from our diet. I’ve never been a big fan of oil and would omit it every chance I got. This is one of those recipes that I didn’t even think of sharing but after having people ask about it, I decided it was time.

Like most of my recipes, it’s also really easy.

Oil-free Vegan Fried Rice

Oil-Free Fried Rice

Ingredients

  • 1/2 cup onion, diced
  • 3 cloves garlic, chopped
  • 1 cup carrots, diced
  • 1 cup frozen peas
  • 2-3 Tbsp’s Soy Sauce, Tamari or Braggs Liquid Aminos
  • 4 cups cooked Brown Rice
  • a little water as needed

Do

  1. Heat skillet over medium heat. Sprinkle a few drops of water in the skillet to make sure it is hot.
  2. Once hot add the onions and garlic. Stir regularly. As the onions begin to brown (see the photo), pour a little water into the pan then give it a good stir. Continue to cook the onions repeating the step of adding water as often as necessary until the onions are translucent and soft.
  3. Add the veggies and stir them into the onions. Cover with a lid and cook until carrots are soft.
  4. Add the cooked rice and soy sauce and stir once more. Reduce the heat to low and heat until everything is warm.Oil-Free Fried Rice

Inspired by Chef. Created by You.

You can add a little more umph by adding Gardein™ to the dish! Gardein is deliciously meat-free and really convenient. I cooked the Mandarin Orange Crispy Chick’n in a skillet in just a few minutes. It’s so easy, you don’t even need a recipe! Cook the chick’n until it is nice and crispy. While it is cooking, defrost the sauce packet in a bowl of warm water. Once it is defrosted simply snip the corner off the sauce packet and pour it over the Crispy Chick’n. Stir it quickly so that all of the chick’n gets covered.

This was a huge treat for my 5 year old. He kept asking for more, then finally said, “Can I just have the whole bowl.”

If you want to try the Crispy Chick’n or the Sliders I made last month you can get a $1 off coupon on the Meet Chef page.

Gardein Mandarin Crispy Chick'n and Fried Rice

You can follow Gardein on Facebook, Twitter, Pinterest, Youtube, Instagram or the Gardein website.

Gardein Mandarin Crispy Chick'n and Fried Rice

This is a sponsored conversation written by me on behalf of Gardein . The opinions and text are all mine.

Comments submitted may be displayed on other websites owned by the sponsoring brand.

Filed Under: Recipes, Side Dishes, Uncategorized Tagged With: Plant Based Diet, Recipes, Vegan

« Previous Page
Next Page »

Primary Sidebar

Footer

Find it here!

Amazon Affiliate Disclosure

Holly Yzquierdo of My Plant-Based Family is a participant in the Amazon Services LLC Associates Program, an affiliate advertising program designed to provide a means for sites to earn advertising fees by advertising and linking to amazon.com.

Disclosures

Unauthorized use and/or duplication of any part of this website or content without express and written permission from Holly Yzquierdo is prohibited. Excerpts and links may be used, provided that full credit is given to Holly Yzquierdo and MyPlantBasedFamily.com with links to the original content.

More information on our Privacy Policy and other Disclosures are available.

Copyright © 2026 · Wellness Pro on Genesis Framework · WordPress · Log in